App Ratings are important! Seriously!
The better the reviews, the more likely it is for a mobile app to top the charts of an app store.
However if your app looks bad, works bad or crashes, it will be raining one-star reviews all day long. And that is something that is very hard to recover from.
This article is published from the DNC Magazine for Developers and Architects. Download this magazine from here [PDF] or Subscribe to this magazine for FREE and download all previous and current editions.
Mobile application testing is quite challenging. For example, before submitting an app to the store, is it feasible to test the various form factors, connectivity types, different OS versions, device densities etc.? Is it possible to test your application on all the targeted devices?
Well, now it is.
Tools like the Xamarin Test Cloud enables you to test your app on thousands of physical devices. And it is not just for Xamarin apps!
Xamarin Test Cloud: First Look
Xamarin Test Cloud is a UI acceptance-testing tool for mobile apps.
Introduced in 2014 with over 1,000 physical devices, Xamarin Test Cloud was unique in its kind. At Xamarin, they surveyed a large number of developers and concluded that 80% of the developers were relying on manual testing on devices. On the other hand, the survey also pointed out that 75% of these developers thought that the quality of their apps is top priority.
However in all practicality, for a sole developer, or even a company, it is impossible to test everything on physical devices, especially in combination with all the different versions of Android and iOS out there.
Today, Test Cloud is located in a warehouse in Denmark and has over 2,000 different devices, while still adding about a 100 each month. These non-jailbroken devices are representative for actual devices that your users use every day.
For all these devices, you can write test scripts which can be executed automatically. The results are available to you in great detail. For each step, you can see a screenshot, how much was the memory usage at the time, as well as the CPU cycles.
All this information is available for you, today!
In the future, they are even looking to expand the list of features and give you, the developer, control over a device.
So not only can you run automated scripts on it, you can also remote debug your app on a device that you do not actually own. So if the app crashes or a bug is discovered on only a specific set of devices, you can reserve some time for it on Test Cloud and debug your app on it.
All of this makes up a very powerful test suite.
Xamarin Test Cloud Limitations
There are a few limitations as well. You cannot work with anything related to Bluetooth, there is no camera support, testing happens on Wi-Fi (no cellular data that means) and there is no Windows Phone support.
The other thing (which may be a limitation for some) is that all these features comes at a price. TADA!
The first tier starts at $99 per month. With this you can have unlimited apps, but you are limited to one concurrent device and one hour a day. This meaning that when you have six tests that take 10 minutes each, you can run them all once a day. The tests will be executed on one device at a time.
If you have more concurrent devices, you could run on two devices at a time and the tests would only take 30 minutes. In Figure 1, you can see how Xamarin explains this concept on their website.
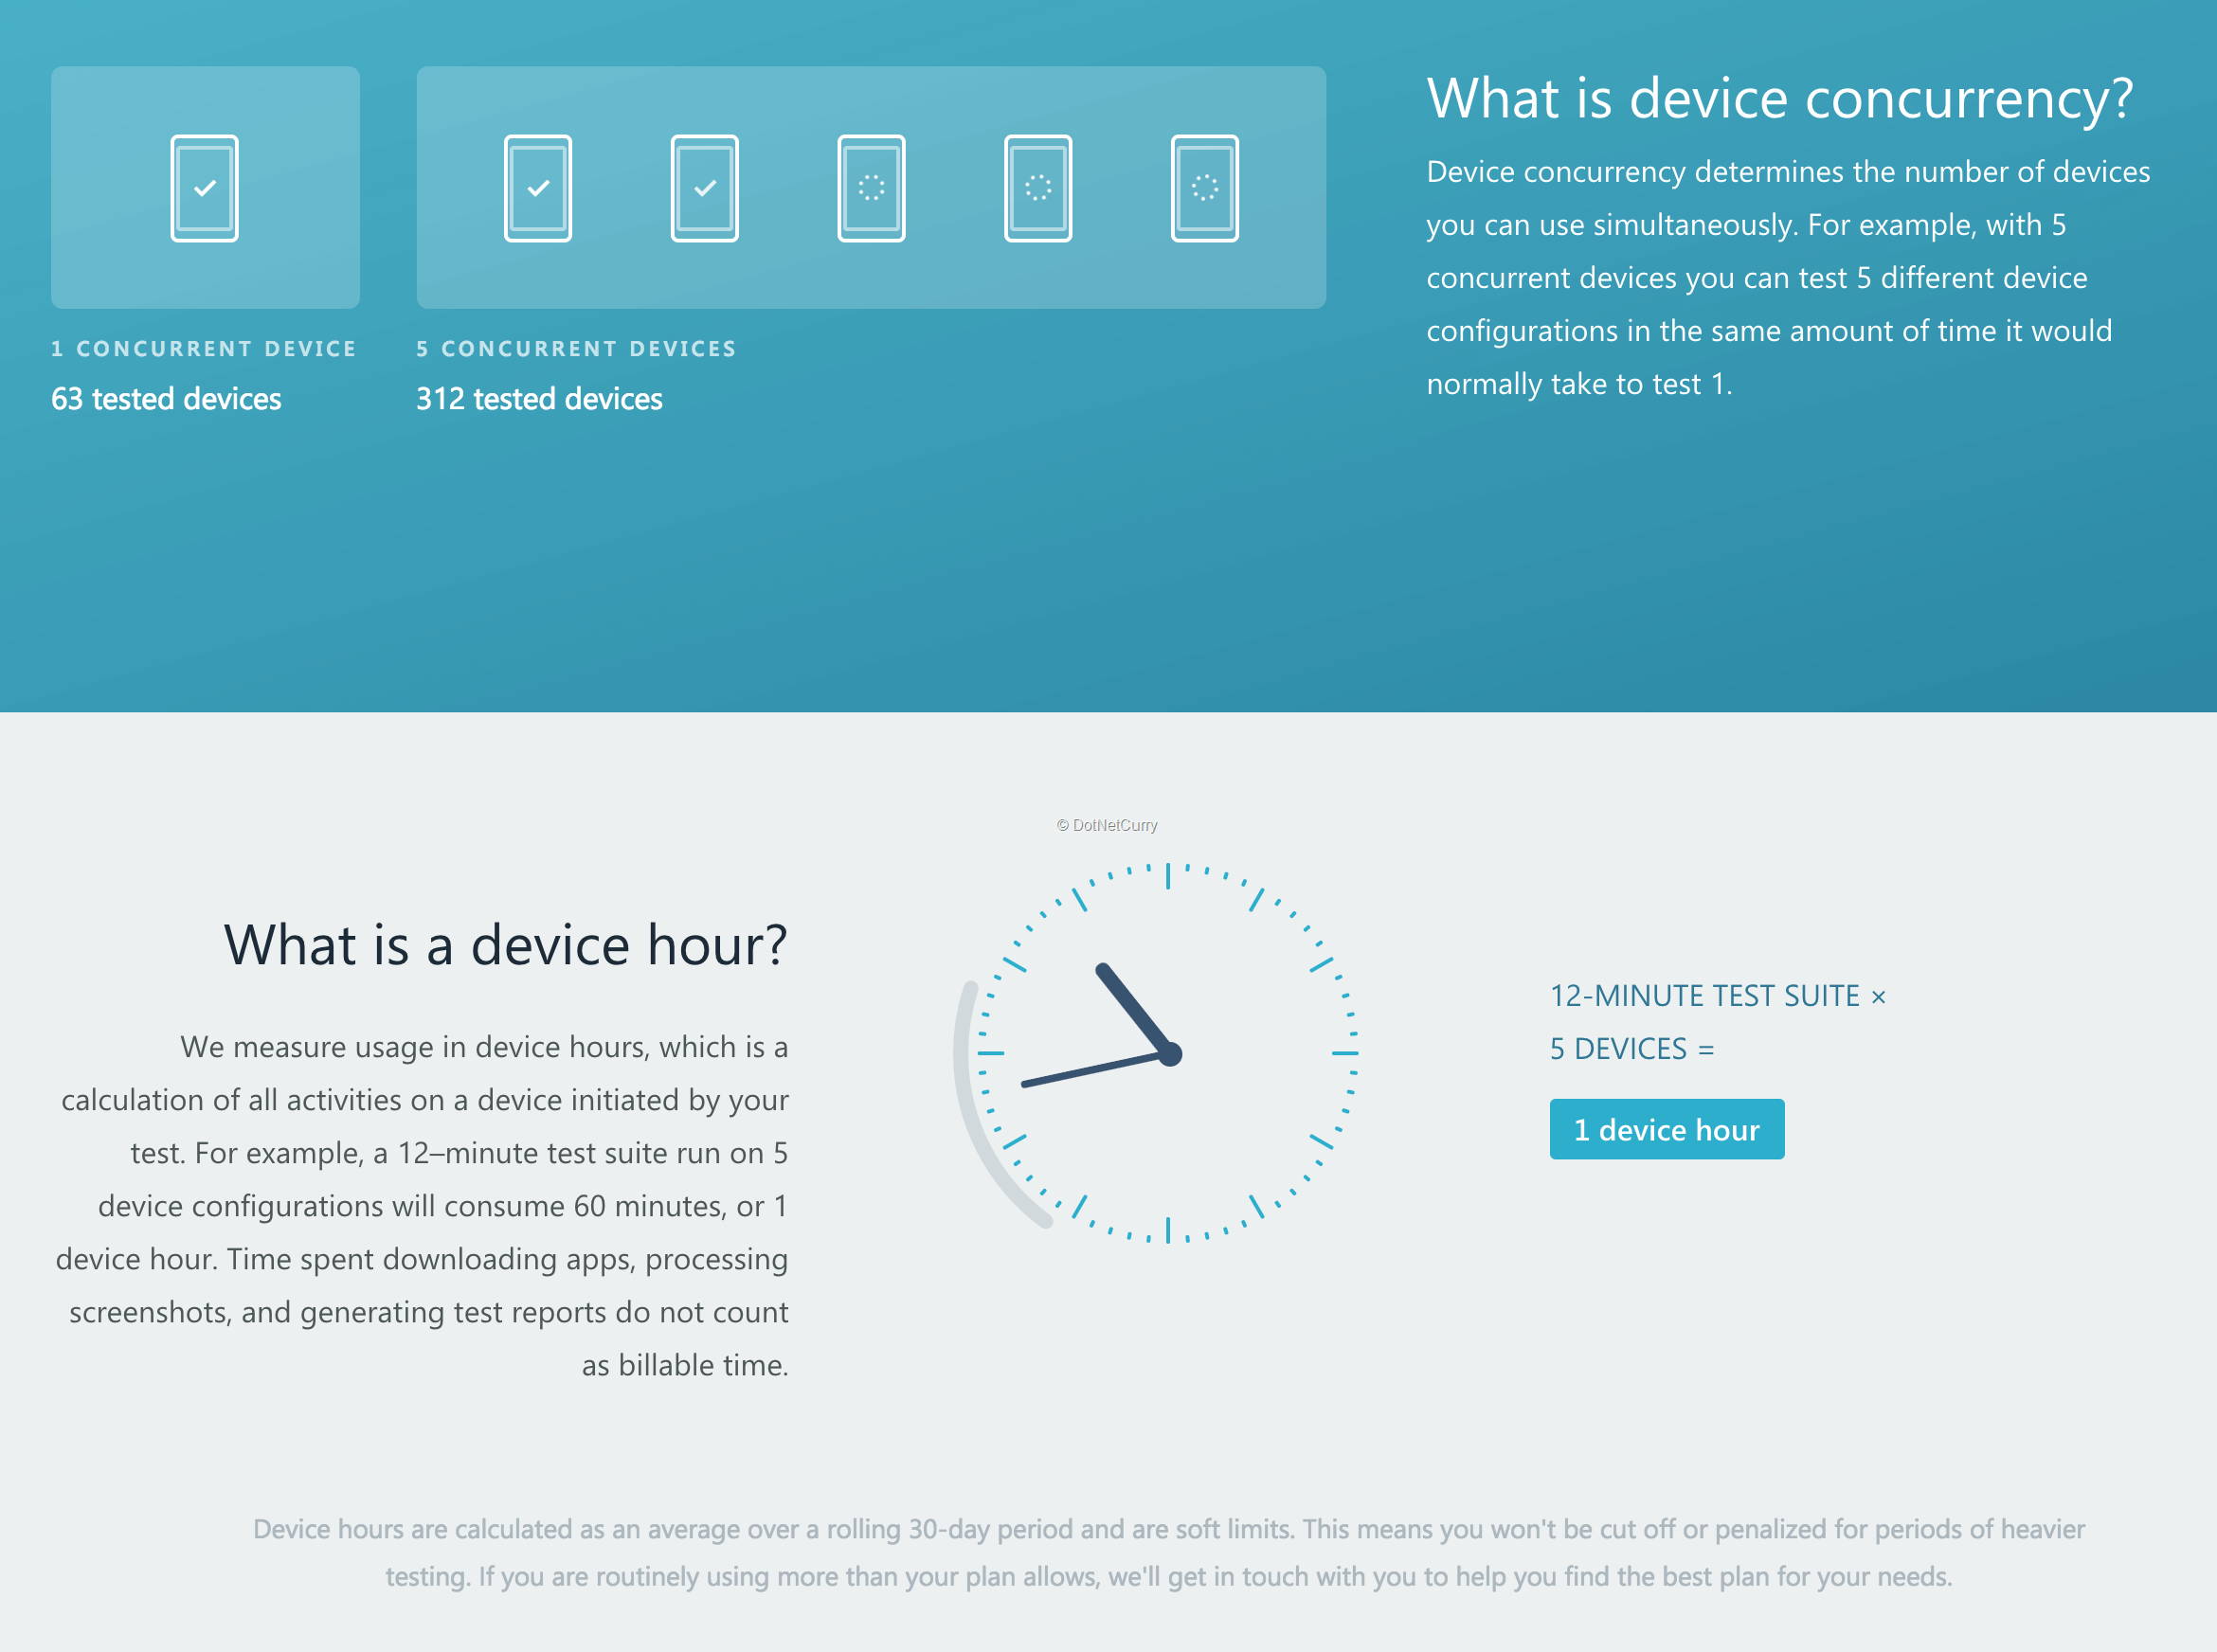
Figure 1: device hours and device concurrency on Test Cloud
For as much as $380 dollars a month, you will get three concurrent devices and five hours per day. Like I said; this can mean a lot of money especially if you are a one-man company.
But when you think about it; the number of devices and power that you get for this money is enormous. You cannot buy all those configurations yourself and find the time to run all the tests on them manually.
So if you think about it the other way, it really is a bargain to keep the quality of your apps at a high level. If you need more convincing, there is a trail available. Also, if you are a MSDN subscriber, you can get 25% off the prices.
Finally, all this awesomeness can be integrated in any continuous pipeline. If you have read my article in the previous edition about setting up an automated pipeline for Xamarin apps, you can fit this part right in there. (link: bit.ly/dnc-auto-xamarin-app).
Writing Xamarin UI Tests
Tests can be written for the Test Cloud in a couple of ways. At the time of this writing, three frameworks are supported: Calabash, Appium and Xamarin.UITests.
Calabash is an Automated UI Acceptance Testing framework that allows you to write and execute tests to validate the functionality of your iOS and Android apps. Read more about it at bit.ly/dnc-calabash.
If you already know a little bit about these frameworks, you might notice that Calabash and Appium are based on web-driver and the Ruby framework. This means you can write tests in Ruby, Java, JavaScript, Python and even PHP.
This also means that not only C# Xamarin apps are supported, but also native iOS in Swift or Objective-C and Android Java apps.
Xamarin.UITest is based on the NUnit framework and has full IDE support for Visual Studio and Xamarin Studio. In the end, all these frameworks can achieve the same result. Basically, Xamarin advises to use the UITest framework when your app is a Xamarin app. The framework is easy to pick up because it is also in C# and has some small advantages like running the tests locally on your own device simulators.
If your app is a Java or Objective-C/Swift app, or for that matter a hybrid web app, you could choose Calabash or Appium. You can write the scripts in whatever tooling you want and upload the scripts along with the binaries of your app.
In this article, I will show you how to write tests for a Xamarin app in C# using the Xamarin.UITest framework in Visual Studio. By doing so, we will have an extra tool at our disposal: the Xamarin Test Recorder.
At the time of this writing, this tool has been in preview for a while. As you might expect with this application, you can record test scripts. Instead of having to code these scripts yourself, you can now tap through your app in the simulator or on your device, and it will generate the code to take these actions. The only thing that remains is to add some assertions statements to verify the results of the tests. To read more about the Test Recorder, take a look at this link: https://developer.xamarin.com/guides/testcloud/testrecorder/.
Creating a Test Run
A Test Run is what defines a test in the Test Cloud.
With a Test Run, you specify a test series, the devices included in this test run and what locale the devices should have. When you log into Test Cloud, you will be taken to the dashboard. There are already a few sample apps in there for you to look at. By going through them, you can see what to expect from the test results.
Figure 2 shows you a screenshot of the dashboard.
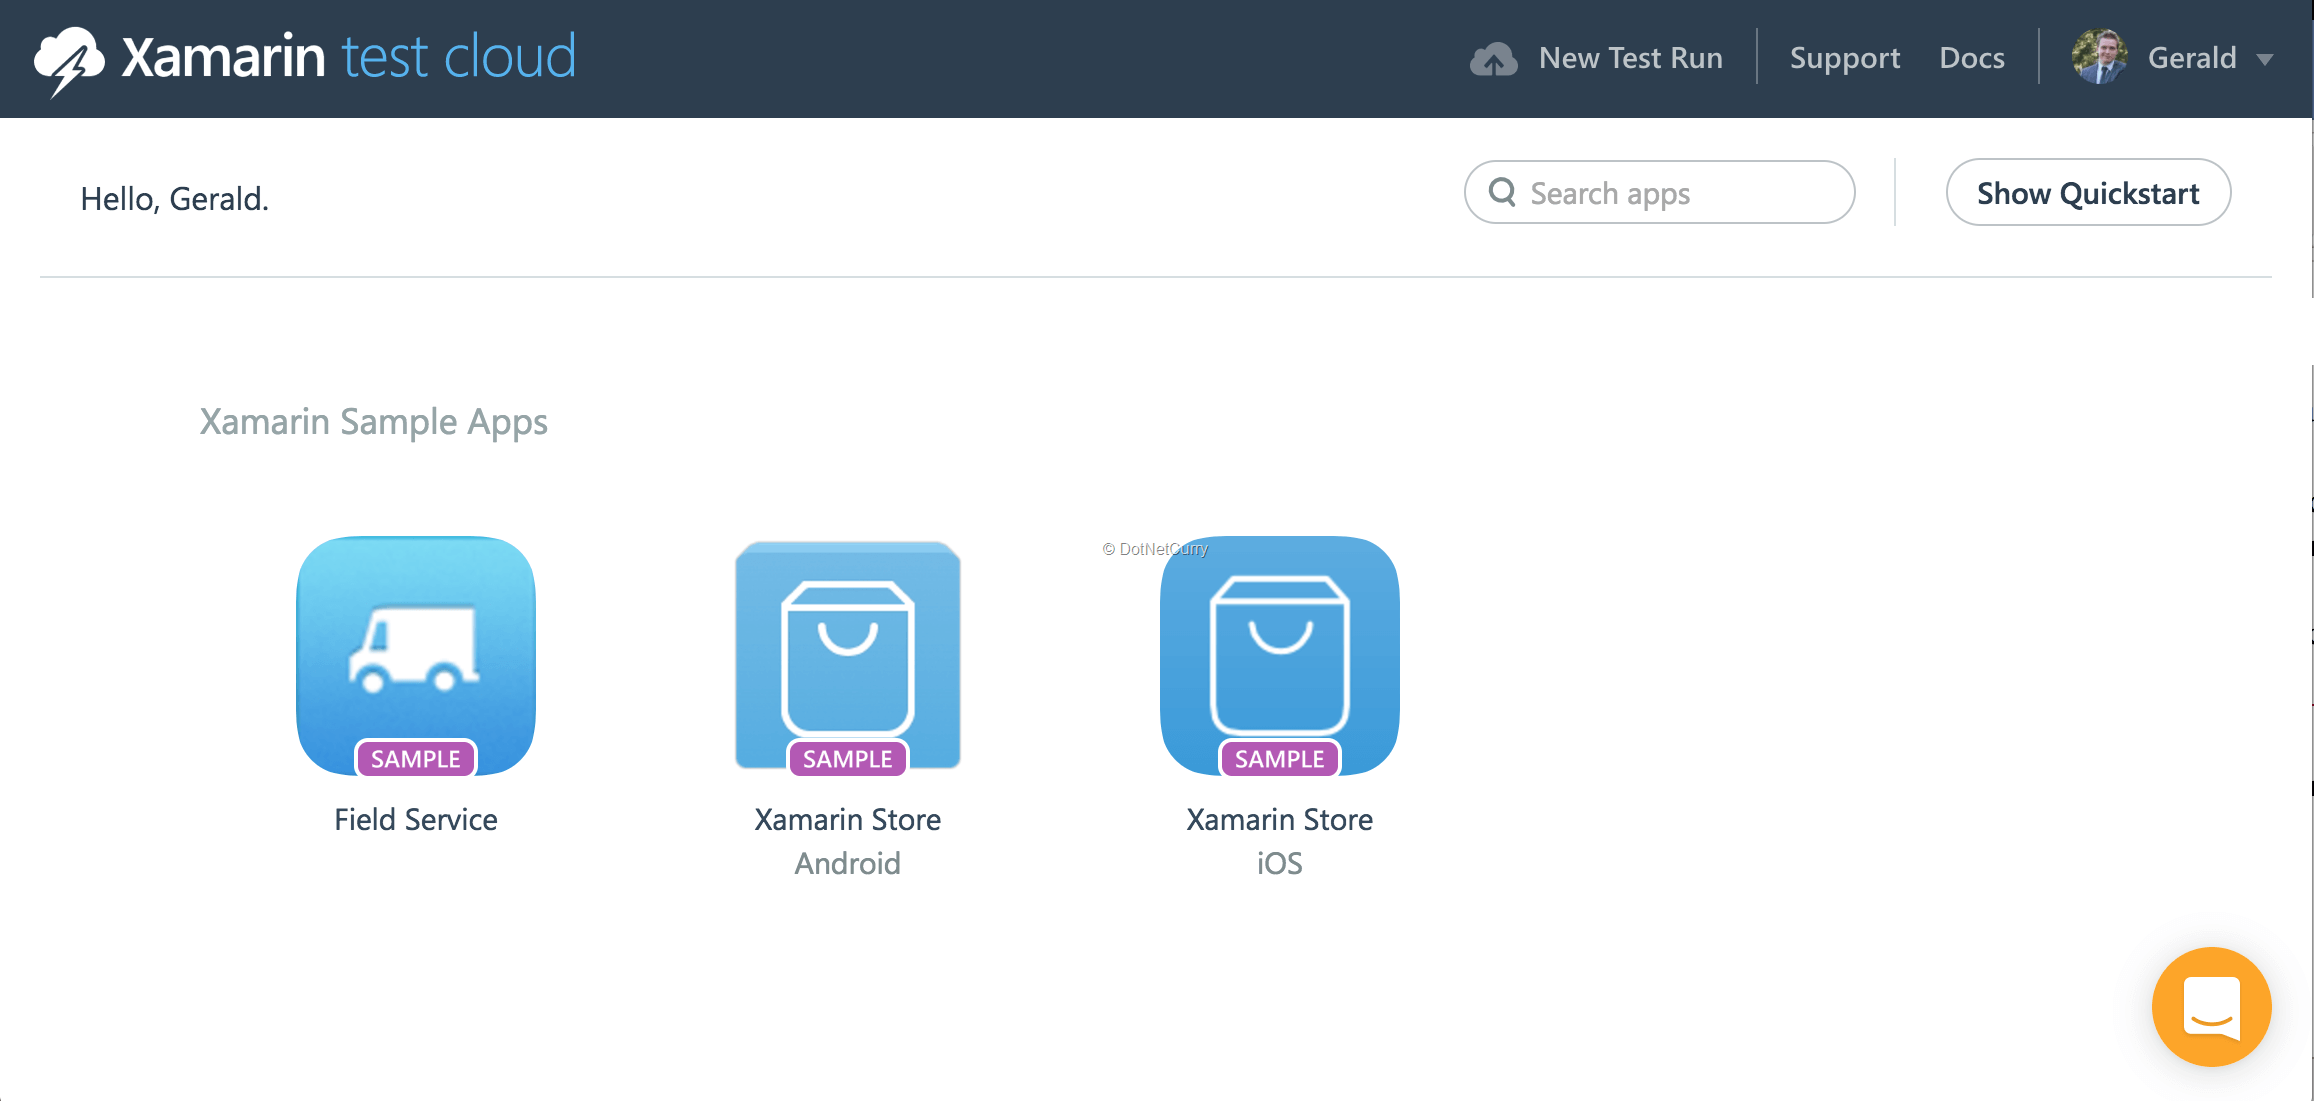
Figure 2: Xamarin Test Cloud dashboard
At the upper-right corner, you will also notice the ‘New Test Run’ button. Click it to create a new run. When you do so, you will be presented with a pop-up in which you get to choose if you want to create a Test Run for iOS or Android. Later, if you already have some apps in here, you can also create a new Test Run for that app.
After choosing a platform, a screen will show up where you can select the devices that are to be included in the tests. This screen in shown in Figure 3.
The screenshot shows iOS devices; if you have selected Android, there would be a lot of Android devices here.
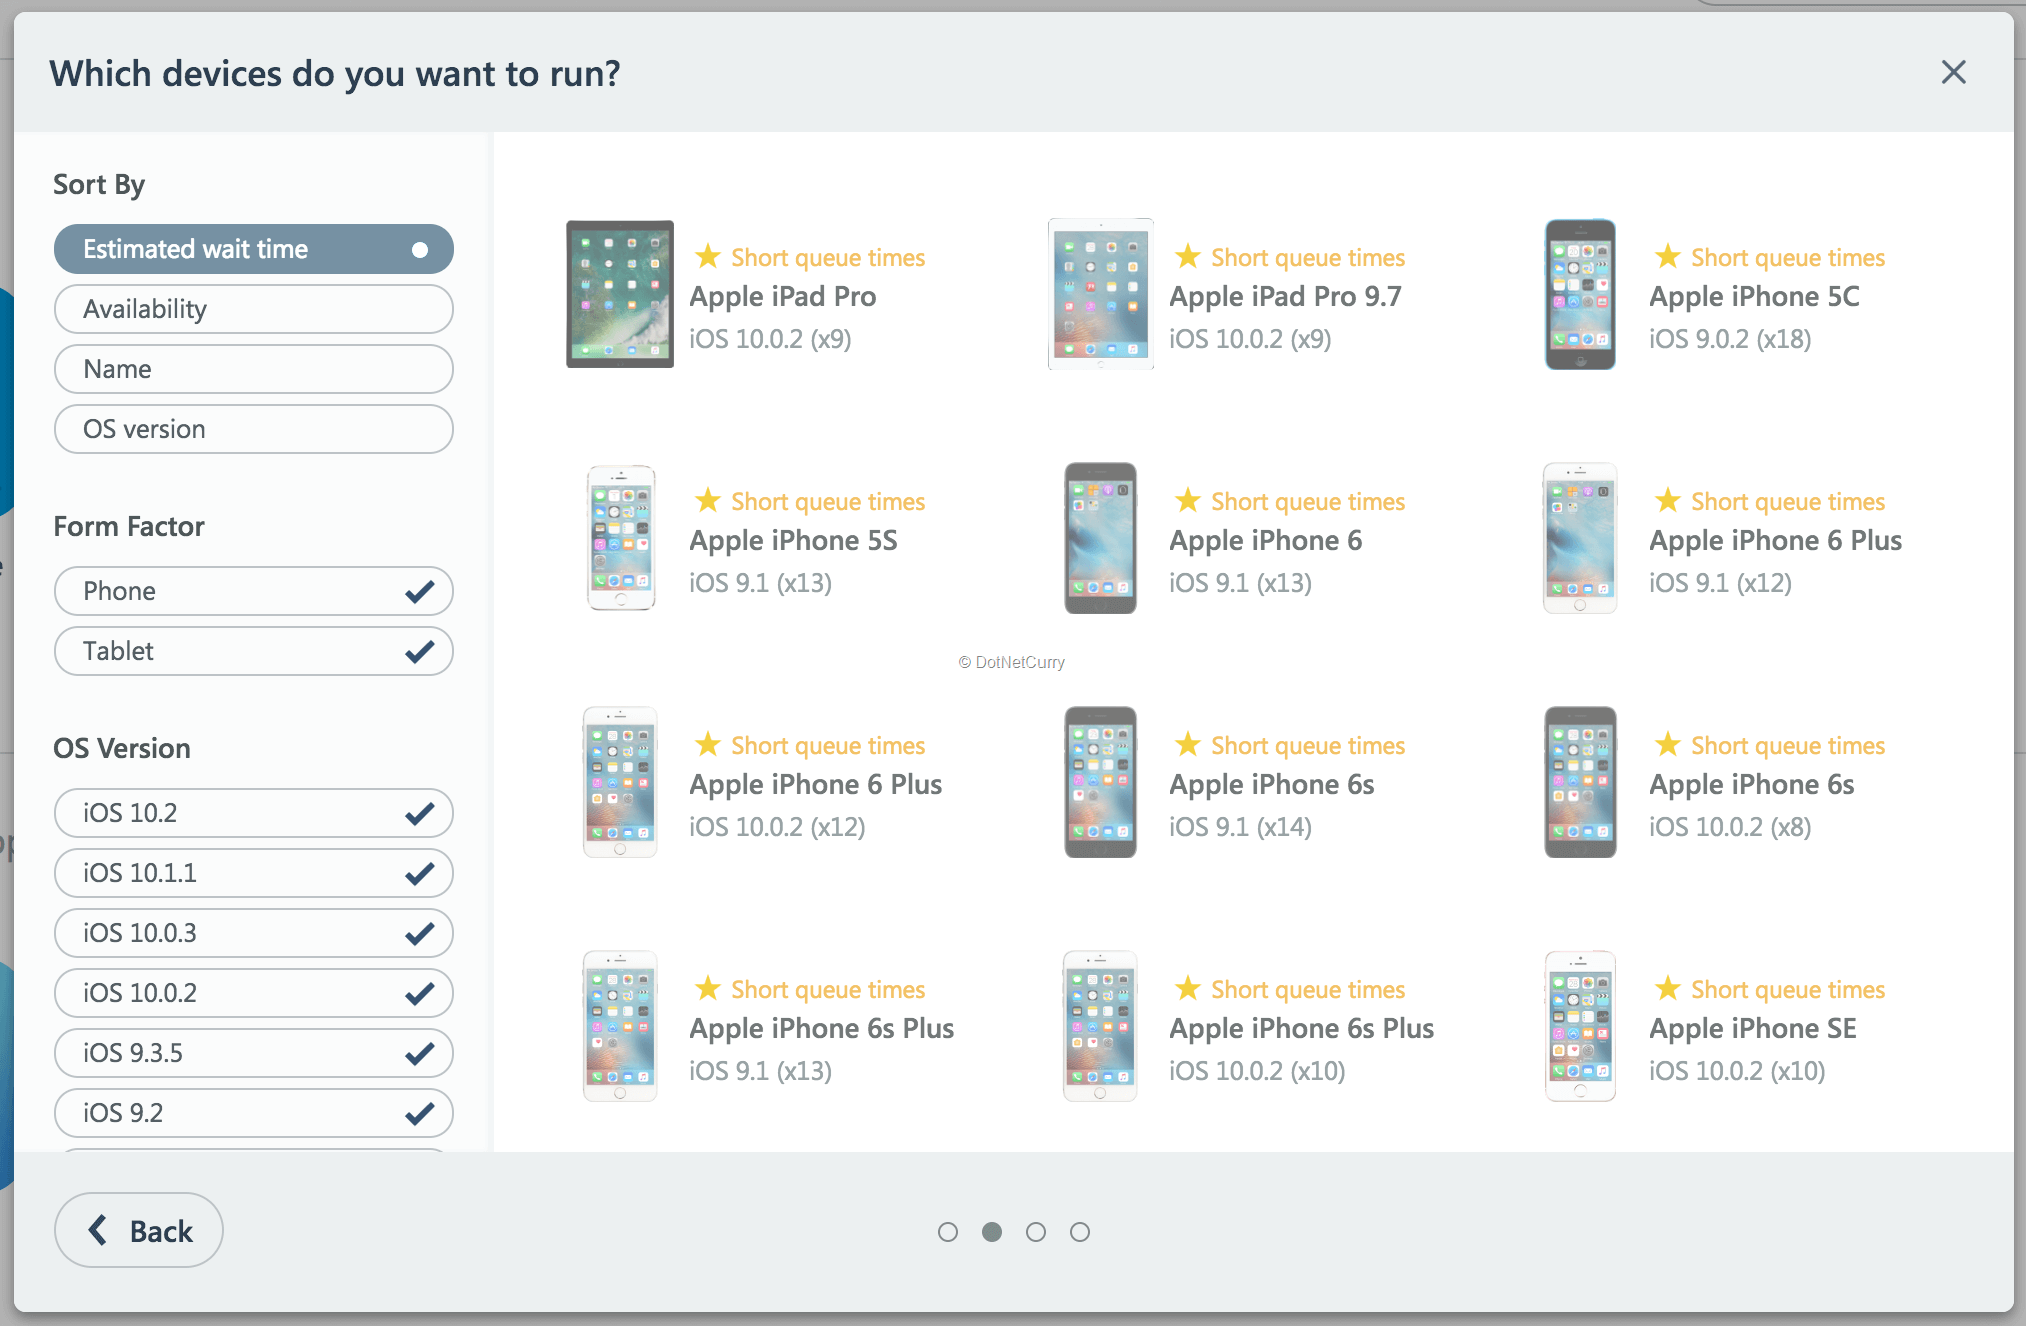
Figure 3: Selecting devices to include in the Test Run
The list of devices works very intuitively. You can sort by useful properties such as the estimated wait time. This time refers to the time that your test is queued in Test Cloud, in other words; how long do you generally have to wait before it is your turn. Because these are physical devices, there is a limit of how many tests can be running at one time.
Another handy field is availability. This enables you to show the devices based on how many of them are out there i.e. how many actual people in the world are using this device.
Other options include the ability to filter by form factor or OS version. This way you can fine-grain your selection. There is no real limit on how many devices you can select here.
After you have selected the devices that you want, go to the next screen to configure the test series that you want these devices to be in. This way you can break up your tests into multiple logical series. It is nothing more than a name that you group them by, think of them as categories. Also, you can choose a locale. With this you can specify the language settings that are to be used before commencing your tests. This enables you to also test language specific features.
In the last step, do not just click the done button and expect it to save something for you, because it does not. In the final step, you are only presented with a console command as shown in Figure 4.
If we inspect it more closely, we can recognize some of the configuration we have just done. The locale is in there and so is the series. But there is also a switch for devices. As you can see, the devices are specified by a hash value. Depending on the devices and/or configurations you have selected, the hash will change.
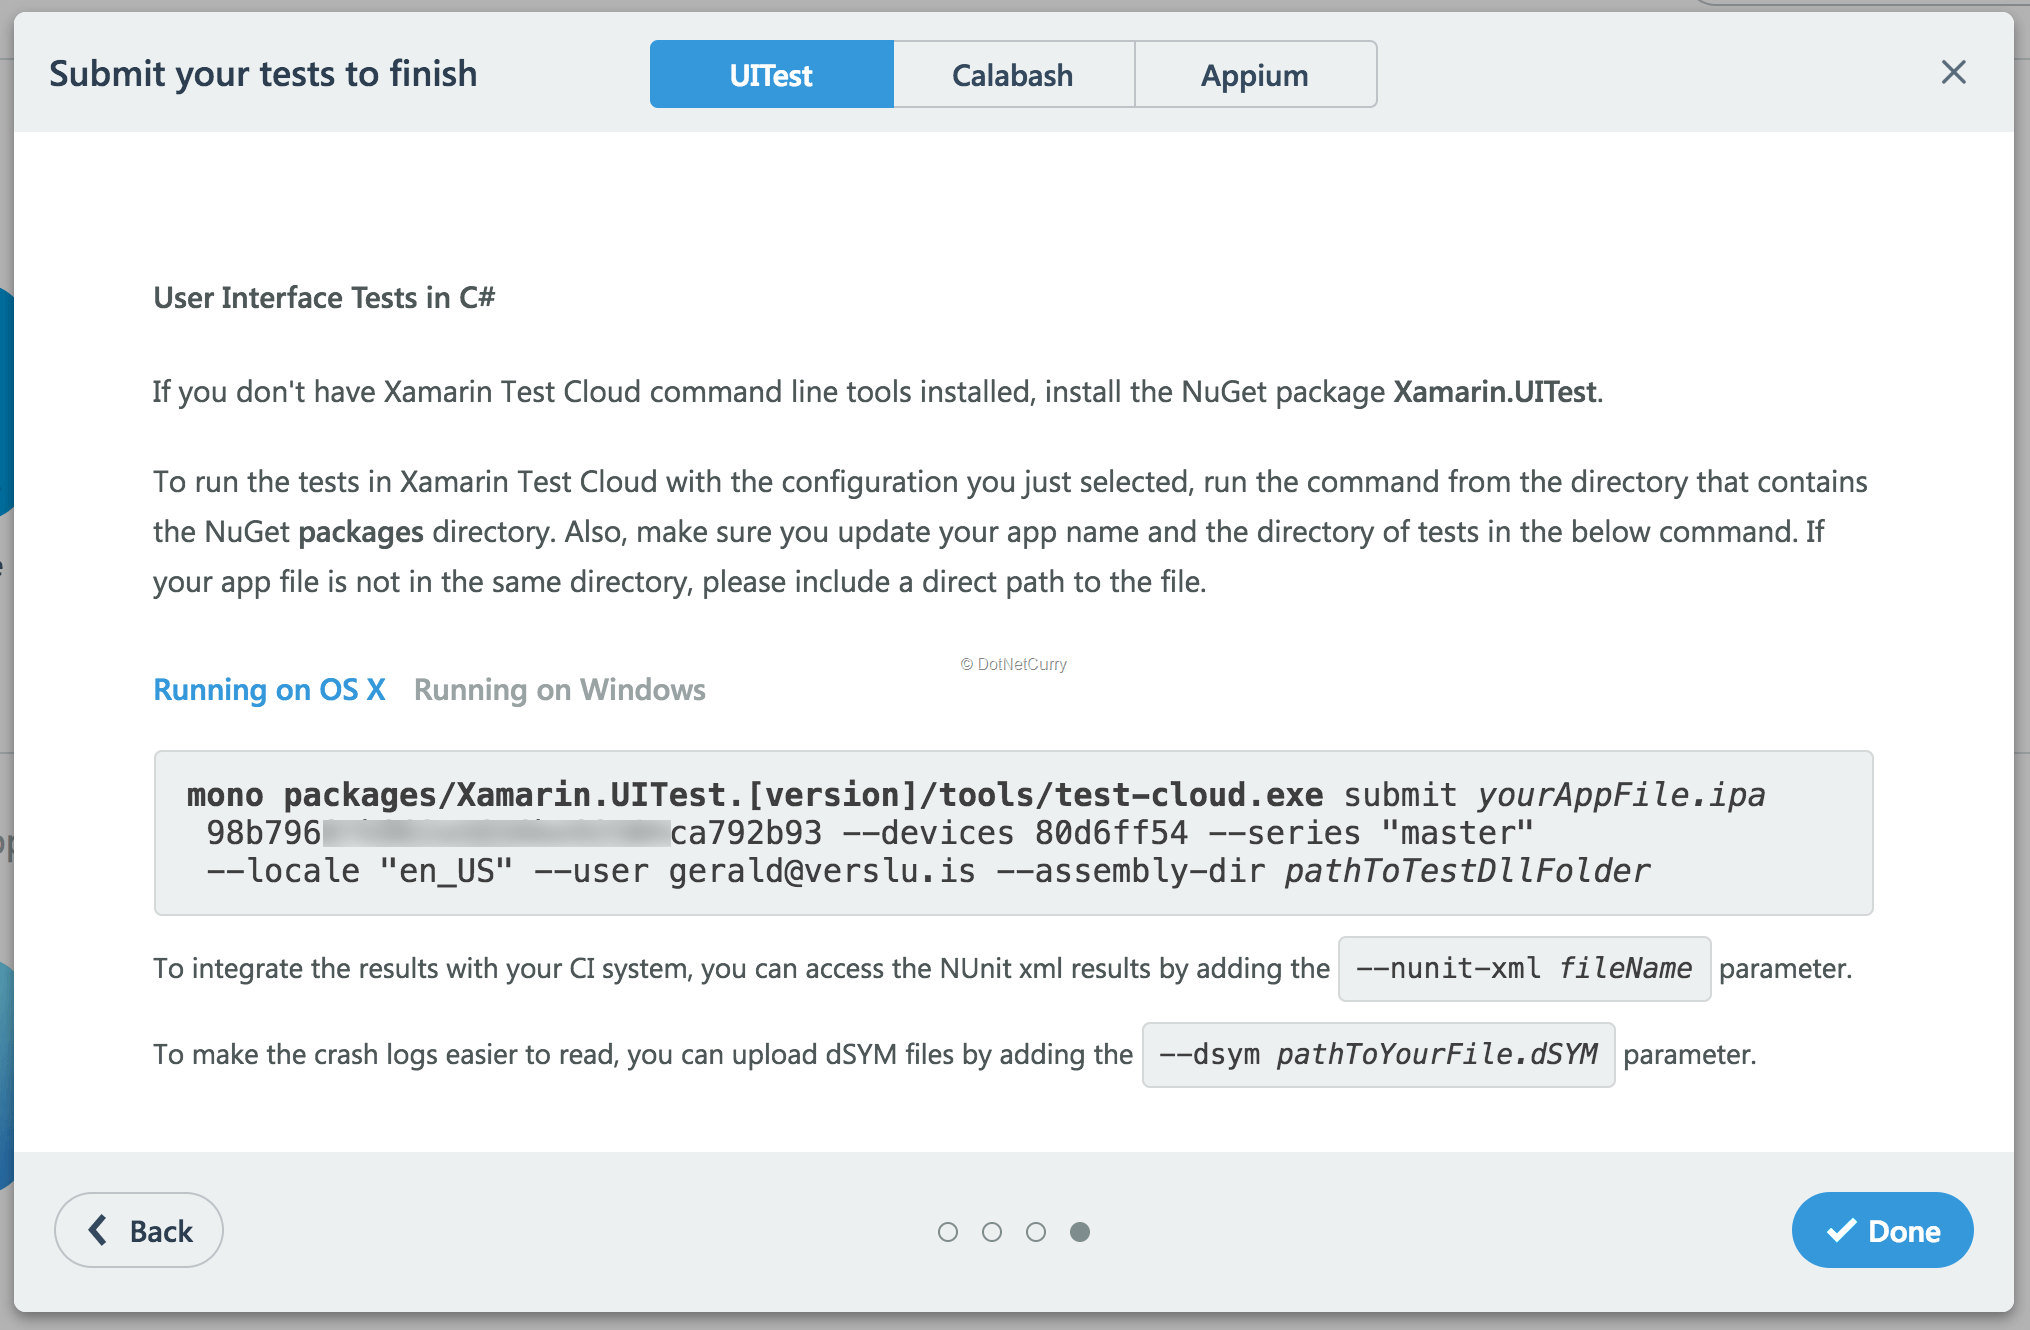
Figure 4: Final step of creating the Test Run
Also notice the longer hash value just before the devices switch. I have blurred a part of it, because this is your API key. Together with the email address that you will see later, this can be considered as your username and password.
Copy and paste this command to a notepad for later use.
Writing UI Tests for the Test Cloud
If you are already aware of writing unit tests in the .NET ecosystem, writing UI tests for Test Cloud will be a breeze. Before I show you how to write a test, let me show you the sample app that I will be using for this article. You can also find it on my GitHub here: http://bit.ly/dncm29-xamarintestcloud.
For this sample, I have used a Xamarin.Forms app, using XAML. There isn’t actually any difference when writing tests for the traditional Xamarin apps, besides from how to select controls. I will describe the difference in a little bit.
The UI for this app looks similar to Figure 5. It is a very simple interface, just one label and two buttons. The green button will be a succeeding test scenario, and the red one is a failing scenario.
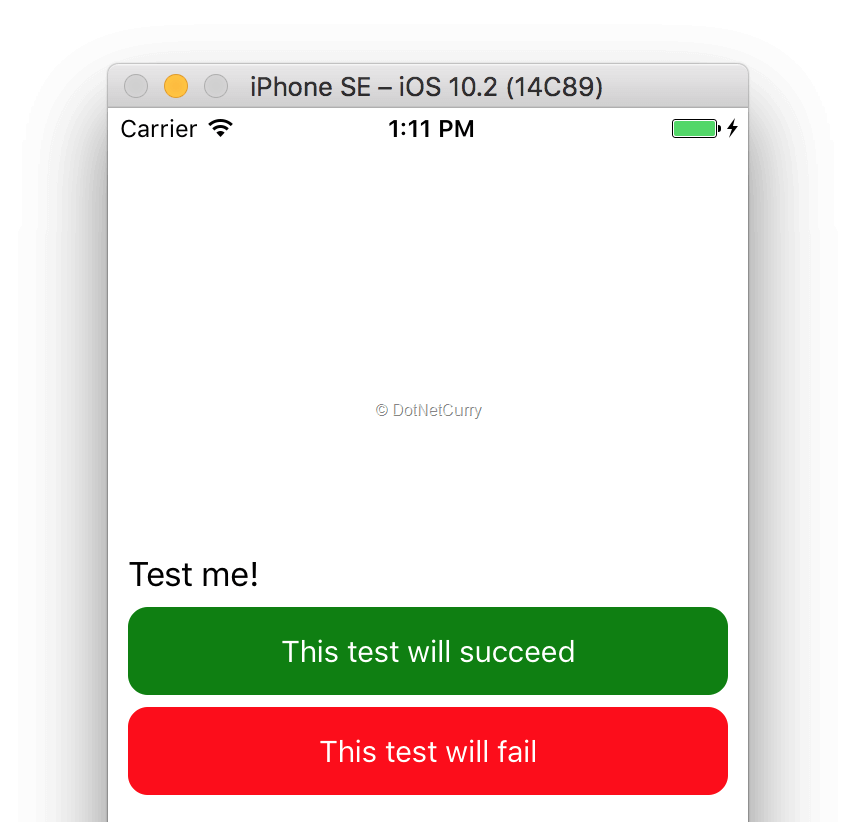
Figure 5: our sample test app
First observe what our XAML looks like. This is shown in Figure 6. Notice how the Label and two Buttons have an attribute called ‘AutomationId’. This was a property introduced especially for Test Cloud.
With this attribute, we can easily find out controls from within the test scripts. This is also where the difference between traditional Xamarin and Xamarin.Forms is. Of course, the traditional Xamarin controls do not have the AutomationId property. In this case, you can use ‘AccessibilityIdentifier’ for iOS and for Android, the ‘ContentDescription’. These are properties present in all controls on these platforms.

Figure 6: XAML for our UI
Actually, to make this work in Xamarin.Forms, we need some additional code which maps the ‘AutomationId’ property value to the ‘AccessibilityIdentifier’ and ‘ContentDescription’ for the respective platforms. For iOS, go into the AppDelegate.cs and in the FinishedLaunching method, add this piece of code after the Forms.Init(); line.
Forms.ViewInitialized += (object sender, ViewInitializedEventArgs e) => {
    if (!string.IsNullOrWhiteSpace(e.View.AutomationId))
    {
        e.NativeView.AccessibilityIdentifier = e.View.AutomationId;
    }
};
With this piece of code, the AutomationId property will be mapped. Do the same for Android too. Go to the MainActivity.cs and in the OnCreate method, after the Forms.Init(); line, add this piece of code, which maps it to the ‘right’ property for Android.
Xamarin.Forms.Forms.ViewInitialized += (object sender, Xamarin.Forms.ViewInitializedEventArgs e) => {
    if (!string.IsNullOrWhiteSpace(e.View.AutomationId))
    {
        e.NativeView.ContentDescription = e.View.AutomationId;
    }
};
If you examine these pieces of code closely, you will notice that it uses an event-handler at a very high level and which will be invoked for each view. As your app grows in complexity, this can become a big performance hit. To work around this, you can create a separate build configuration which holds a special compiler directive.
You are going to need this anyway, at least for iOS. Because for iOS we need to introduce some more code to make it work. By adding this code, some private iOS APIs are invoked, which is not allowed by the App Store review process. So, making a build with the Test Cloud code in place, will not be allowed in the App Store.
For iOS, install the Xamarin.TestCloud.Agent NuGet package. Then add some more code to the FinishedLaunching method, just like we did earlier. Behind the code that we have just introduced, initialize the Test Cloud agent by these lines of code:
// Code for starting up the Xamarin Test Cloud Agent
#if ENABLE_TEST_CLOUD
            Xamarin.Calabash.Start();
#endif
Our projects are now ready to be used in the Test Cloud.
When we go back to the main page of the app and look at the code-behind for the buttons, we will see this code:
void Succeed_Clicked (object sender, System.EventArgs e)
{
   ResultLabel.Text = "Hooray!";
   ResultLabel.TextColor = Color.Green;
}
void Failed_Clicked (object sender, System.EventArgs e)
{
    ResultLabel.Text = "Whoops, that is embarrassing";
    ResultLabel.TextColor = Color.Red;
}
The green button will make the label value say “Hooray!” and make the color of the text green. And the red button will set the label to another text, as we will see later the text was not what it is supposed to be.
Now let’s see how we can write a test for this. Add a test project to your solution by right-clicking your solution, go to ‘Add’ and choose ‘New Project…’. In the ‘Add New Project’ screen go to the ‘Test’ category. This is shown in Figure 7.
As you can see, there are different kinds of test projects to choose from. The one that we are after is the ‘UI Test App (Xamarin.UI Test | Cross Platform)’. There are separate projects for Android and iOS as well. Since my app is a Xamarin.Forms app, I will focus on the cross-platform app. However writing and running the tests aren’t actually that different.
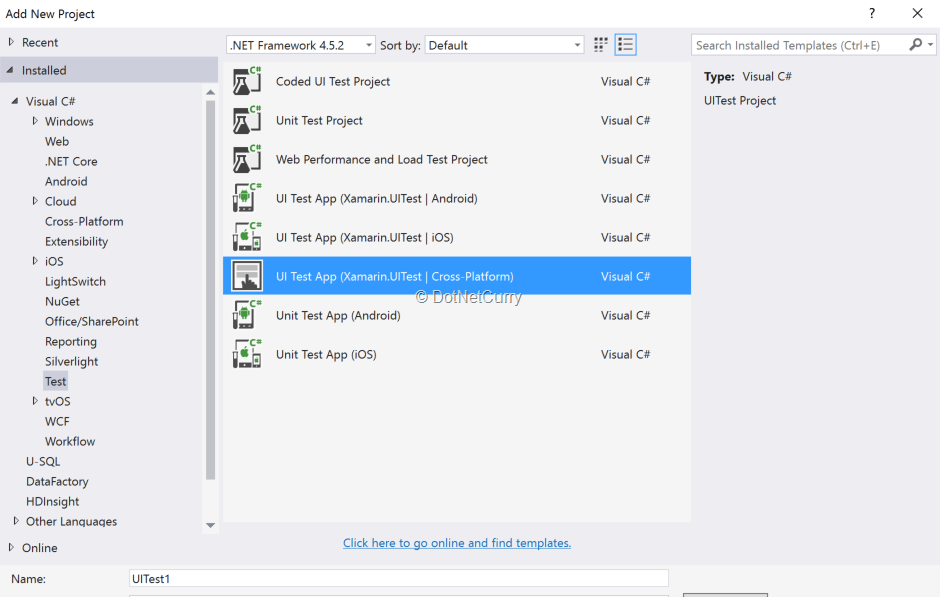
Figure 7: Adding the UITest project
Name your project appropriately and add it to your solution. If we look at the project structure, we see that it now consists of two files: AppInitializer.cs and Tests.cs. Like you might have expected the first file contains code to initialize the test project and the latter contains the actual tests.
Initializing the tests does nothing more than create an IApp context which holds all kinds of methods to compose our tests with. Depending on the platform that we run it on, the interface gets a different implementation.
In the Tests.cs file, the real magic happens. You can see the initial contents in Figure 8. When you open it up there already is some code in there to help you get started. There is a constructor, which sets a field so that we can detect what platform we are on. Also there is a method BeforeEachTest, as the name tells you: the code in this method is ran before each of the separate test methods. The line of code in there refreshes the IApp context before each test so that the state of that object will not influence the results of another test.
And then there is the AppLaunches method which is handled like a test. The only thing it does is take a screenshot.
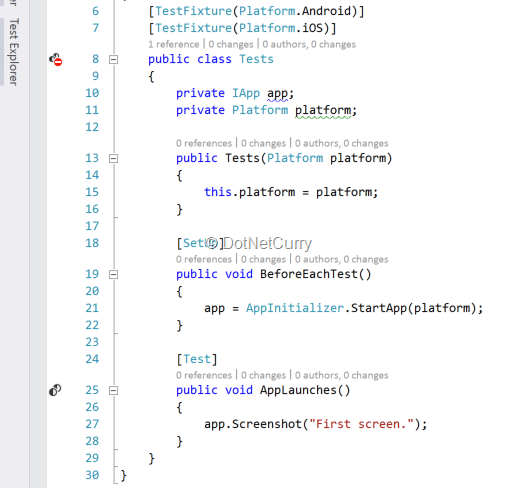
Figure 8: Initial contents of the Tests.cs file
You might have noticed that there are attributes at different levels. This way you can define which class contains tests and for which platform (TestFixture). You can also choose which method is the initializer method (SetUp) and which methods contain test code (Test). If you have written unit tests for .NET, this might look familiar to you as it uses the same structure.
For this sample, I will just use one class, but as you are going to expand your app and accompanying tests, you might want to break it up in different classes - at least per platform, but as the number grows, you might want to make more distinction per feature or screen. That is up to you.
Besides the code that is already here, let us create two more test methods:
[Test]
public void Press_Good_Button_And_Pass_Hooray()
{
   // Arrange
   // Nothing to arrange for this test
   // Act
   app.Tap(e => e.Marked("SucceedButton"));
   app.Screenshot("Green button tapped");
   // Assert
   Assert.AreEqual("Hooray!", app.Query(e => e.Marked("ResultLabel")).First().Text);
}
[Test]
public void Press_Bad_Button_And_Fail_Boo()
{
   // Arrange
   // Nothing to arrange for this test
   // Act
   app.Tap(e => e.Marked("FailButton"));
   app.Screenshot("Red button tapped");
   Assert.AreEqual("Whoops, that is embarrassing...", app.Query(e =>
      e.Marked("ResultLabel")).First().Text);
}
First off, the tests are composed in the Arrange-Act -Assert pattern. You write some code to arrange the app to the situation that you want to test. Then write code which executes the logic that you want to test, which is the act part. And lastly you assert the outcome values by comparing the expected result to the actual result.
Like I have mentioned before, the IApp object, which is in the app variable, contains all the methods to compose our tests. For instance, app.Tap() allows you to tap an element on the screen just like a user would. In most of the methods, you can pass a func object. This will be the way to locate controls. Besides the Tap method, there is also DoubleTap, PinchToZoomIn, ClearText and DismissKeyboard, to name a few.
If we look at this line: app.Tap(e => e.Marked("SucceedButton")); you will see that we are looking for a control that is marked with the ‘SucceedButton’ identifier. This is the value that we put in our AutomationId property. Because we are using the AutomationId (and thus the platform-specific fields I mentioned earlier), we can use the Marked method. This method relies on the fact that you are using those fields. But with the Query method that you see in there as well, you can query controls on any property or property value.
In both the tests, you will see that I tap the button, take a screenshot and then assert the outcome. In the first test, the expected result and the actual result will match and thus pass, whereas in the second test, I have made a subtle change in the expected value by adding three dots at the end.
Before we can send this off to Test Cloud, we need to add the right references to our platform-specific app projects. Right-click the ‘References’ node in the test project and add the Droid and iOS project.
Running the Tests in Xamarin Test Cloud
I already told you that you can run the tests locally, but the true power lies in running them in the Test Cloud. Running the tests locally can be a bit tricky from Windows. iOS apps are not supported for local execution in Visual Studio. If you do want to do this, I would suggest to switch over to Xamarin Studio, where running tests locally is simpler. Just set the test project as the startup project and run it!
We will be focusing on running it in the Xamarin Test Cloud. We will use the command that we copied from the Test Cloud web interface when we created our Test Run.
From Visual Studio, when you have Xamarin installed, you can just right-click the test project and select the ‘Run in Test Cloud’ option. The rest is self-explanatory. For now, we will do this the hard way. Make sure that you got the ipa/apk file for your iOS/Android app. In case of iOS, make sure the Test Cloud code was initialized, else you will run into an error message. For Android, do not use the Shared Mono Runtime. You can turn it off by going into your project settings. In my case, I will be running a test on Android through my Mac.
Look at the command we got earlier from the Test Cloud portal and replace the missing values. You need to specify the UITest version in the path, the path to the apk file and the path to the test assemblies. The resulting string will be something along these lines:
mono packages/Xamarin.UITest.2.0.5/tools/test-cloud.exe submit Droid/bin/Debug/com.versluisit.testclouddemo.apk 98b79xxxxxxxxxxxxxxxx792b93 --devices a44740d1 --series "master" --locale "en_US" --user gerald@verslu.is --assembly-dir UITests/bin/Debug/
I have obfuscated my API key.
Start a console (or Terminal) window in either Windows or Mac and navigate it to the ‘Packages’ folder of your solution on your filesystem. Then paste in the command we just composed. If everything is OK, the files will be uploaded to Test Cloud and the tests will commence. In Figure 9 you will see the Terminal window uploading the files and running the tests.
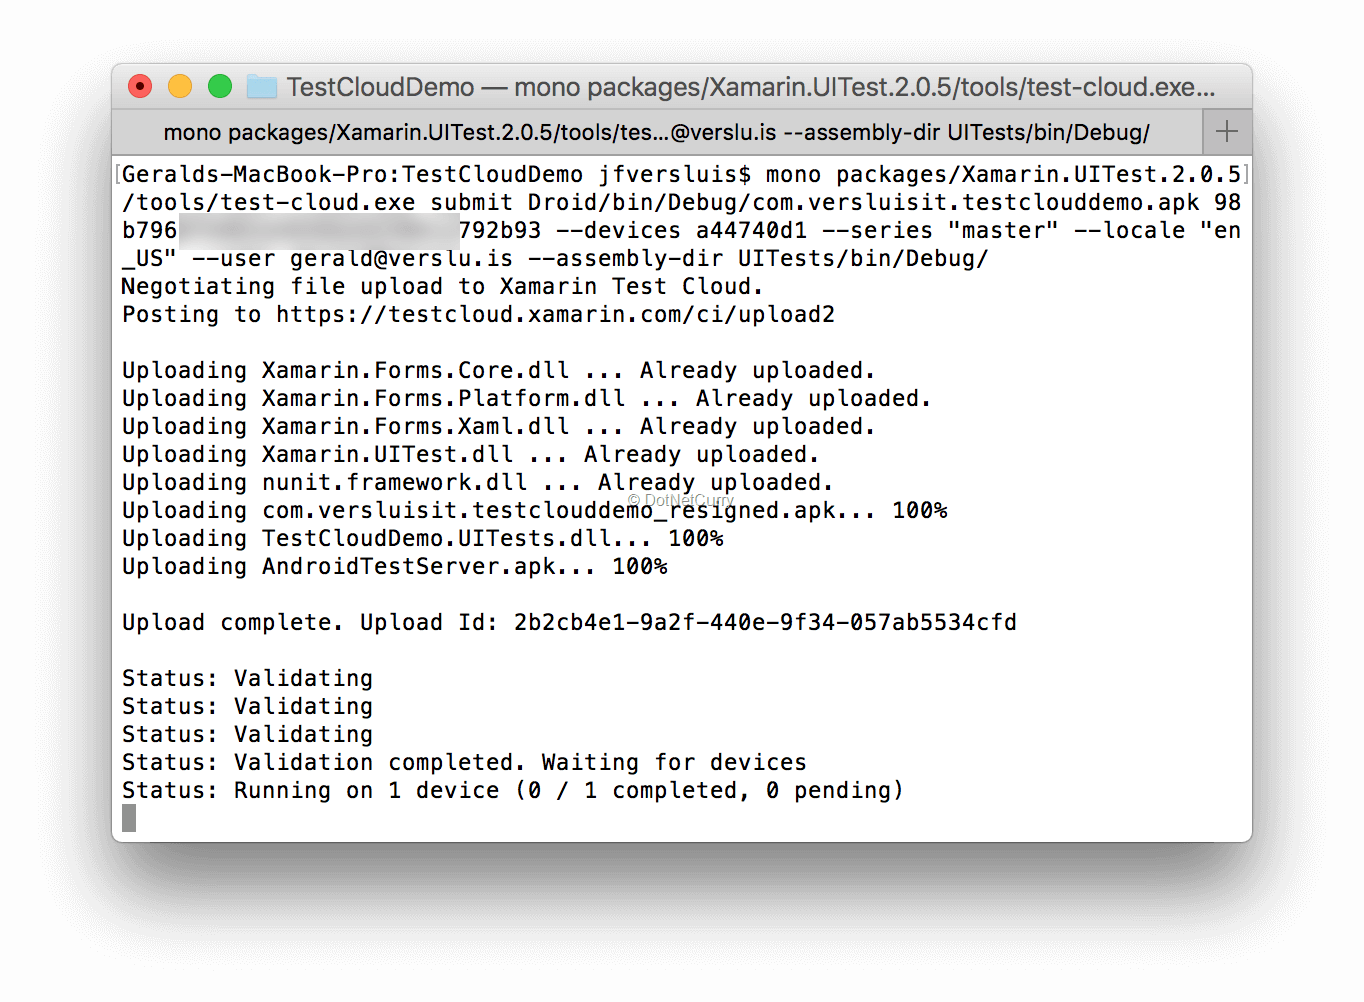
Figure 9: Sending our app to Test Cloud
If we now go back to the Test Cloud web interface, you can already see the tests in progress. Wait for the tests to be processed. You can follow the test progress using the terminal output. When the tests are completed, click through to the Test Run to see the results. An overview of the results can be seen in Figure 10.
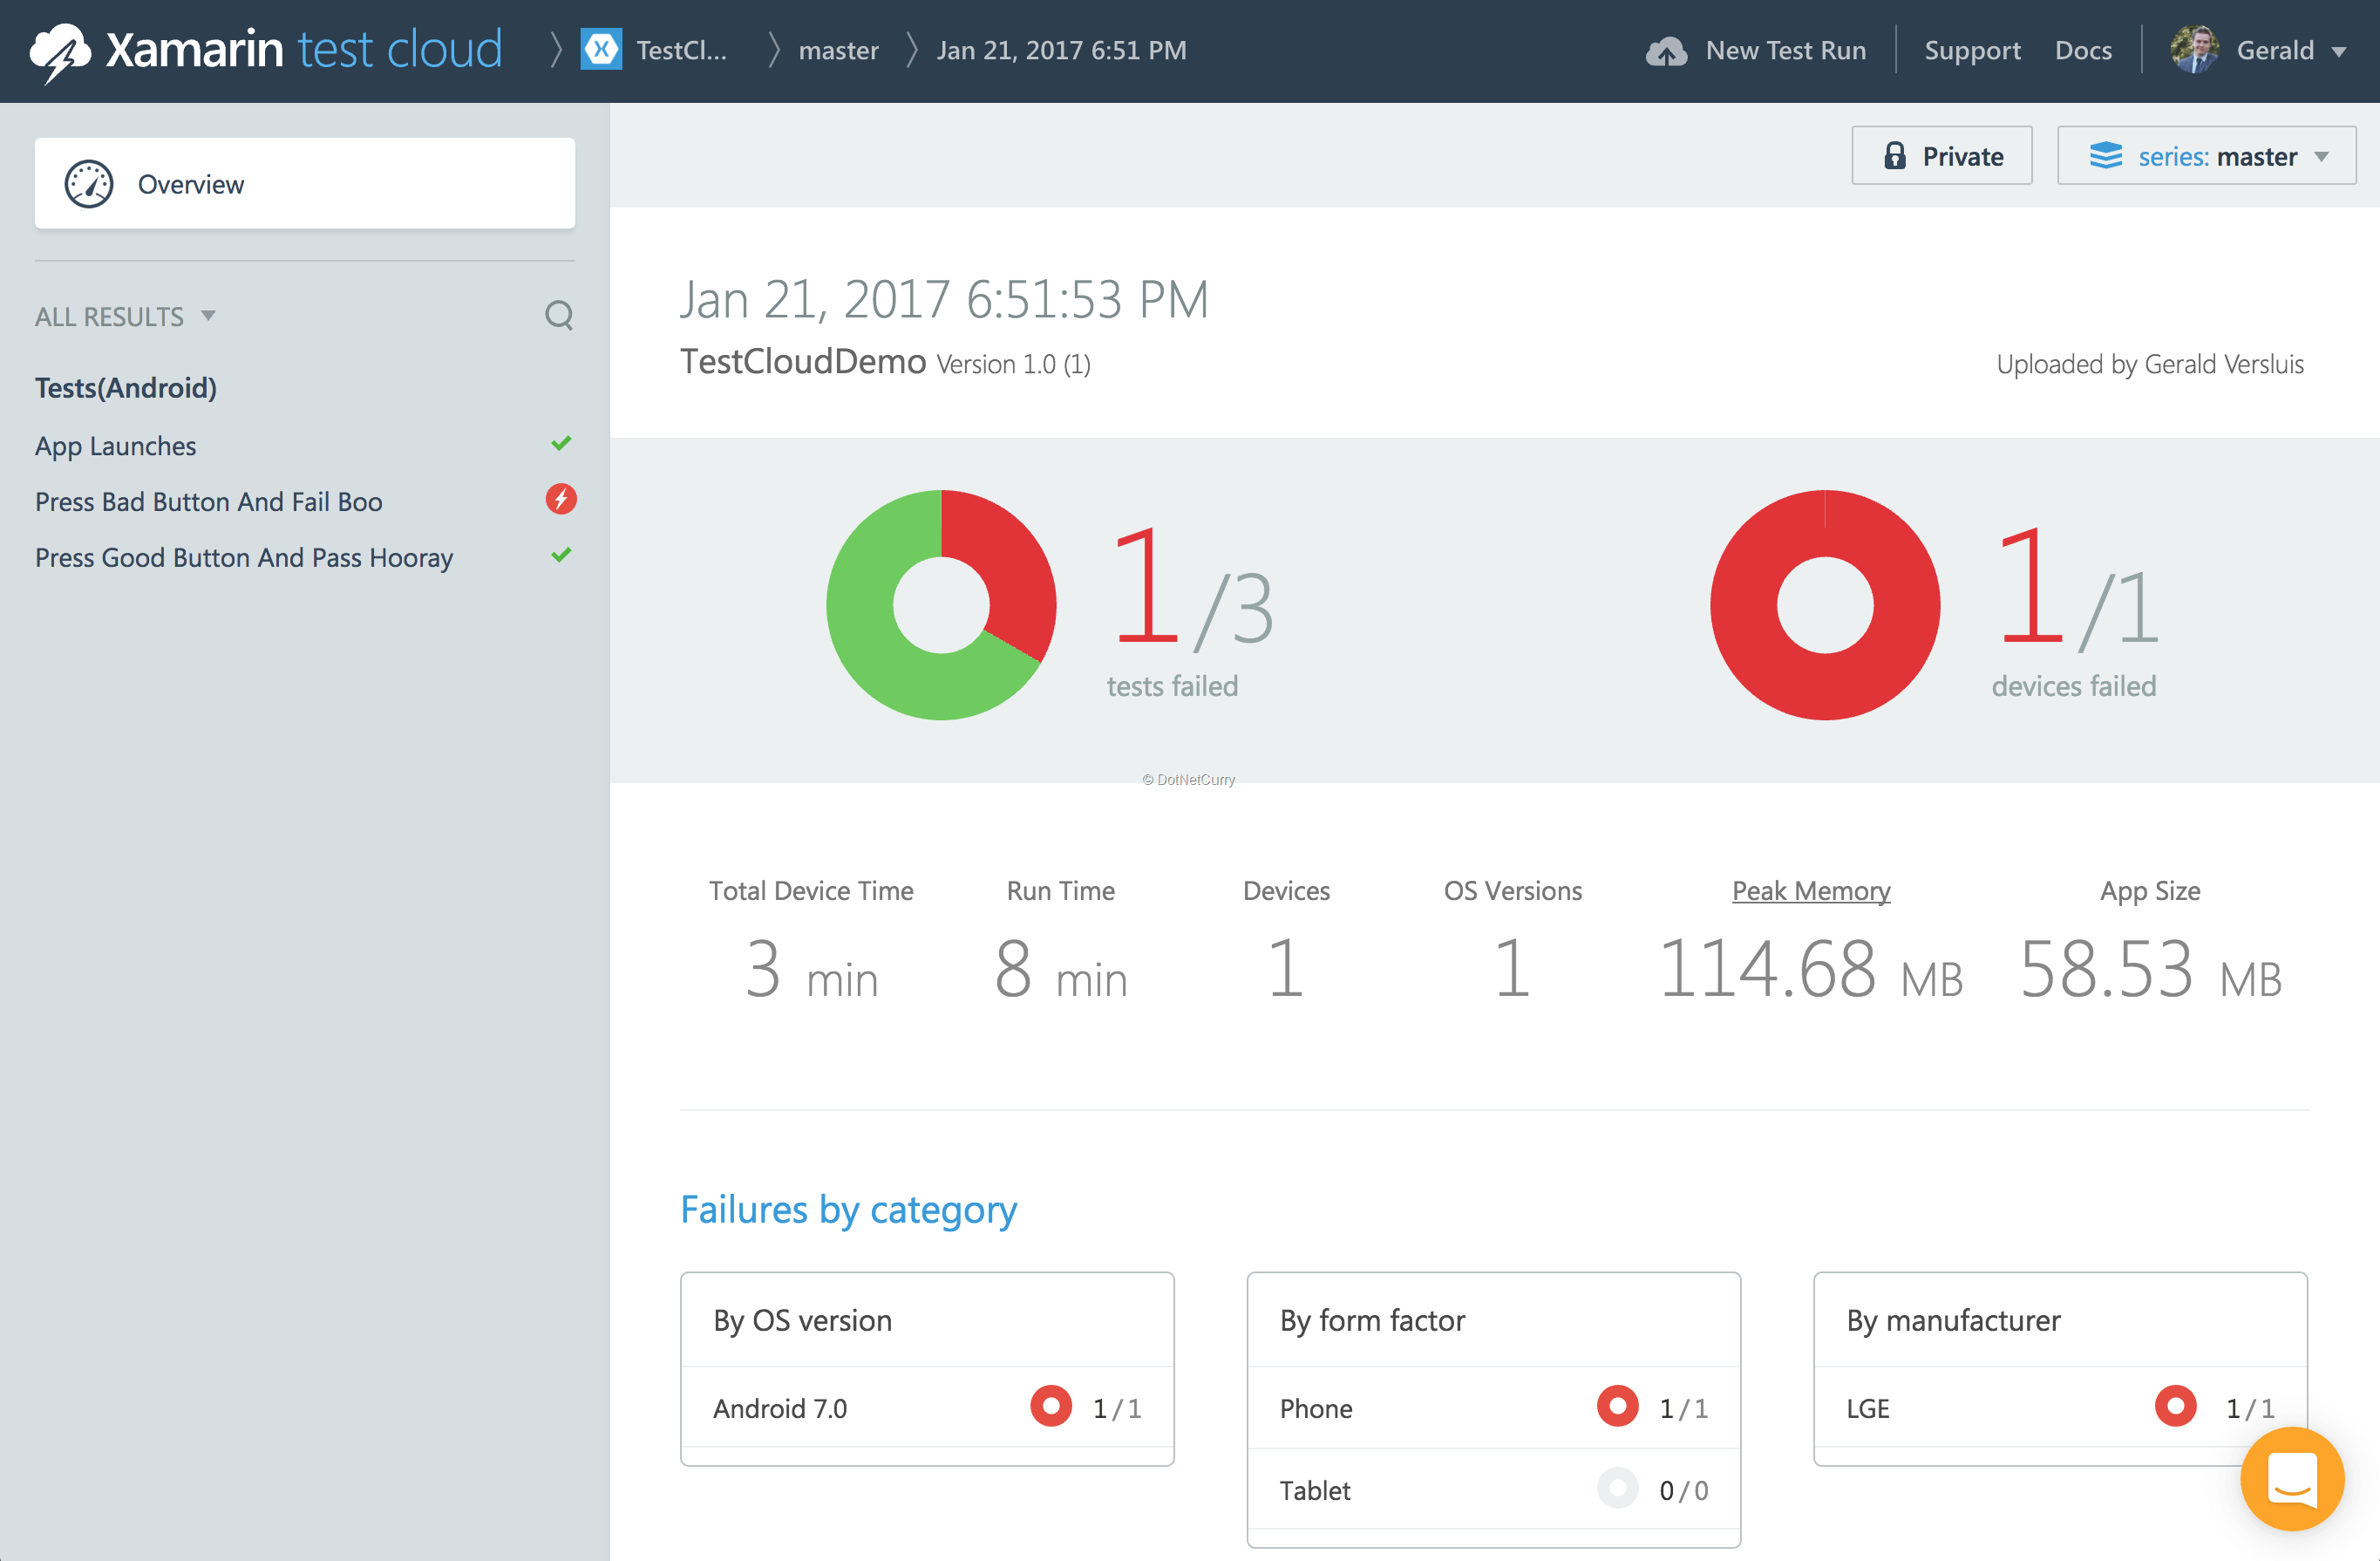
Figure 10: Overview of the test results
On the left-hand side, you see all the test methods we have defined. A fun thing to notice is that I named my test method as a sentence. I have separated the word in the method name with underscores like: Press_Good_Button_And_Pass_Hooray. As you can see, Test Cloud is smart enough to strip out the underscores so it looks nicer.
On the right-hand side, you see a summary of this test run. As we expected, our test failed.
When you click through on the left into the method, you will see all the steps that were taken. Take a look at Figure 11, where I have clicked through into the test where you can see all the details per step. You can see stats like what was the memory usage at the time? What was the CPU used at the time?
But probably the most important thing I find is that you can see a screenshot of the device.
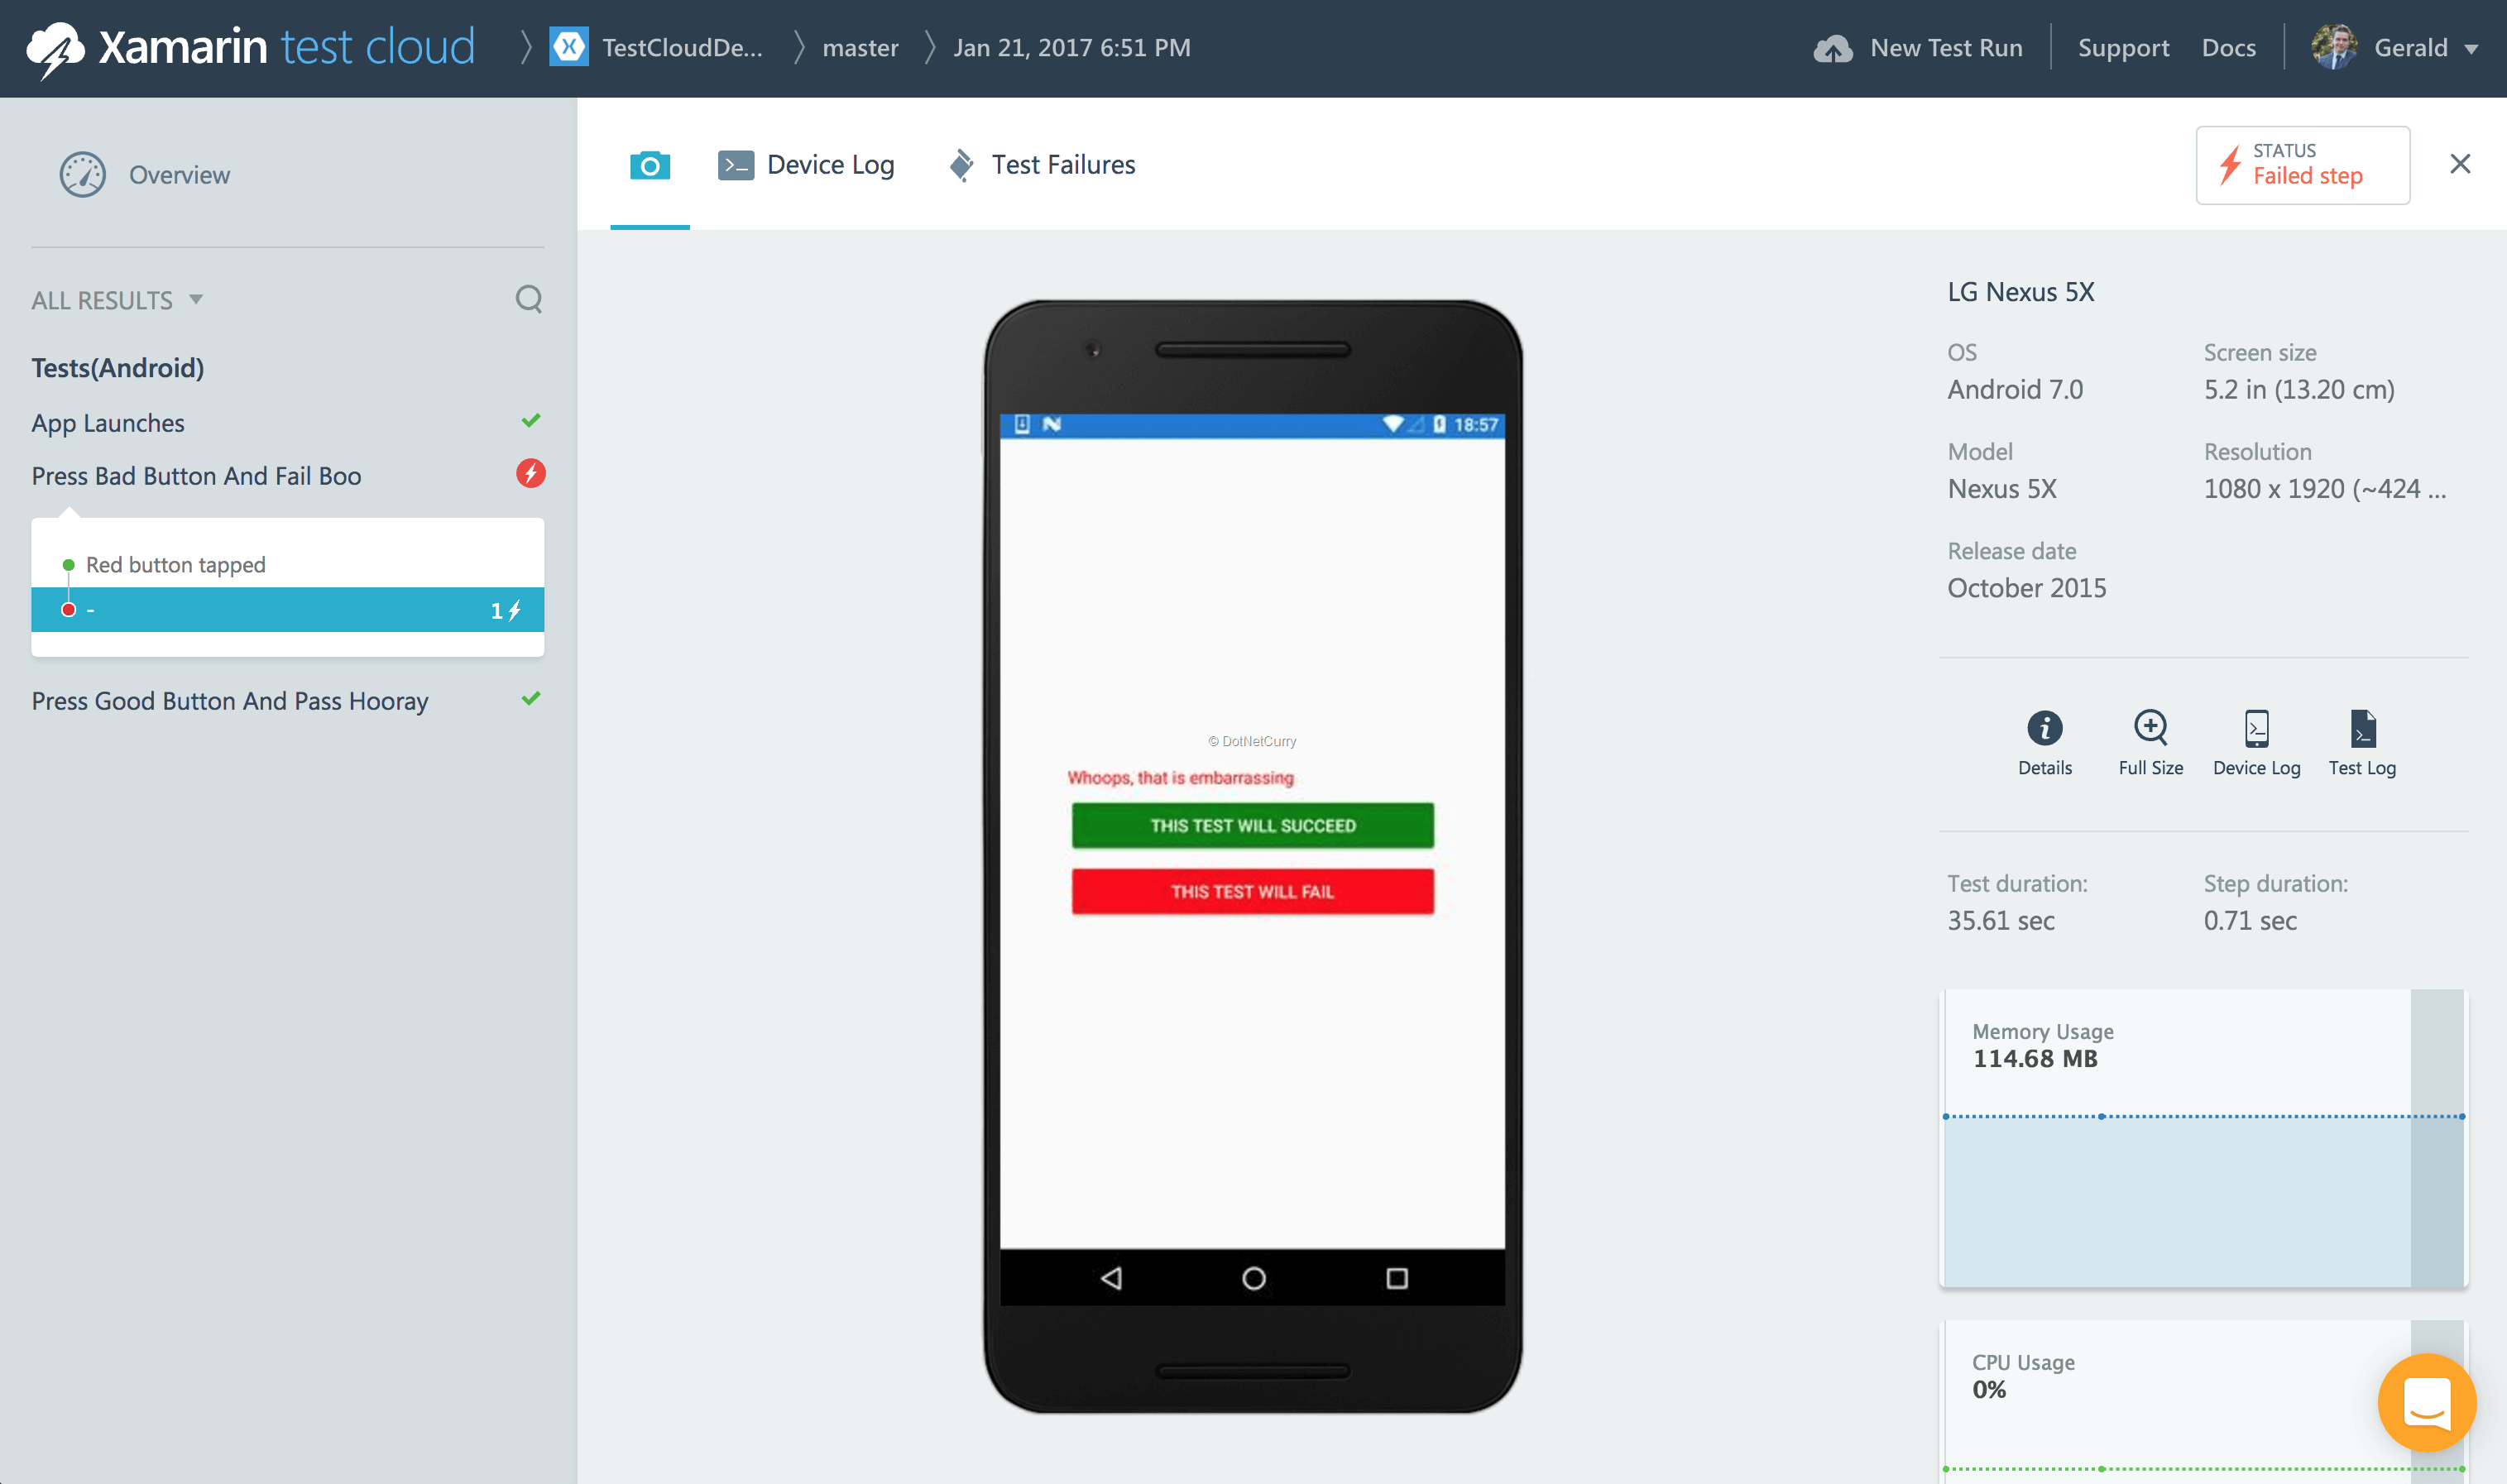
Figure 11: Details of the failed test
The complete device log is also available and you can see why a Test has failed under ‘Test Failures’. In my case it says: ‘Expected string length 31 but was 28. Strings differ at index 28. An ellipses (…) would have done it as the expected string could have been: "Whoops, that is embarrassing..." but instead was: "Whoops, that is embarrassing"’.
The awesome things about these tests is that it can compare values like these and check if an error snuck in there, but it also checks for usability. For instance, one time when I created a test and ran it through the Test Cloud, I placed a button near the bottom of the screen. When I composed the test, I selected a couple of devices, including some with a smaller form factor. While I did not expect any failures, some tests did fail! And the tests were failing on the smaller form factor phones. What happened was that the button near the bottom got pushed outside of the screen to a place where the user would never be able to reach it. Therefore the test failed.
So I was very happily surprised to see that Test Cloud also does these kind of checks. That way you are assured that you deliver high quality, five-star review apps.
Conclusion
In this article, we explored what the Xamarin Test Cloud is, how you can write tests for it and how to run them in the Cloud. I hope you have learned a thing or two and that you are just as enthusiastic about this as I am. I would like to encourage you to starting writing test and make your apps even better!
Download the entire source code from GitHub at bit.ly/dncm29-xamarintestcloud
This article has been editorially reviewed by Suprotim Agarwal.
C# and .NET have been around for a very long time, but their constant growth means there’s always more to learn.
We at DotNetCurry are very excited to announce The Absolutely Awesome Book on C# and .NET. This is a 500 pages concise technical eBook available in PDF, ePub (iPad), and Mobi (Kindle).
Organized around concepts, this Book aims to provide a concise, yet solid foundation in C# and .NET, covering C# 6.0, C# 7.0 and .NET Core, with chapters on the latest .NET Core 3.0, .NET Standard and C# 8.0 (final release) too. Use these concepts to deepen your existing knowledge of C# and .NET, to have a solid grasp of the latest in C# and .NET OR to crack your next .NET Interview.
Click here to Explore the Table of Contents or Download Sample Chapters!
Was this article worth reading? Share it with fellow developers too. Thanks!
Gerald Versluis (@jfversluis) is a full-stack software developer and Microsoft MVP (Xamarin) from Holland. After years of experience working with Xamarin and .NET technologies, he has been involved ina number of different projects and has been building several apps. Not only does he like to code, but he is also passionate about spreading his knowledge - as well as gaining some in the bargain. Gerald involves himself in speaking, providing training sessions and writing blogs (https://blog.verslu.is) or articles in his free time. Twitter: @jfversluis Email: gerald[at]verslu[dott]is . Website:
https://gerald.verslu.is