Barcodes in Xamarin.Forms
For as long as I can remember, Barcodes have been a thing.
It all started with the 1D barcodes that give you a string value of max 48 characters. With QR codes (2D), you can store more information. These days they are often used to guide people to a certain URL, or use it for two-factor authentication.
It is evident that barcodes are still very much alive and can be used for a great variation of solutions.

Barcodes are most suited to be used in Mobile, since a camera can potentially read a barcode and extract the data, which can then be processed further.
In this tutorial, I will show you how you can scan barcodes as well as generate them in your Xamarin.Forms mobile app.
Different Types of Barcodes and Usages
Over time, numerous barcode formats have been invented. The most famous ones are the simple 1D barcode, the one with just the vertical stripes, and the QR code, the square, black and white barcode. You can see these two formats in Figure 1.

Figure 1: 1-dimensional barcode(left) and QR code(right). Both hold the same data.
Depending on its appliance, a certain format might be preferred. Some benefits of the QR code is that it can be read even when it is damaged. Also, it can hold much more data than the traditional barcodes.
As I have already mentioned, although the technique is quite old, barcodes still play a big role in today’s world. You can see barcodes on every book, every product from the supermarket, you might see QR codes on stickers on advertisements on bus stops or you can even connect guests to your Wi-Fi connection with a QR code.
The latter is what we will be focussing on in our sample app.
Connecting to Wi-Fi with a QR Code
In the app that we are building in this tutorial, we will read and generate QR codes that will allow people to connect to a certain Wi-Fi network.
We are not actually connecting people to Wi-Fi with our app. While that technically is possible, that is not the scope of this article.
For this app, we will focus on generating a QR code that can connect a user to a Wi-Fi network, and scan a QR code to see what it contains.
The QR code, is nothing more than a string in a certain format that has been standardized and implemented in the operating system of Android and iOS. When this string is recognized in a QR code, the OS will suggest that you connect to the network with the settings encoded in that QR code. The string format looks like this: WIFI:S:<SSID>;T:<WPA|WEP|>;P:<password>;;
The string has to start with WIFI:. The order of the parameters doesn’t really matter. All parts of the string are then key/value pairs separated by a colon. Underneath you can see what each letter stands for.

The parts between angle brackets will be replaced with actual values.
Barcode Libraries
There are multiple libraries out there that allow you to work with barcodes. The most notable ones are ZXing (short for Zebra Crossing) and Scandit. Both can do mostly the same thing and have libraries for usage in Xamarin apps. I will use the ZXing library for this sample. You can find background information on their GitHub page: https://github.com/zxing/zxing. The Xamarin.Forms specific port can be found here: https://github.com/Redth/ZXing.Net.Mobile and is created by Jonathan Dick. This version is also available through NuGet as we will see in a minute.
Creating the Sample App
Let’s get started on the actual app. I will be using Visual Studio for Mac, but everything should work on Windows as well. I have created a new Xamarin.Forms project and am targeting iOS and Android. All code can be found on my GitHub page for it: https://github.com/jfversluis/WifiBarcodeSample.
Since I am not a great designer, the UI is going to be super simple, I mean minimalistic. A first version will look like the one shown in Figure 2.
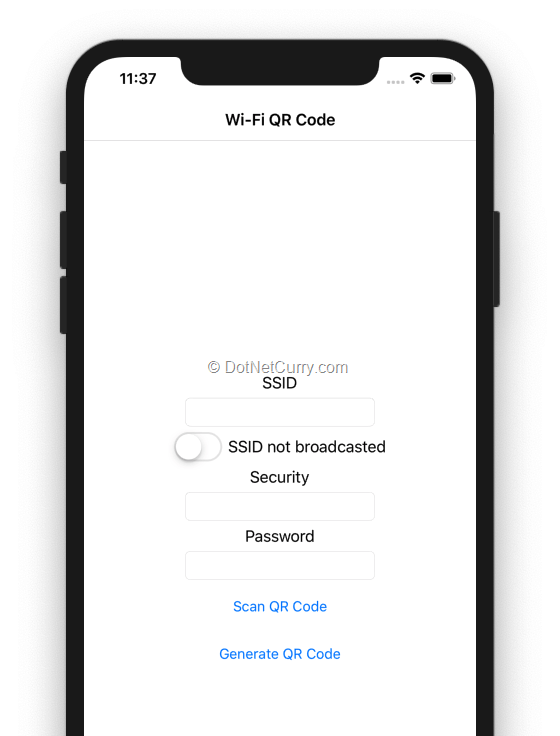
Figure 2: A very simple UI for our Wi-Fi QR code app
As you can imagine, the code for this UI is not very complicated. I am a big fan of using XAML for the UI. You can see the XAML markup for this page in the following code. It doesn’t really do much right now, but it will help you understand where I will be placing certain other elements on the page later on.
<?xml version="1.0" encoding="utf-8"?>
<ContentPage Title="Wi-Fi QR Code" xmlns="http://xamarin.com/schemas/2014/forms" xmlns:x="http://schemas.microsoft.com/winfx/2009/xaml" xmlns:local="clr-namespace:WifiBarcodeSample" x:Class="WifiBarcodeSample.MainPage">
    <StackLayout VerticalOptions="CenterAndExpand">
        <Label Text="SSID" HorizontalOptions="Center" VerticalOptions="Center" />
        <Entry x:Name="Ssid" WidthRequest="200" HorizontalOptions="Center" VerticalOptions="Center" />
        <StackLayout Orientation="Horizontal" HorizontalOptions="Center">
            <Switch x:Name="HiddenSsid" HorizontalOptions="Center" VerticalOptions="Center" />
            <Label Text="SSID not broadcasted" HorizontalOptions="Center" VerticalOptions="Center" />
        </StackLayout>
        <Label Text="Security" HorizontalOptions="Center" VerticalOptions="Center" />
        <Picker x:Name="Security"  WidthRequest="200" HorizontalOptions="Center" VerticalOptions="Center">
            <Picker.ItemsSource>
                <x:Array Type="{x:Type x:String}">
                    <x:String>WPA/WPA2</x:String>
                    <x:String>WEP</x:String>
                    <x:String>None</x:String>
                </x:Array>
            </Picker.ItemsSource>
        </Picker>
        <Label Text="Password" HorizontalOptions="Center" VerticalOptions="Center" />
        <StackLayout Orientation="Horizontal" HorizontalOptions="Center">
            <Entry x:Name="Password" WidthRequest="200" IsPassword="true" HorizontalOptions="Center" VerticalOptions="Center" /> <Button Text="Show/Hide" Clicked="ShowHidePassword" />
        </StackLayout>
        <Button Text="Scan QR Code" WidthRequest="200" HorizontalOptions="Center" VerticalOptions="Center" />
        <Button Text="Generate QR Code" WidthRequest="200" HorizontalOptions="Center" VerticalOptions="Center" />
    </StackLayout>
</ContentPage>
Adding the ZXing Library
As I have already mentioned, the ZXing library for Xamarin.Forms is available through NuGet, so you can simply add it to your projects.
Notice how I say project(s) i.e. plural.
If you have been working with Xamarin.Forms before, you might know that a lot of the libraries are to be installed in all projects. This means: your shared code project as well as your platform projects. This is needed because the library needs an abstraction at the shared code level and the actual implementation lives in the platform project. It’s basically how all of Xamarin.Forms is setup.
Add the NuGet package to each of the projects by opening the Add package dialog and find the ZXing.Net.Mobile.Forms package. Repeat this for each project in your solution, in my case it was three. You can see the project structure in Figure 3.
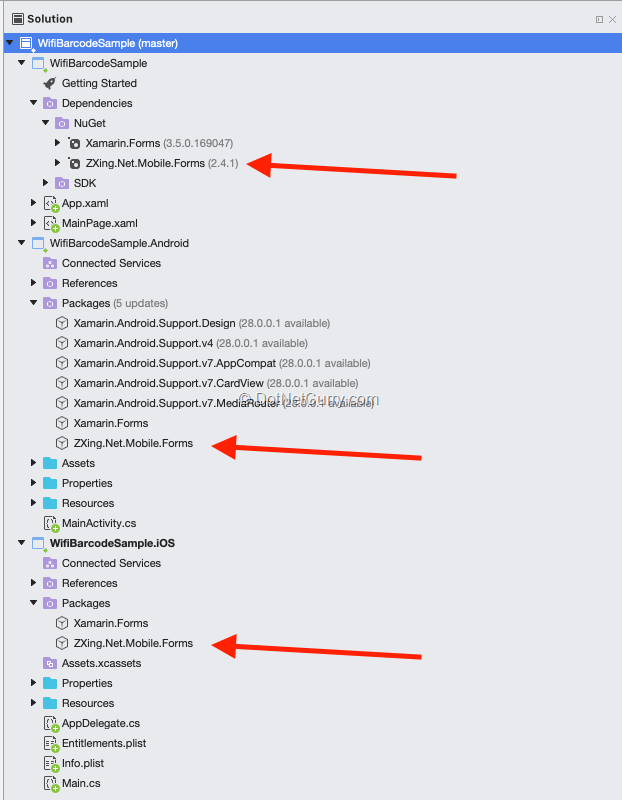
Figure 3: The project structure of the sample app. You can see that the ZXing library is installed on all projects.
At the very root, you see the solution. Directly under that you see the WifiBarcodeSample project. This is a .NET Standard library that contains our shared code. You will want to have most of your code in this library, since that will allow us to share it across all platforms.
Then there is the WifiBarcodeSample.Android and WifiBarcodeSample.iOS projects, which are bootstrap projects for the Android and iOS platforms. If we would need to write platform-specific code, this is where we would do it.
iOS
In the case of the ZXing library, we do need some initialization code per platform. On iOS, go into the AppDelegate.cs file and in the FinishedLaunching method, add this line:
ZXing.Net.Mobile.Forms.iOS.Platform.Init();
Android
For Android we need to do something similar. Go into the MainActivity.cs file and in the OnCreate method, place this line:
ZXing.Net.Mobile.Forms.Android.Platform.Init();
For some reason, you also need to add another NuGet package to your Android project, be sure to add the ZXing.Net.Mobile package manually. This is not needed for iOS.
Other
If you do not do this, the scanner and barcode images will not work. There is also support for Windows Phone and UWP. Please refer to the ZXing GitHub page to see the code for those platforms.
Generating Barcodes
Besides scanning barcodes, this library can also generate barcodes. Since that is quite simple, let’s get that out of the way first. For that, ZXing has an object named ZXingBarcodeImageView. This is what we will add to our layout first.
Because this is in a different namespace, we will also need a new namespace declaration in XAML. The resulting XAML (snippet) will then look like the following.
<ContentPage Title="Wi-Fi QR Code" ... xmlns:zxing="clr-namespace:ZXing.Net.Mobile.Forms;assembly=ZXing.Net.Mobile.Forms" xmlns:zxcm="clr-namespace:ZXing.Common;assembly=zxing.portable">
  <StackLayout VerticalOptions="CenterAndExpand">
     <zxing:ZXingBarcodeImageView x:Name="BarcodeImageView" BarcodeFormat="QR_CODE" IsVisible="false" BarcodeValue="Foo">
            <zxing:ZXingBarcodeImageView.BarcodeOptions>
                <zxcm:EncodingOptions Width="300" Height="300" />
            </zxing:ZXingBarcodeImageView.BarcodeOptions>
        </zxing:ZXingBarcodeImageView>
     <Label Text="SSID" HorizontalOptions="Center" VerticalOptions="Center" />
...
</ContentPage>
I have omitted some code to make it more readable. The things to note here are the xmlns:zxing and xmlns:zxcm attributes on the ContentPage node and the zxing:ZXingBarcodeImageView.
The first two attributes are used to import the right namespace, so the XAML page knows where to look for the control. Then, we can actually use the image view which will show our barcode. You can see that we gave it a name, with this we can access this control from code as we will see in a bit. Also, I specified a BarcodeFormat. With this property you tell the control which type of barcode is to be rendered.
Because of some quirks in the ZXingBarcodeImageView, I also specified an initial value for the BarcodeValue. And since I have to set an initial value, I set the IsVisible to false to only show the QR code when it shows a right value.
The last thing that stands out is the ZXingBarcodeImageView.BarcodeOptions. If we do not specify this options object with a width and a height, the barcode will look very fuzzy. Probably because the actual image is rendered smaller than the image view and is thus stretched.
To make it all work, we need to take the values entered by the user in the input fields and generate the actual barcode.
Let’s start with adding a Clicked parameter to our Generate QR Code button. Make sure it looks like this:
<Button Text="Generate QR Code" WidthRequest="200" HorizontalOptions="Center" VerticalOptions="Center" Clicked="Generate_Barcode" />.
I have added the Clicked parameter and specified a name of the method that is going to handle the event when someone taps the button. While I am using simple code-behind code right now, everything can also be done with data-binding if you want to use an architectural pattern like MVVM.
In the code-behind, create a new method that looks like the code shown here.
public void Generate_Barcode(object sender, EventArgs e)
{
    // TODO Implement error handling and validation
    var security = "";
    var ssidHidden = "";

    switch (Security.SelectedIndex)
    {
        case 0:
            security = "WPA";
            break;
        case 1:
            security = "WEP";
            break;
        default:
            security = "";
            break;
    }

    if (HiddenSsid.IsToggled)
        ssidHidden = "H:true";

    BarcodeImageView.BarcodeValue = $"WIFI:S:{Ssid.Text};T:{security};P:{Password.Text};{ssidHidden};";

    BarcodeImageView.IsVisible = true;
}
Here you can see how I compose the string that is needed to connect to the Wi-Fi network. Depending on the input, I set different parts to different values. At the end, I set the string value to the BarcodeValue of the image view and set the image view to be visible. A sample output on iOS can be seen in Figure 4. Go ahead, try to scan it with your camera app and see if it responds!
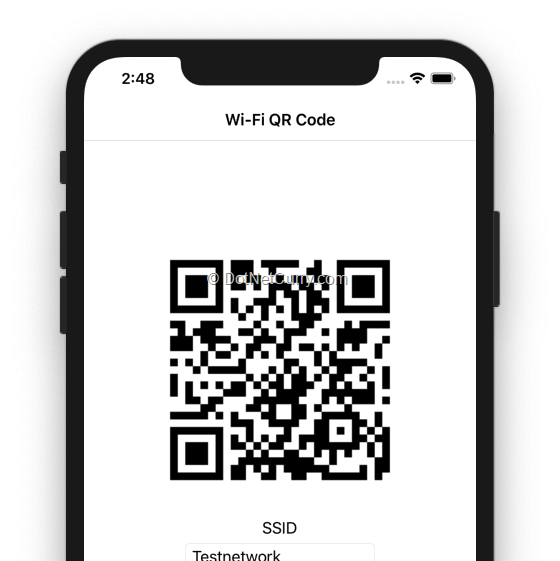
Figure 4: Barcode image view in iOS.
As indicated by the todo in the comment, I did not take into account any validation or error handling in this case so we can just focus on the relevant part.
Scanning Barcodes
Now for the reverse part. Let’s scan barcodes!
For this piece of functionality, we will allow the user to scan a barcode with the camera and put the values in the input boxes.
There is a couple of things we need to do before we can start implementing the code for this. Since we will be using the camera, we need to request the permissions for that in both iOS and Android.
iOS
The way to do it in iOS is pretty simple. You will have to provide an entry in the info.plist file. With this entry, you specify a description that the user will see whenever the camera is accessed for the first time.
By adding this entry, you are letting iOS know that you intend to use the camera and you get the ability to explain to the end-user what you want to use the camera for. If you open the info.plist file, you will see it is just an XML file. Add the entry shown here between the <dict></dict> tags and give it a meaningful description.
<key>NSCameraUsageDescription</key>
<string>Please allow the camera to be used for scanning barcodes</string>
This concludes all we need to do for iOS.
Android
For Android it is roughly the same, but also different. By adding the ZXing package, the permission for the camera should have already been added. You can double-check this by right-clicking the Android project and go to Options (or Properties on Windows). There, find the permissions list and see that Camera is checked. Additionally, you will need to add the following method to your MainActivity.cs file to support the new permissions model for newer Android versions.
public override void OnRequestPermissionsResult(int requestCode, string[] permissions, Permission[] grantResults)
{
    global::ZXing.Net.Mobile.Android.PermissionsHandler.OnRequestPermissionsResult (requestCode, permissions, grantResults);
}
Implement Barcode Scanning
Finally, time to implement the real magic.
Go back to the shared project and to the MainPage.xaml file. Under the barcode image view, we will now add a scan view. This is nothing more than simply adding this line of XAML:
<zxing:ZXingScannerView x:Name="BarcodeScanView" IsVisible="false" HeightRequest="200" OnScanResult="Handle_OnScanResult" />.
We give it a name so we can reference it from code-behind and just like the image view, set the IsVisible to false to only let it show up when we need to.
Set a HeightRequest to make sure it will show up in our layout. With the OnScanResult, set up the event that will be triggered whenever the camera discovers a barcode. While I am not doing this now, you can also provide an options object to the scanner view which lets you specify which barcode formats to detect, amongst other things. Let’s have a look at this method.
In our code-behind, first let’s add the code for the “Scan QR Code” button. With this button we will show the camera view and start scanning. To hook it up, add the Clicked attribute to the button and implement the event handler. I trust you know how to do this by now, else have a look at the button to generate the QR code. The implemented event handler can be seen underneath.
public void Scan_Barcode(object sender, EventArgs e)
{
    BarcodeImageView.IsVisible = false;
    BarcodeScanView.IsVisible = true;
    BarcodeScanView.IsScanning = true;
}
Notice that I hide the image view – in case the user generated a barcode before this – and how I show the scanner view. Additionally, I set the IsScanning property to true. This tells the scanner view to start the camera feed and start looking out for barcodes. Each time a barcode is recognized within the camera’s viewport, the scanner view’s event will be invoked.
Now we will add the method we mentioned in the OnScanResult attribute earlier. This is the event whenever a barcode is spotted. Underneath you will find the code for this method. I will walk you through the implementation.
public void Handle_OnScanResult(Result result)
{
    if (string.IsNullOrWhiteSpace(result.Text))
        return;
    if (!result.Text.ToUpperInvariant().StartsWith("WIFI:", StringComparison.Ordinal))
        return;
    var ssid = GetValueForIdentifier('S', result.Text);
    var security = GetValueForIdentifier('T', result.Text);
    var password = GetValueForIdentifier('P', result.Text);
    var ssidHidden = GetValueForIdentifier('H', result.Text);
    Device.BeginInvokeOnMainThread(() =>
    {
        Ssid.Text = ssid;
        switch (security)
        {
            case "WPA":
                Security.SelectedIndex = 0;
                break;
            case "WEP":
                Security.SelectedIndex = 1;
                break;
            default:
                Security.SelectedIndex = 2;
                break;
        }
        Password.Text = password;
        HiddenSsid.IsToggled = !string.IsNullOrWhiteSpace(ssidHidden) && ssidHidden.ToUpperInvariant() == "TRUE";
    });
}
The Handle_OnScanResult method is invoked each time a barcode is detected. Note, this can be multiple times one after the other. On the scanner view, you can set a delay to wait between scans. By default, this delay isn’t long, so the event might be fired multiple times after each other quickly. If that is not desirable, you can increase the delay. Simply set the IsScanning property to false or implement a check to see if the incoming result is different from the last result. This is totally up to you.
In my implementation, I start with two simple validation checks: is the incoming string value not empty, and does it start with WIFI: .
If these checks are true, I know it is a Wi-Fi connection string. Then, I try to extract all the different sections from the connection string and put it in the right UI controls. For this, I wrote a helper method called GetValueForIdentifier. This is not really important for the barcode scanning, but is important for the sample to work. I won’t go into the code here, but you can find it on the repository.
After I have retrieved all the values, I start assigning them to the controls. This needs to be wrapped in a Device.BeginInvokeOnMainThread call. Because the event is fired in a background thread and the UI can only be updated from the main thread, I need to use this Xamarin.Forms built-in helper method. This method will invoke all code inside it on the main thread. In Figure 5, you can see that a QR code being scanned has filled the UI with the actual values.
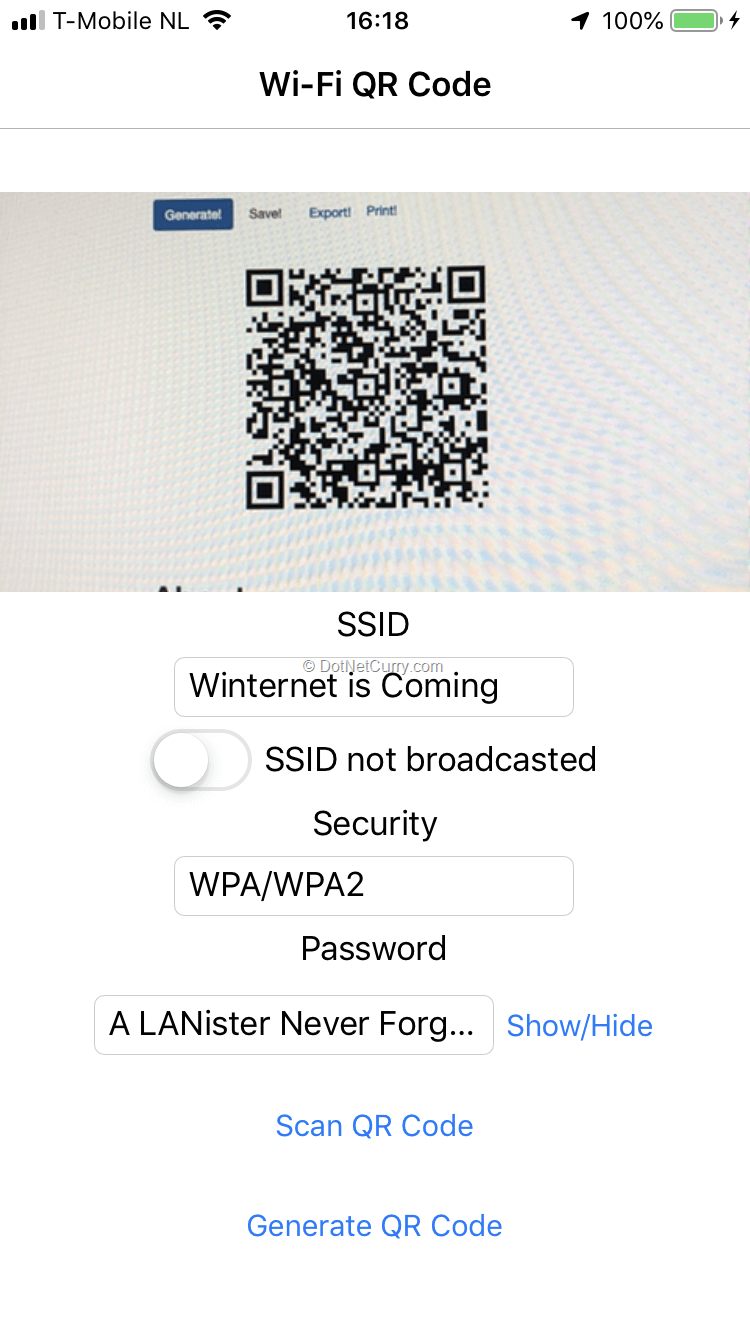
Figure 5: Scanning a QR code containing a Wi-Fi connection string now fills our UI with the values
This concludes this article for now. There are some options which allow you to scan with the front camera, toggle the torch for better lighting and a few others, but I’ll leave that for you to discover yourself.
One thing that is important to note is the fact that besides the scanner view, there is also a scanner page. Instead of a small camera view that fits in your design, you can also scan with a full page. Here you can also supply an overlay with some instructions and indicators for the user on how to work with your barcode scanner.
Summary
In this article, I have shown you what barcodes are and how they can be used. More importantly, we have learned how we can generate and scan barcodes in our own apps. Through an example that allows us to scan and generate barcodes that connect us to a Wi-Fi connection, we have seen how easy it is to integrate this functionality. While there are a number of different things you can still do, the gist of it will be the same. Just the format of the barcode will be different.
The library we used, ZXing has some strange bugs. I’m not sure if that is in the original ZXing library, or rather in the Xamarin library wrapper. Luckily, there are no critical bugs that we cannot work around. Another option would be to use an alternative library like Scandit. I do not have any hands-on experience with that one yet, but it seems it can do practically the same thing. If you choose to use that library, please let me know how it works for you.
I hope you can use this knowledge to your advantage and I am always curious to see what you build. Be sure to reach out to me on Twitter (@jfversluis) with any questions or anything else you want to let me know. All code from this article can be found on: https://github.com/jfversluis/WifiBarcodeSample.
This solution and a couple more can be found in my latest book Xamarin.Forms Solutions, full of solutions for Xamarin.Forms applications. So, if you want to know more, please find it on Amazon: https://amzn.to/2Z0KW8Z
This article was technically reviewed by Mayur Tendulkar.
This article has been editorially reviewed by Suprotim Agarwal.
C# and .NET have been around for a very long time, but their constant growth means there’s always more to learn.
We at DotNetCurry are very excited to announce The Absolutely Awesome Book on C# and .NET. This is a 500 pages concise technical eBook available in PDF, ePub (iPad), and Mobi (Kindle).
Organized around concepts, this Book aims to provide a concise, yet solid foundation in C# and .NET, covering C# 6.0, C# 7.0 and .NET Core, with chapters on the latest .NET Core 3.0, .NET Standard and C# 8.0 (final release) too. Use these concepts to deepen your existing knowledge of C# and .NET, to have a solid grasp of the latest in C# and .NET OR to crack your next .NET Interview.
Click here to Explore the Table of Contents or Download Sample Chapters!
Was this article worth reading? Share it with fellow developers too. Thanks!
Gerald Versluis (@jfversluis) is a full-stack software developer and Microsoft MVP (Xamarin) from Holland. After years of experience working with Xamarin and .NET technologies, he has been involved ina number of different projects and has been building several apps. Not only does he like to code, but he is also passionate about spreading his knowledge - as well as gaining some in the bargain. Gerald involves himself in speaking, providing training sessions and writing blogs (https://blog.verslu.is) or articles in his free time. Twitter: @jfversluis Email: gerald[at]verslu[dott]is . Website:
https://gerald.verslu.is