This is the third entry in a series of articles taking a look at all the different strategies for testing web applications in general and ASP.NET Core applications in particular.
A testing strategy comprising unit, integration and E2E tests was introduced for ASP.NET Core Applications, with earlier articles covering both unit (bit.ly/dnc-aspcore-unit) and integration testing (bit.ly/dnc-aspcore-integration). In this article, we will now take a look at E2E (end to end) tests.
The source code is available on its GitHub project.
Are you keeping up with new developer technologies? Advance your IT career with our Free Developer magazines covering C#, Patterns, .NET Core, MVC, Azure, Angular, React, and more. Subscribe to the DotNetCurry (DNC) Magazine for FREE and download all previous, current and upcoming editions.
The role of End-to-End (E2E) tests
In the previous articles, we discussed the idea of defining a testing strategy involving unit, integration and E2E tests that roughly followed a pyramidal structure with unit tests at the bottom and end-to-end tests at the top:
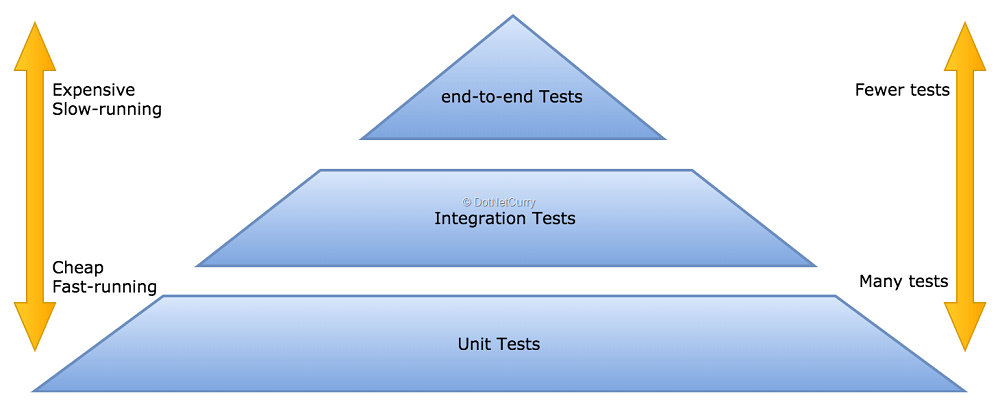
Figure 1: the testing pyramid
By their very nature, E2E tests are the closest to how a user interacts with the application. This makes them an expensive but powerful tool:
- They are expensive to write and maintain as they become tightly coupled with the user interface. Since the UX is one of the more volatile aspects of the application, these tests are under constant danger of being broken by UX changes.
- They involve a real browser running against your application, so they are the slowest tests in your strategy. They also depend on UX behavior which means they often have to wait for actions to complete or the interface to update
- However, they are also very valuable as we get feedback closer to what a user might experience when using our application. At the end of the day, our application is intended to be used by our users and we need to make sure things are working from their perspective.
Given these characteristics, we need to strike the proper balance between cost and value when adding E2E tests. Having no such tests would be a risk but having too many of them would be very expensive! (In some cases you can ignore E2E tests altogether, for example applications without UX that just publish an API for other systems to integrate with).
Let’s ensure we have proper testing coverage for our business logic, corner cases and component interactions with unit and integration tests.
We can then use the E2E tests to ensure the most important actions users would take from their perspective. Applied to our running example of the BlogPlayground application, we can use E2E tests to ensure:
- Users can login and logout
- Users can see the list of articles
- Users can open an article
- Users can add an article
- Users can remove an article
Basically, we are smoke testing the basic functionality of the application in its most simple form, without worrying much about corner cases or business rules.
Selenium and the Web Driver API
Selenium is a tool that lets you automate browsers, whereas the Web Driver API is a standard for automating browsers. It so happens that Selenium implements the Web Driver API and can abstract your tests from many different target browsers.
While these tools can be used to automate any tasks which usually involve a human interacting with a browser, they are most widely used for testing web applications.
When using Selenium, you need to stand up a Selenium server which connects to a browser via a web driver. Your test interacts with the selenium server through the JSON Web Driver API, which in turn controls the browser through a browser-specific driver that also implements the Web Driver API.
In order to write tests, you can use pretty much any language since Selenium has client libraries available for most languages like C#, JavaScript, Python, Ruby or Java.

Figure 2: Selenium based tests
While your tests could directly use the browser-specific web driver, introducing the Selenium server in the middle is a powerful abstraction that makes your tests independent of the target browser and environment.
You can write your test once using the Selenium client library and run against any target environments such as different desktop browsers on different operating systems or even browsers in mobile devices, simply letting the Selenium server know where to find the appropriate drivers and which one to use during that particular test run.

Figure 3: Selenium drivers allow the same test to run against different environments
It is now so common to use Web Driver based tests for verifying your application that there are many cloud services that let you run your tests against many different browsers/devices, both simulated or on real hardware. These include platforms like BrowserStack, Sauce Labs or CrossBrowserTesting just to name a few.
In this article we will use Nightwatch.js, a framework that lets you write Selenium Web Driver tests using a JavaScript library and we will see how to run these tests from the command line (either as a developer or from a CI server).
Preparing the ASP.NET Core application for E2E tests
In order to make any automated test stable, we need to keep as many factors under control as possible. Amongst other things, this means being able to control the state of the system our tests will run against.
For example, if we want our tests to be able to login, there needs to be an account created with the right username and password. We might also want to make sure test data shows up on different pages for which we would need to seed the system with some predefined test data.
This greatly depends on how we are going to manage the server, our E2E tests run against:
- We can deploy a test environment (separated from our development/production environments) which is used for the sole purpose of E2E testing, with tests directing the browsers to the URL of said environment. Our CI/testing process needs to make sure the state of the system is the right one before the tests can run, using methods like seeding scripts, tests API and/or backups.
- We can stand up a new environment from scratch, run our tests against it and shut it down at the end. We can include seeding scripts as part of the startup process and we don’t need to worry about any previous state nor cleaning afterwards as the whole environment is shutdown.
In this article, I will follow the second option as it is very similar to what we did for the integration tests. In fact, we can reuse the same predefined data and seeding script. We will basically use a Kestrel server with a SQLite in-memory database, which will be started at the beginning of the test run and shutdown at the end.
Note: There are very little changes in terms of how the tests are written or executed when following a different option. Your tests would just use a different URL and you would come up with a different set of steps/scripts/processes to ensure the state of the system is the desired one.
Let’s start by adding a new empty ASP.NET Core project to our solution, named BlogPlayground.E2ETest. Add a reference to the existing BlogPlayground and BlogPlayground.IntegrationTest projects.
Now we can replace the predefined Startup class with one that basically extends the regular Startup class by setting up a SQLite in-memory database and running the database seeder script that inserts the predefined data:
public class TestStartup: BlogPlayground.Startup
{
    public TestStartup(IConfiguration configuration) : base(configuration)
    {
    }

    public override void ConfigureDatabase(IServiceCollection services)
    {
        // Replace default database connection with SQLite in memory
        var connectionStringBuilder = new SqliteConnectionStringBuilder { DataSource = ":memory:" };
        var connection = new SqliteConnection(connectionStringBuilder.ToString());
        services.AddDbContext<ApplicationDbContext>(options => options.UseSqlite(connection));

        // Register the database seeder
        services.AddTransient<DatabaseSeeder>();
    }

    public override void Configure(IApplicationBuilder app, IHostingEnvironment env, ILoggerFactory loggerFactory)
    {
        // Perform all the configuration in the base class
        base.Configure(app, env, loggerFactory);

        // Now create and seed the database
        using (var serviceScope = app.ApplicationServices.GetRequiredService<IServiceScopeFactory>().CreateScope())
        using (var dbContext = serviceScope.ServiceProvider.GetService<ApplicationDbContext>())
        {
            dbContext.Database.OpenConnection();
            dbContext.Database.EnsureCreated();

            var seeder = serviceScope.ServiceProvider.GetService<DatabaseSeeder>();
            seeder.Seed().Wait();
        }
    }
}
Next, we need to update the predefined Program to launch a Kestrel server using the TestStartup class we have just created. This also needs to include the UseContentRoot workaround that allows the Razor views declared on the BlogPlayground project to render correctly when launching this server:
public class Program
{
    public static void Main(string[] args)
    {
        BuildWebHost(args).Run();
    }

    public static IWebHost BuildWebHost(string[] args)
    {
        // To avoid hardcoding path to project, see: https://docs.microsoft.com/en-us/aspnet/core/mvc/controllers/testing#integration-testing
        var integrationTestsPath = PlatformServices.Default.Application.ApplicationBasePath; // e2e_tests/bin/Debug/netcoreapp2.0
        var applicationPath = Path.GetFullPath(Path.Combine(integrationTestsPath, "../../../../BlogPlayground"));

        return WebHost.CreateDefaultBuilder(args)
                .UseStartup<TestStartup>()
                .UseContentRoot(applicationPath)
                .UseEnvironment("Development")
                .Build();
    }
}
This process should result very similar to the one we followed for standing up a server, our integration tests could run against. The only difference is that now we will be running a real Kestrel server in its own process (instead of the TestServer) and a SQLite database (instead of the limited EF in-memory one).
Once compiled, you should be able to run this project from either Visual Studio or the command line with dotnet run. Double check you can cd into the new project folder and run it from the command line as this is exactly what we will do at the beginning of our test run!

Figure 4: making sure the test server starts with dotnet run
Writing and running Selenium tests with Nightwatch.js
Now we have everything ready to start writing our Selenium-based tests.
I have chosen Nightwatch.js, a popular JavaScript framework that allows you to write your tests using a nicer API, as compared to barebones Selenium.
Note: Nightwatch allows you to have access to the underlying Selenium API when needed.
There are several reasons why I have ended up using Nightwatch.js and JavaScript for this task:
- Its dynamic nature makes it easier to write and maintain tests that depend on something as volatile as the UX, while at the same time keeping your test code clean with custom commands, assertions and page objects.
- Nightwatch syntax makes it really well suited for browser-based tests, cleanly managing CSS/XPath selectors and asynchronous actions.
- Nightwatch is able to start/stop the Selenium process if required. It is also easy to integrate with cloud providers like Sauce Labs or BrowserStack.
- It is closer to the code used by the UX itself which means no context switching between writing frontend and test code. It also makes it a breeze to write JavaScript code that can be run in the browser as part of your test.
- The scripting capabilities of Node make it easier to automate pre-processing steps like standing up the server while ensuring it runs from the command line and can be easily added to any CI process.
You could argue that writing XUnit tests in C# that use the Selenium library is equally valid, and if that works better for you and your team, please use that by all means. The underlying principles are the same.
Use the tools that work for you as long as you reach the same test coverage and are satisfied with the code quality and maintainability of your tests.
Prerequisites to run Selenium based tests
In order to run Selenium based tests, we need to run a selenium server, which is written in Java. This means we need to install Java on our development environment (and the CI server which will run the tests unless you use a cloud service).
Since Nightwatch.js is a JavaScript framework, we will also need to install Node.js on the same machines.
Once installed, let’s start by adding a package.json file to our BlogPlayground.E2ETest project. This is the file that Node’s npm uses to manage dependencies and define scripts. You can use VS “Add New Item…” command for that, or run the npm init command from the project folder.
Next, let’s add the required Node dependencies for Nightwatch.js and Selenium by running the following command on the project folder:
npm install --save-dev nightwatch selenium-server-standalone-jar
We will be running the tests against Chrome and Edge, which means we are going to need the web drivers for these two browsers.
Add a new folder named selenium-drivers to the project and download the latest versions of the drivers (assuming you have the latest versions of the browsers installed). The binaries can be downloaded from their official pages:
Now we need to add a configuration file that lets Nightwatch know where to look for test files, where to find the Selenium server, which browsers to use, and so on. Although you can read more about the configuration of Nightwatch on its documentation, I have annotated the code so it should be easy to follow:
const seleniumJar = require('selenium-server-standalone-jar');
const settings = {
  // Nightwatch global settings
  src_folders: ['./tests'],
  output_folder: '.test-results/',

  // Nightwatch extension components (commands, pages, assertions, global hooks)
  globals_path: './globals.js',
  //custom_commands_path: './commands',
  //page_objects_path: './pages',
  //custom_assertions_path: './assertions'

  // Selenium settings
  selenium: {
    start_process: true,
    server_path: seleniumJar.path,
    start_session: true,
    log_path: '.test-results/',
    port: process.env.SELENIUM_PORT || 4444,
    host: process.env.SELENIUM_HOST || '127.0.0.1',
    cli_args: {
      'webdriver.edge.driver': './selenium-drivers/MicrosoftWebDriver.exe',
      'webdriver.chrome.driver': ''
    }
  },

  test_settings: {
    default: {
      // Nightwatch test specific settings
      launch_url: process.env.LAUNCH_URL || 'http://localhost:56745',
      selenium_port: process.env.SELENIUM_PORT || 4444,
      selenium_host: process.env.SELENIUM_HOST || 'localhost',
      screenshots: {
        enabled: true,
        on_failure: true,
        on_error: true,
        path: '.test-results/screenshots'
      },
      // browser related settings. To be defined on each specific browser section
      desiredCapabilities: {
      },
      // user defined settings
      globals: {
        window_size: {
          width: 1280,
          height: 1024
        },
        start_app: process.env.LAUNCH_URL ? false : true,
        login_url: (process.env.LAUNCH_URL || 'http://localhost:56745') + '/Account/Login',
        user_info: {
          email: 'tester@test.com',
          password: '!Covfefe123',
        },
        navigation_timeout: 5000,
        initial_load_timeout: 10000
      }
    },
    // Define an environment per each of the target browsers
    chrome: {
      desiredCapabilities: {
        browserName: 'chrome',
        javascriptEnabled: true,
        acceptSslCerts: true,
        chromeOptions: {
          args: ['--headless'],
        }
      },
    },
    edge: {
      desiredCapabilities: {
        browserName: 'MicrosoftEdge',
        javascriptEnabled: true,
        acceptSslCerts: true
      }
    }
  }
};

//make output folder available in code
//so we can redirect the dotnet server output to a log file there
settings.test_settings.default.globals.output_folder = settings.output_folder;

//Set path to chromedriver depending on host OS
var os = process.platform;
if (/^win/.test(os)) {
  settings.selenium.cli_args['webdriver.chrome.driver'] = './selenium-drivers/chromedriver-2.35-win.exe';
} else if (/^darwin/.test(os)) {
  settings.selenium.cli_args['webdriver.chrome.driver'] = './selenium-drivers/chromedriver-2.35-mac.exe';
} else {
  settings.selenium.cli_args['webdriver.chrome.driver'] = './selenium-drivers/chromedriver-2.35-linux.exe';
}

module.exports = settings;
There are a few points worth highlighting:
- In the global setting section, you can see the path to a folder where we can define custom commands, assertions and pages. These should exist, so we will uncomment them once we add one of those.
- A number of settings have a default value that can be overridden by setting environment variables, more specifically the LAUNCH_URL, SELENIUM_HOST and SELENIUM_PORT. This allows the tests to be dockerized and even target different servers from a CI process by setting these ENV variables.
- The section annotated as “user defined settings” lets you define any data you later want to use in any of your tests, for example I have added the credentials of one of the test users there that our seeding scripts will create.
- The --headless argument for Chrome allows it to run in headless mode. You won’t see any new Chrome window appearing in your system while the test runs, which is desirable on any kind of CI server. If you are curious and want to see the Chrome window while running, comment that line!
Starting the server as part of the test run
Now we need to add another file called globals.js where we can add global test hooks which are functions that run:
- Before and after the entire test run
- Before and after each test
This file is conveniently referenced from the configuration file as the globals_path setting and has the following rough structure (before we start adding our code):
module.exports = {
    // External before hook is ran at the beginning of the tests run, before creating the Selenium session
    before: function (done) {
        done();
    },

    // External after hook is ran at the very end of the tests run, after closing the Selenium session
    after: function (done) {
        done();
    },

    // This will be run before each test file is started
    beforeEach: function (browser, done) {
        done();
    },

    // This will be run after each test file is finished
    afterEach: function (browser, done) {
        //close the browser window then signal we are done
        browser
            .end()
            .perform(() => done());
    }
};
Basically, what we need is to run the dotnet run command before the test run, and to kill that process at the end of the test run. We will use Node’s childProcess module, in concrete its spawn method, piping its output to a log file:
const childProcess = require('child_process');
const path = require('path');
const fs = require('fs');

let dotnetWebServer = null;
let dotnetWebServerStarted = false;

function startWebApplication(outputFolder, done) {
  const logFile = path.join(outputFolder, 'server.log');
  console.log(`Starting web application. Log found at: ${logFile}`);

  // Start web app in separated process.
  dotnetWebServer = childProcess.spawn("dotnet", ["run"]);

  // Fail test run startup if the server dies before it got properly started
  dotnetWebServer.on('close', (code) => {
    if (code !== 0 && !dotnetWebServerStarted) {
      console.error(`Could not start dotnet server. Exited with code ${code}. Check log at ${logFile}`);
      process.exit(-1);
    }
  });

  // Do not start the test until we see the "Application started" message from dotnet
  dotnetWebServer.stdout.on('data', (chunk) => {
    if (chunk.toString().includes("Application started")) {
      dotnetWebServerStarted = true;
      done();
    }
  });

  // Redirect the standard output of the web application to a log file
  const appLogPath = path.join(__dirname, logFile);
  const childServerLog = fs.createWriteStream(appLogPath);
  dotnetWebServer.stdout.pipe(childServerLog);
  dotnetWebServer.stderr.pipe(childServerLog);
}
Now we can update the before and after functions to ensure the dotnet server is started/stopped at the beginning/end of the test run:
before: function (done) {
  startWebApplication(this.output_folder, done);
},

after: function (done) {
  const os = process.platform;
  if (/^win/.test(os)) childProcess.spawn("taskkill", ["/pid", dotnetWebServer.pid, '/f', '/t']);
  else dotnetWebServer.kill('SIGINT');
  done();
},
Finally, we might want to run our test against an environment which isn’t started by the tests themselves, for example a test environment deployed by CI or running in a separated docker container.
We can use our configuration file to setup a start_app flag which will depend on whether a specific target URL is provided as an environment variable or not, and then check that variable in our before/after global functions:
// user defined settings in nightwatch.config.js
globals: {
  …
  start_app: process.env.LAUNCH_URL ? false : true,
  …
}

// Global hooks in global.js
before: function (done) {
  if (this.start_app) {
    startWebApplication(this.output_folder, done);
  } else {
    done();
  }
},

after: function (done) {
  if (this.start_app) {
    const os = process.platform;
    if (/^win/.test(os)) childProcess.spawn("taskkill", ["/pid", dotnetWebServer.pid, '/f', '/t']);
    else dotnetWebServer.kill('SIGINT');

    done();
  } else {
    done();
  }
},
Writing and running our first test
It is time to add our first test.
Create a folder named tests and a new file inside it named 0.smoke.test.js. Now let’s write a simple test that simply verifies if the browser loads the home page and we get the right title:
module.exports = {
  '@tags': ['smoke-test', 'home-page'],

  'home page can be opened with default url': function (browser) {
      browser
          .url(browser.launchUrl)
          .waitForElementVisible('body', browser.globals.initial_load_timeout)
          .assert.title('Home Page - BlogPlayground')
          .assert.containsText('.body-content #myCarousel .item:first-child', 'Learn how to build ASP.NET apps that can run anywhere.');
  },
};
I hope the test is easy to understand, but basically we are using Nightwatch’s commands and assertions to write our test.
These are convenience methods provided on top of the Web Driver protocol, but you also have access to the underlying Web Driver using the same browser object. Feel free to read around the documentation and see other test examples.
Before we can run the test, we are going to define npm commands that will allow us to easily trigger a test run against Chrome or Edge:
"scripts": {
  "test:chrome": "nightwatch --config ./nightwatch.config.js --env chrome",
  "test:edge": "nightwatch --config ./nightwatch.config.js --env edge"
},
You can now switch to the command line and run any of the following commands:
npm run test:chrome
npm run test:edge

Figure 5: running the first test
Before we move on, you might be wondering how to run specific tests, or exclude certain tests, etc.
Nightwatch allows several command line options for such purposes which can be added to any of those commands, for example (the double pair of dashes is intentional):
# runs only tests with the ‘smoke-test’ tag
npm run test:edge -- --tag smoke-test

# runs only test with specific file name
npm run test:edge -- --test tests/0.smoke.test.js
This might not only be useful for developers, but also to run different sets of tests on different stages of a complex CI process. For example, a server might be started exclusively for the test run and the full suite is run, while a much smaller set of smoke tests might be run against a prod/staging environment after each deployment.
Handling login through a custom command and a global test hook
Some of the pages we would like to test in our sample project like adding/removing an article requires to be logged in as a valid user. By starting the server and seeding the database, we know certain user accounts will exist.
Now, we can add those credentials to the nightwatch’s global settings and create a custom login command. Let’s create a commands folder with a file login.js inside. Remember to uncomment the custom_command_path settings inside nightwatch.config.js.
The structure of a custom command in nightwatch is the following:
exports.command = function (userInfo) {
  const browser = this;

  // Use default nightwatch API
  browser
   .url(…)
   .waitForElementVisible(…)
   .click(…);

  return this; // allows the command to be chained.
};
As the file name is login.js, the command will be available in test code as browser.login(userInfo);
Let’s implement that command by navigating to /Account/Login, filling the login form with the test user credentials and verifying we are redirected back to the login page, but now logged in as the expected user:
exports.command = function (userInfo) {
  const browser = this;
  browser
      // go to login url
      .url(browser.globals.login_url)
      .waitForElementVisible('.form-login', browser.globals.initial_load_timeout)
      // fill login form
      .setValue('input[name=Email]', userInfo.email)
      .setValue('input[name=Password]', userInfo.password)
      .click('.form-login button.btn-default')
      .pause(1000)
      // After login, we should land in the home page logged in as the test user
      .assert.title('Home Page - BlogPlayground')
      .assert.containsText('.navbar form#logout-form', 'Hello Tester!');

  return this; // allows the command to be chained.
};
Let’s update our smoke test to verify users can login and logout from our application, taking the user credentials from the global settings defined in nightwatch.config.js. In Nightwatch, each test file is considered a test which can contain multiple steps which run in sequence.
This way, we can update the smoke test with an initial step that tries to login, a second step that verifies that the home page can be loaded, and a final step that verifies we can logout:
module.exports = {
  '@tags': ['smoke-test', 'home-page'],

  'can login with test user': function (browser) {
      browser.login(browser.globals.user_info);
  },

  'home page can be opened with default url': function (browser) {
      browser
          .url(browser.launchUrl)
          .assert.title('Home Page - BlogPlayground')
          .waitForElementVisible('body', browser.globals.navigation_timeout)
          .assert.containsText('.body-content #myCarousel .item:first-child', 'Learn how to build ASP.NET apps that can run anywhere.');
  },

  'can logout': function (browser) {
      browser
          .assert.containsText('.navbar form#logout-form', 'Hello Tester!')
          .click('.navbar form#logout-form button[type=submit]')
          .waitForElementVisible('.navbar .navbar-login', browser.globals.initial_load_timeout)
          .assert.containsText('.navbar .navbar-login', 'Log in')
          .assert.attributeContains('.navbar .navbar-login .login-link', 'href', browser.globals.login_url);
  }
};
Finally, we can update the global beforeEach function in globals.js to automatically run the login command before starting any test, other than the smoke test. This way, we can assume we are logged in as the test user on any test:
beforeEach: function (browser, done) {
  // Every test will need to login with the test user (except in the smokeTest where login is part of the test itself)
  if ( !browser.currentTest.module.endsWith("smoke.test")) {
      browser.login(browser.globals.user_info);
  }

  //Once all steps are finished, signal we are done
  browser.perform(() => done());
},
With these changes, we are now ready to write the final set of tests for the articles pages.
Testing the Articles pages
Start by adding a new test file articles.test.js inside the tests folder. Inside this test, we will add several steps that verify the following process:
- The articles list page loads and displays several predefined articles
- A new article can be added
- New articles appear on the list page and the recent articles sidebar
- An article can be opened by navigating to its details page
- An article can be removed
Implementing these steps is a matter of using the right CSS selector to find the appropriate elements from the page so you can click on them, set their value or verify their contents are as expected.
A simple implementation is shown here for completeness:
const testArticle = {
  title: 'Testing with Nightwatch',
  abstract: 'This is an automated test',
  contents: 'Verifying articles can be added'
}

module.exports = {
  '@tags': ['articles-page'],

  'Articles can be opened with its url': function (browser) {
    browser
      // Open the articles list page
      .url(`${browser.launchUrl}/Articles`)
      .assert.title('Articles - BlogPlayground')
      .waitForElementVisible('body', browser.globals.navigation_timeout)
      // Verify at least the 2 default articles show up in the list
      .expect.element('.body-content .article-list li:nth-child(1)').to.be.present;
  },

  'New Articles can be added': function (browser) {
    browser
      // Go to the create page
      .url(`${browser.launchUrl}/Articles/Create`)
      .assert.title('Create - BlogPlayground')
      .waitForElementVisible('body', browser.globals.navigation_timeout)
      // Enter the details and submit
      .setValue('.body-content input[name=Title]', testArticle.title)
      .setValue('.body-content textarea[name=Abstract]', testArticle.abstract)
      .setValue('.body-content textarea[name=Contents]', testArticle.contents)
      .click('.body-content input[type=submit]')
      // Verify we go back to the articles list
      .pause(browser.globals.navigation_timeout)
      .assert.title('Articles - BlogPlayground');
  },

  'New Articles show in the Articles page': function (browser) {
    browser
      .assert.containsText('.body-content .article-list li:first-child', testArticle.title)
      .assert.containsText('.body-content .article-list li:first-child', testArticle.abstract)
      .assert.containsText('.body-content .article-list li:first-child .author-name', 'Tester');
  },

  'Articles can be read in their details page': function (browser) {
    browser
      // Open the article from the lisdt
      .click('.body-content .article-list li:first-child h4 a')
      // Verify navigation to the article details and the right contents are displayed
      .pause(browser.globals.navigation_timeout)
      .assert.title(`${testArticle.title} - BlogPlayground`)
      .assert.containsText('.body-content .article-summary', testArticle.title)
      .assert.containsText('.body-content .article-summary', testArticle.abstract)
      .assert.containsText('.body-content .article-summary .author-name', 'Tester')
      .assert.containsText('.body-content .markdown-contents', testArticle.contents);
  },

  'Articles can be removed': function (browser) {
    browser
      // Click remove on article details
      .click('.body-content .sidebar button.dropdown-toggle')
      .waitForElementVisible('.body-content .sidebar ul.dropdown-menu', browser.globals.navigation_timeout)
      .click('.body-content .sidebar ul.dropdown-menu li:last-child a')
      // Verify navigation to the confirmation page and click delete
      .pause(browser.globals.navigation_timeout)
      .assert.title('Delete - BlogPlayground')
      .click('.body-content input[type=submit]')
      // Verify navigation to articles list and that it disappeared from the list
      .pause(browser.globals.navigation_timeout)
      .assert.title('Articles - BlogPlayground')
      .assert.containsText('.body-content .article-list li:first-child', 'Test Article 2');
  }
};
Go ahead and run the tests again, you should see them all passing in your console output:

Figure 6: full test run
A note on CSS selectors and tests maintainability
As you might notice, the tests are hugely dependent on the HTML structure and attributes of the application. You really want your selectors as vague as possible to avoid them breaking with the simplest of refactoring. Sometimes this will mean adding ids or class names to elements, so your tests can find them without having to assume too much about the HTML structure of your page.
For example, instead of a selector like '.body-content .sidebar button.dropdown-toggle' it might be a good idea to add an id to the dropdown with article actions and simply use '#articles-actions-dropdown'.
This allows you to redesign your article details page and the test won’t care as long as there is a dropdown with such an id, while with the first selector, your test might break if the dropdown uses a link tag or is moved away from the sidebar.
Another consideration is the repetition of selectors inside a test file like articles.test.js.
You might want to extract constants with those selectors or even better define Nighwatch custom pages that explicitly provide elements to interact with and encapsulate methods to perform actions on those pages. This allows you to use Page Models in your test, instead of directly interacting with the browser API.
As you write more tests and your test suite grows, you really want to leverage Nightwatch’s extensibility and create custom commands, pages and assertions so your test code stays clean and maintainable.
This is one of the reasons for using a framework like Nightwatch over directly using the Web Driver API.
Conclusion
Testing is hard, there is no escape from this. And within the different types of tests, End-to-end (E2E) tests are the ones that present the biggest challenge. Not only are they closely dependent on the UI (which makes them very brittle), they also involve the largest number of moving parts.
These tests require your application to run on a real (or as close as possible/feasible) environment and involve a real browser (most likely multiple different browsers), a driver for that browser and a Selenium environment. That’s a fairly large number of processes and services, all of them required to work in order for your tests to run and remain stable!
There are many ways you can write E2E tests using the Web Driver protocol, of which we have seen one possible approach with Nightwatch and Selenium.
While my experience with these tools has been positive and made my life easier managing this particular challenge, you might prefer to use other tools. That’s absolutely fine, since the principles are the same and your main challenge will be finding the right balance between coverage and the creation/maintenance cost of the tests.
It is an interesting challenge but remember you can leverage the work you did with unit and integration tests. This way, it should be easier for you to keep a reduced number of E2E tests while maintaining a good overall coverage of your application.
Thanks to Damir Arh for reviewing this article.
This article has been editorially reviewed by Suprotim Agarwal.
C# and .NET have been around for a very long time, but their constant growth means there’s always more to learn.
We at DotNetCurry are very excited to announce The Absolutely Awesome Book on C# and .NET. This is a 500 pages concise technical eBook available in PDF, ePub (iPad), and Mobi (Kindle).
Organized around concepts, this Book aims to provide a concise, yet solid foundation in C# and .NET, covering C# 6.0, C# 7.0 and .NET Core, with chapters on the latest .NET Core 3.0, .NET Standard and C# 8.0 (final release) too. Use these concepts to deepen your existing knowledge of C# and .NET, to have a solid grasp of the latest in C# and .NET OR to crack your next .NET Interview.
Click here to Explore the Table of Contents or Download Sample Chapters!
Was this article worth reading? Share it with fellow developers too. Thanks!
Daniel Jimenez Garciais a passionate software developer with 10+ years of experience who likes to share his knowledge and has been publishing articles since 2016. He started his career as a Microsoft developer focused mainly on .NET, C# and SQL Server. In the latter half of his career he worked on a broader set of technologies and platforms with a special interest for .NET Core, Node.js, Vue, Python, Docker and Kubernetes. You can
check out his repos.