In the past few years, JavaScript has become crucial for creating attractive and efficient web applications.
Although JavaScript came into being in the 90s, its use for cross platform applications either at the server end or on the client side has become a standard due to creation of frameworks and libraries like jQuery, NodeJS, React, Angular etc.
Many other additional tools for supporting these frameworks have come into being which enables quick and effective testing, optimization of code, code analysis, packaging, build etc. Unfortunately, use of these frameworks is more individualistic and not treated as team work. Applications developed using Java, .NET and C++ are given the support of automation and tools for version control, build, packaging and deployment because those are treated as non-trivial applications to be developed by large teams whereas JavaScript applications do not have wide support of those same tools.
In this series of articles, I am going to step through the various services offered by Azure DevOps for applications developed using NodeJS, Angular and React. I am also going to cover support of Azure DevOps for using Gulp, TypeScript etc. for building these applications.
Assumptions
This series of articles assumes that you are familiar with JavaScript frameworks like NodeJS, Angular and React. I am not going to cover the technological aspects of using these technologies. For learning these technologies, please follow these links:
www.dotnetcurry.com/tutorials/angularjs
www.dotnetcurry.com/nodejs/1143/nodejs-tutorial-series-beginner-experienced-developer
www.dotnetcurry.com/reactjs/1353/react-js-tutorial
I also assume that you are aware of Azure DevOps and can a create Team Project in your subscription of Azure DevOps. For more information please visit https://visualstudio.microsoft.com/. I am going to use Visual Studio Code on Windows and Git repository on Azure DevOps for version control. Familiarity with these is also assumed.
Azure DevOps for JavaScript applications (Five Part Series)
In the first article of this series, I am going to do a walkthrough of the following steps:
1. Create a NodeJS app that shows a simple web page
2. Add the NodeJS app to version control (git repository) of a team project on Azure DevOps.
3. Create a Web application as App Service on Azure which will be hosting our NodeJS app
4. Create a build definition on Azure DevOps that packages the NodeJS app
5. Add a Mocha test (with Chai assertion) and run that after deployment of NodeJS app, as part of release process.
6. Create a release definition on Azure DevOps that deploys the packaged NodeJS app to the Azure App Service.
Node Application
As the first step of this walkthrough, I suggest you to create a simple NodeJS app or download a readymade app from https://github.com/Azure-Samples/nodejs-docs-hello-world. All the code in this walkthrough is from this app. After downloading it, open the app in VS Code.
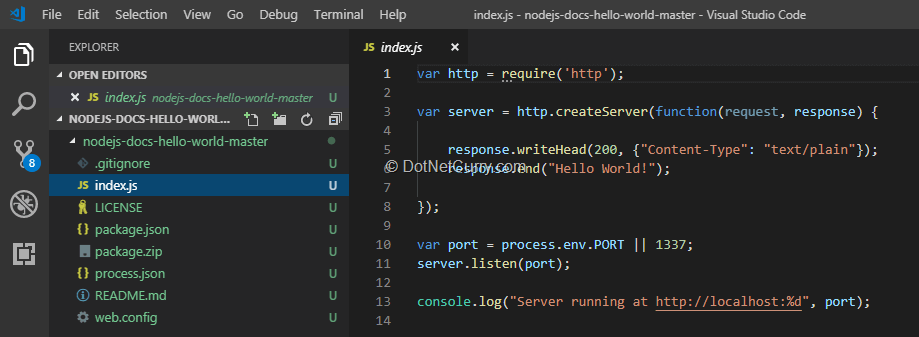
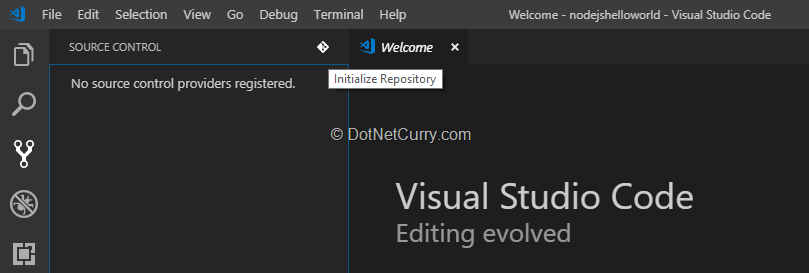
Let’s add that to our Git repository. VS Code ships with a Git source control manager (SCM) extension. We will start by initialization of our local repository and then commit the code to the local repository. To initialize the local repository, click the Source Control icon on the left and then click the git icon. After this, you can select the folder that contains the downloaded Hello World App.
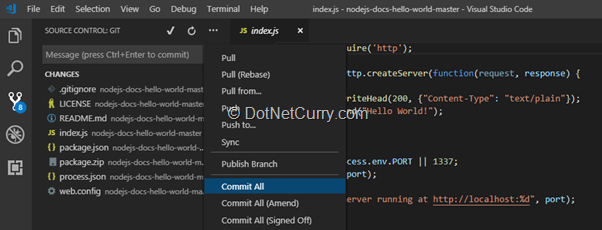
You can now commit the app by clicking “Commit all” button, located under the “more actions (…)” button. Enter a comment for the commit, for example: “NodeJS project added”.
Add the NodeJS app to the git repository of a team project on Azure DevOps
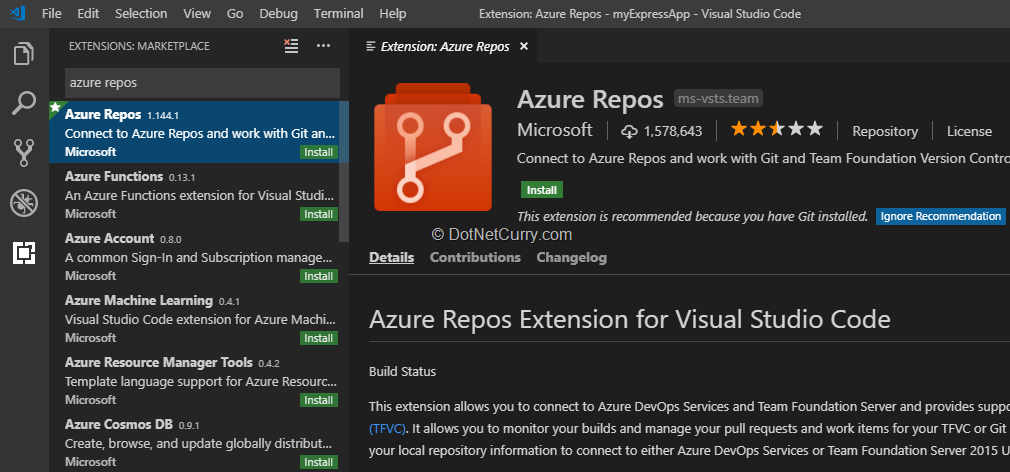
Login to your Azure DevOps subscription and create a team project. Let’s call it SSGSNodeDemo. Remember to select Git as the source control. This will automatically create a repository when the team project is created. This newly created remote repository will now have to be configured locally. If you don’t have Azure DevOps (Repos) extension installed on VS Code, this is the right time to do so.
To add the remote repository, execute the following command on the terminal (check the menu bar):
> git remote add origin

This forms a link between your local repository and the remote repository. When you push or pull the code, it will be to / from that remote repository.
Once the remote/origin is configured, you can push the committed code to that remote repository.
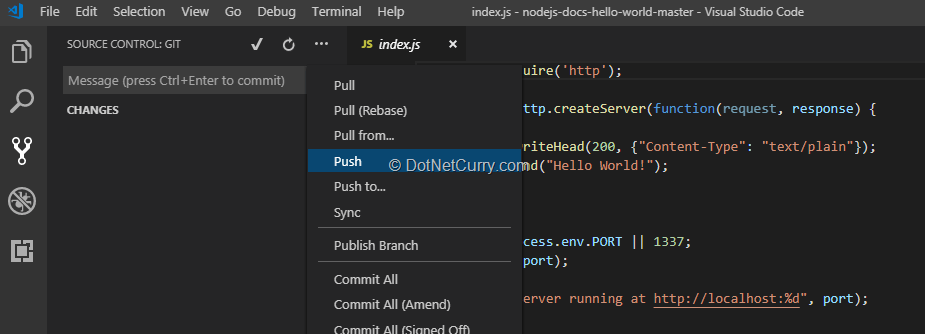
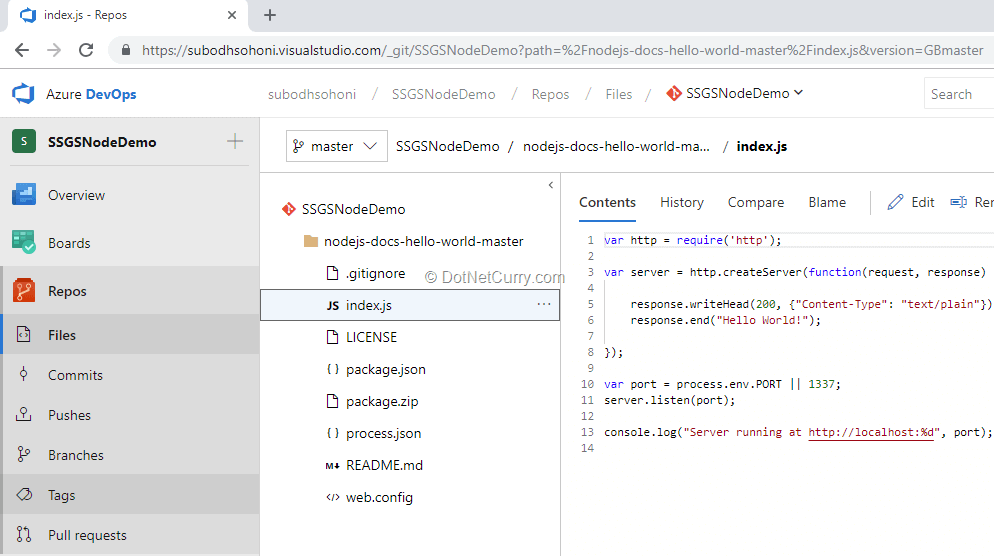
If you now refresh the Repos page on your team project, it will show you the code that is pushed to the remote repository.
Create a Web app as App Service on Azure which will be hosting NodeJS app
You will be hosting your app on Azure App Service as a web application. You can login to your Azure Account in the portal and create a new Web App. After creating the app, under the Application Settings, add a new setting named WEBSITE_NODE_DEFAULT_VERSION. Give it a value according to your node version, say, 8.9.4.
Now our application is ready to run! But it does not have any code to run!
When we deploy our NodeJS app, it will run in the IISnode which is the supported node environment on Azure App Service. In practice, this means you’ll need a specific web.config file in your application root folder. Fortunately, this file is already included in the application you downloaded, so you don’t need to worry about that now.
You need to package the application as a .ZIP file which can be deployed to your App Service. We’ll use the build service of Azure DevOps to create this package and deploy it by using the Release Management service. .
Create a build pipeline on Azure DevOps that packages the NodeJS app
To create a build pipeline in your team project on Azure DevOps, browse to the Pipelines – Builds page. You can create new build pipeline by clicking the ‘New pipeline’ button.
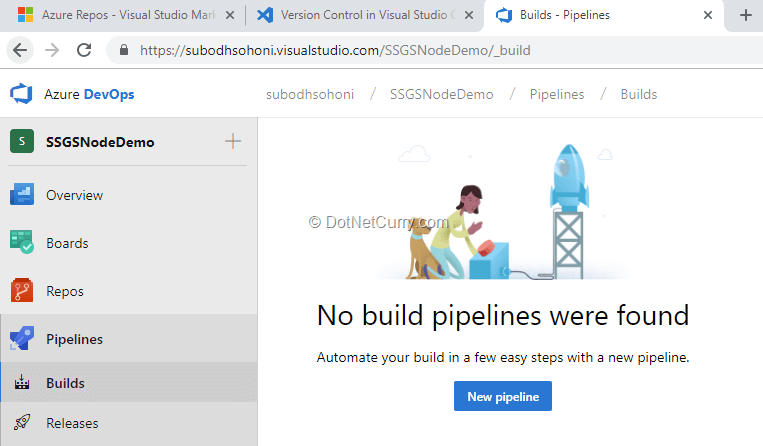
In the process of creating a new build pipeline, you will need to select the source repository. After that, you can select the template for the creation of basic build pipeline which you can customize as required. Since there is no standard template available, I suggest you use “Empty Job” and add the tasks as needed in the workflow of the build pipeline.
We’ll need the following tasks in the workflow of our build pipeline:
1. NPM task: Set its operation property to install. This will detect the dependencies from package.json and install all the dependencies on the agent.
2. Copy files task: This task copies all .js and .json files to the artifact.
Two questions arise here, what is an artifact and why are we copying these files to that artifact when we are going to have a .ZIP package that we are going to deploy.
An artifact is a logical container that holds the output of the build until it can be picked up by the release management service to do actual deployment. Every build creates a separate artifact. Physically it is stored somewhere on Azure DevOps, we don’t need to know the exact location since we will use Release Management service for our deployment. We copy the output to a folder somewhere on the agent. It is represented by a variable “Build.ArtifactStagingDirectory” and from there publish it on Azure DevOps. Those .js and .json files are to be copied because they will contain the Mocha tests that we will need to execute as part of the release. Set properties as below:
Source Folder: nodejs-docs-hello-world-master
Contents: **\*.js
**\*.json
3. Archive NodeJS app: This task creates the .ZIP file of the whole app. Set the properties as below:
Root Folder: nodejs-docs-hello-world-master
Archive file to create: $(Build.ArtifactStagingDirectory)/nodeapp.zip
4. Publish Artifacts: This task will publish the output artifact with a name “drop”. This will be available to Release Management service for deployment.
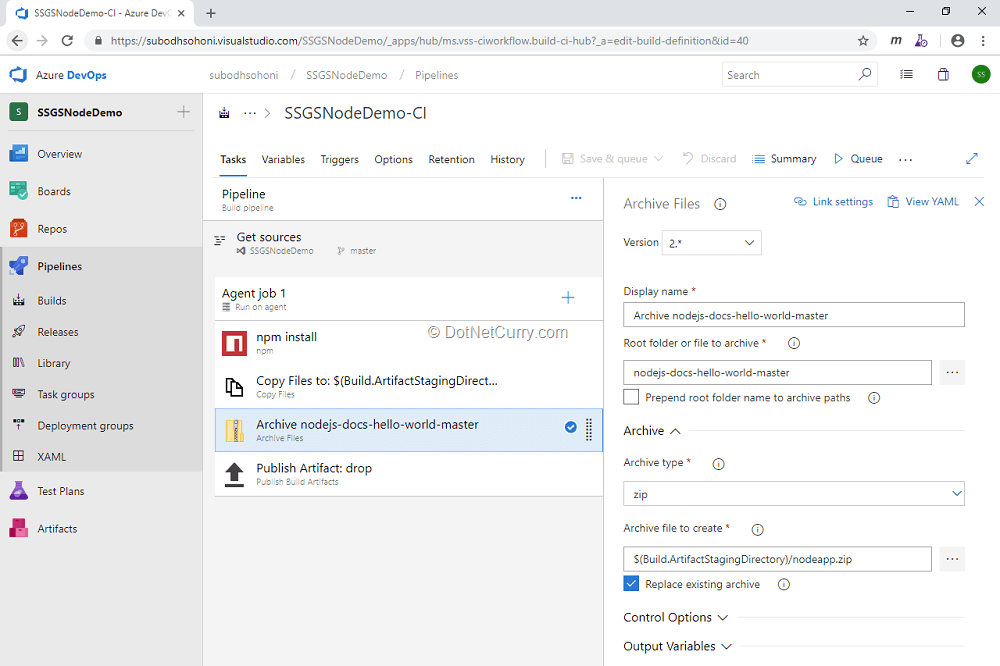
Save and Queue the build and once the build is ready, take a look at the Artifact. It should contain the NodeApp.zip file with the .js and .json files.
Before you do the deployment, let us now consider how you are going to test your application once it is deployed on the Azure App Service. I suggest using Mocha framework to check whenever the required URL https://ssgsnodedemo.azurewebsites.net is requested, it returns a HTTP status code 200 as response and contains the words “Hello World”. Mocha has functionalities for checking status codes, but does not include asserts for checking the containing strings. The “Chai” assertion library can help you do that!
In VS Code you can run the following commands to install Mocha and Chai:
> npm install mocha --save
> npm install chai --save

You will also need to add the “request” node module by executing the command:
> npm install request --save
We can now add a Mocha test. First add a directory named test under the source root and then add a file named test.js to it. You can find the code for the actual test in the screenshot below.
Note that the base_url is the URL of the app which we are going to deploy on the Azure App Service.
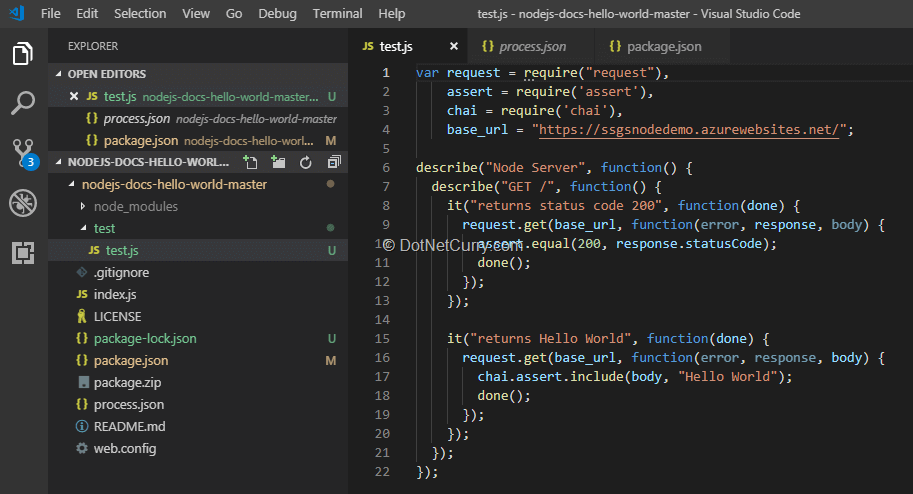
You will want to add a reporter to the Mocha test, so that a report is created in an XML file that can be then picked up and used by the “Publish Test Result” task in the release management. I suggest you use JUnit formatted test results file which is understandable in that task. For doing so, install the mocha-junit-reporter module.
> npm install mocha-junit-reporter --save
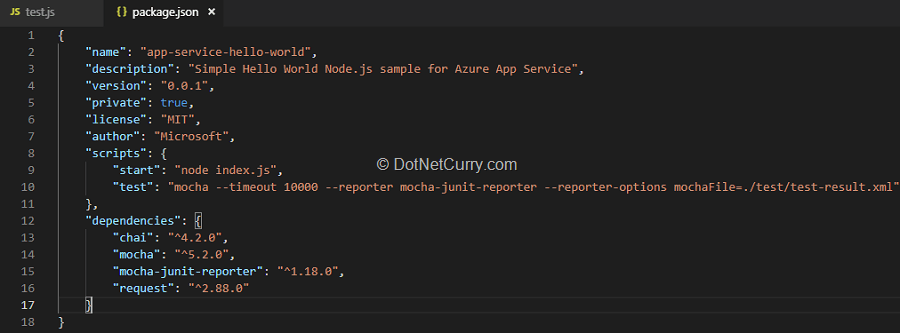
You will notice that by installing these modules in VS Code, we have automatically changed the package.json file to reflect all dependencies. In this file, you will need to add a script to run Mocha test. That script line should have a non-default timeout of 10000, as well as configuration of the mocha-junit-reporter. A result file named test-result.xml will be created when the test runs.
"test": "mocha --timeout 10000 --reporter mocha-junit-reporter --reporter-options mochaFile=./test/test-result.xml"
Modified package.json now will look as follows:
Create a release definition on Azure DevOps
Now you need to deploy the package to Azure DevOps. For deployment and testing the app, you will use the Release Management service of the Azure DevOps.
Start by creating a new Release pipeline. Use the “Deploy a Node.JS app to Azure App Service” template to create the first stage which you can call as the Dev Environment. Select the artifact that was created by your build pipeline and ensure that it always picks up the latest version. Connect this pipeline to your Azure account and the target App Service (web app).
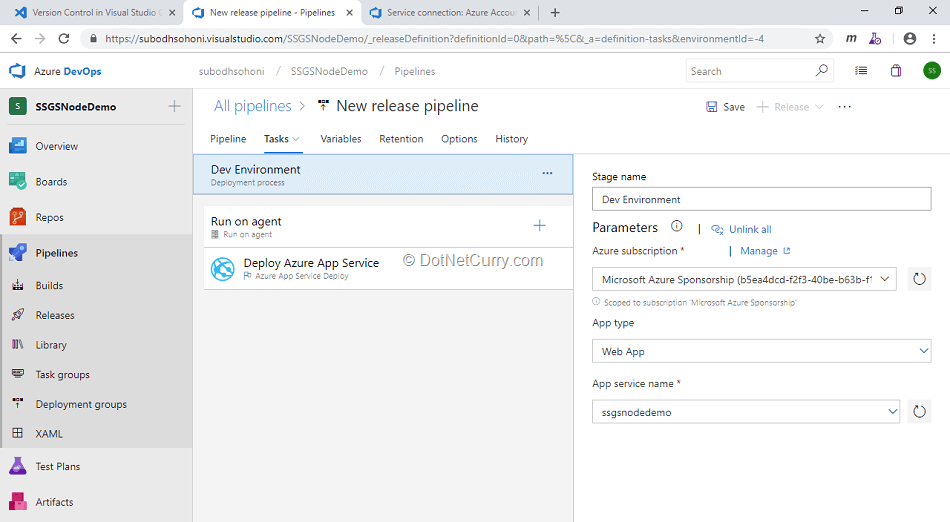
In this pipeline, you will find a task: “Deploy Azure App Service”. This is the task that you will use to deploy the NodeApp.zip to Azure App Service. Provide following values to the parameter
Package or folder: $(System.DefaultWorkingDirectory)/_SSGSNodeDemo-CI/drop/nodeapp.zip.
This task is sufficient to do the deployment but you also need to run the Mocha test that we have configured. For this you need to install all the dependencies that we have configured in package.json on the agent.
Add a task: “npm install” just like we did in the build pipeline. This task will install all the dependencies that are configured in package.json. In my experience though, Mocha and other libraries do not get installed with it. I prefer to add npm tasks explicitly to install mocha and mocha-junit-reporter. I suggest that you also do the same, but feel free to experiment with it to check if npm install task installs all the dependencies.
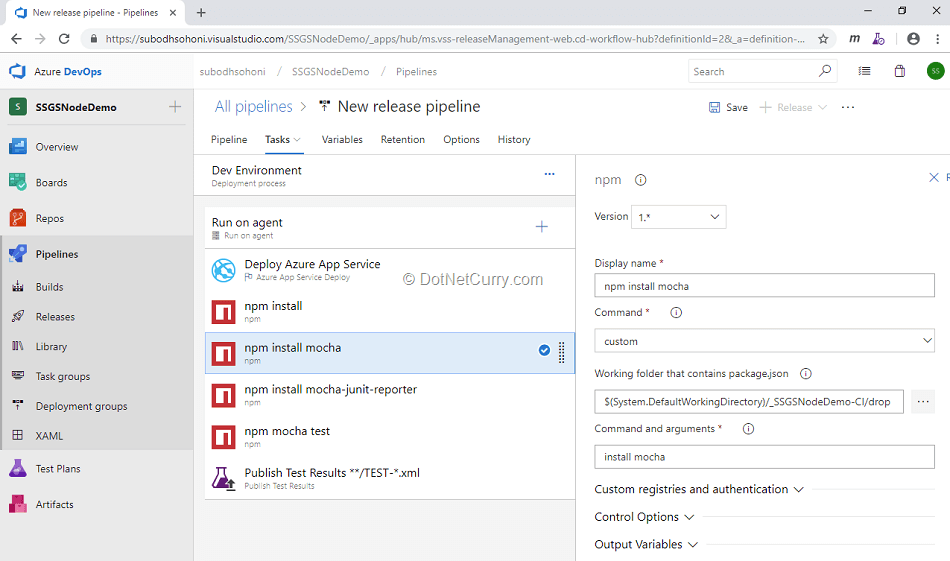
The next task is to run the Mocha test. In the “npm task” select “Custom command” from the dropdown and then provide “test” as the argument. This task will run the Mocha test as well as create the test-result.xml file. This will be created in the test folder under the working directory on the agent.
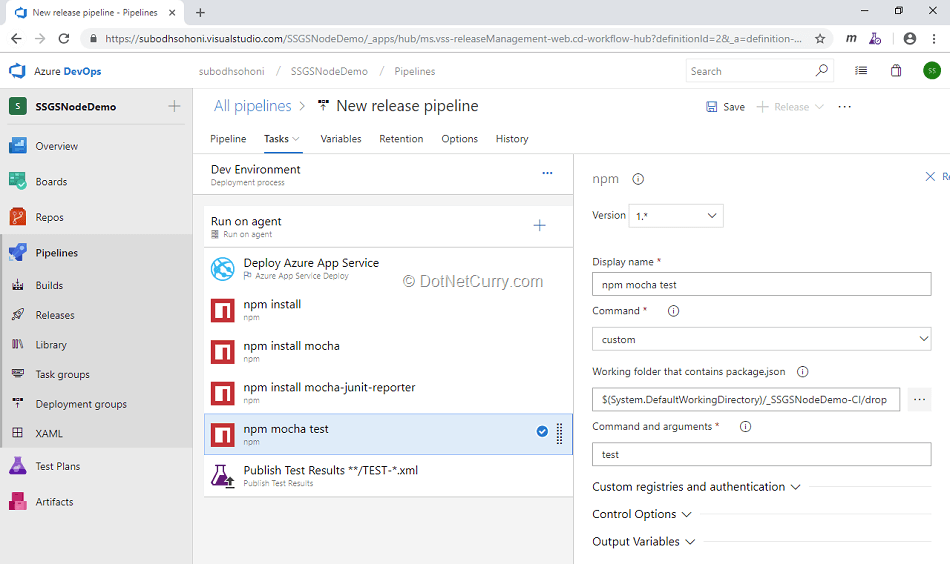
The test result that is created will need to be published to Azure DevOps. Use the task “Publish Test Results” for that. Select JUnit as the test result type since we have configured the reporter for that type. You don’t need to add any further changes in the task.
When you create a release, it will automatically start the deployment. After deploying the application, it will run the Mocha test and publish the results.
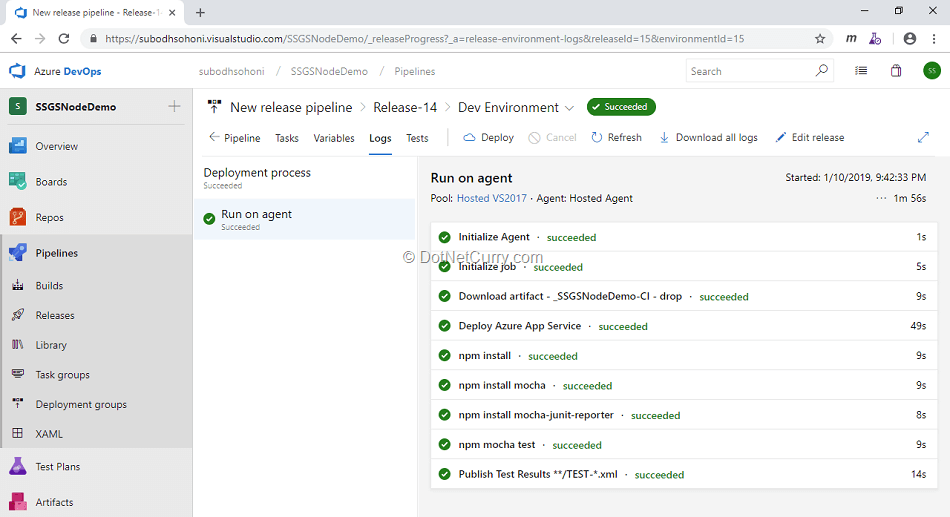
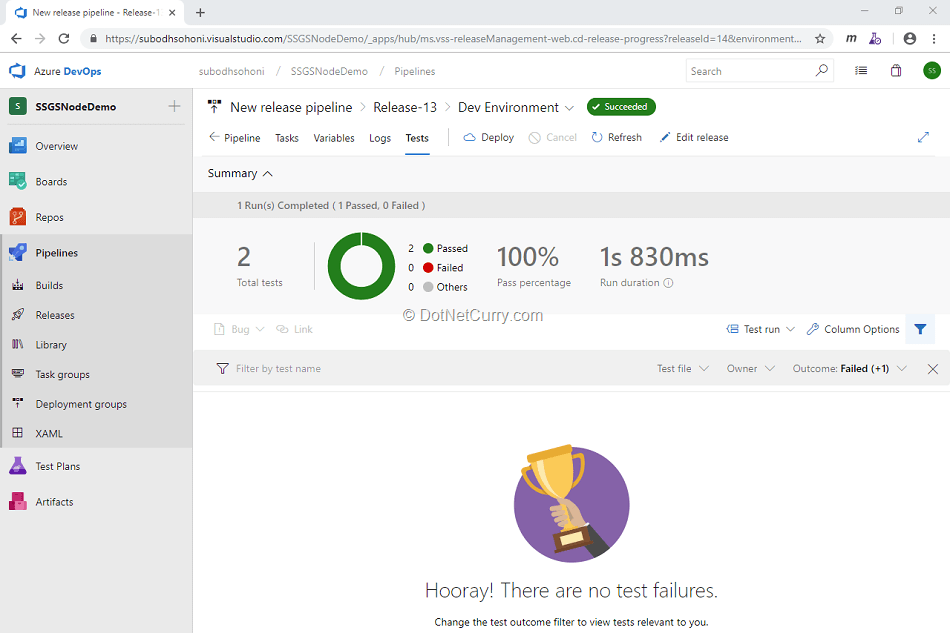
You can now click the “Tests” tab to view results of the tests which are imported from the test-result.xml file. You may also view the actual web page by opening the URL https://ssgsnodedemo.azurewebsites.net in the browser.
Summary
This completes our walkthrough of using “Azure DevOps” for the build and deployment of NodeJS based web application. In this walkthrough, we learned:
- How to create NodeJS app
- Add it to a git repository under the team project of Azure DevOps
- Use pipelines service of Azure DevOps to do the build, deployment and testing of that app.
It is built as a .ZIP package and then deployed to Azure App Service as a web app and finally tested with Mocha framework.
The next article is about using Azure DevOps for NodeJS application optimization using Gulp.
Thanks to Tim Sommer for his suggestions and for technically reviewing this article.
This article has been editorially reviewed by Suprotim Agarwal.
C# and .NET have been around for a very long time, but their constant growth means there’s always more to learn.
We at DotNetCurry are very excited to announce The Absolutely Awesome Book on C# and .NET. This is a 500 pages concise technical eBook available in PDF, ePub (iPad), and Mobi (Kindle).
Organized around concepts, this Book aims to provide a concise, yet solid foundation in C# and .NET, covering C# 6.0, C# 7.0 and .NET Core, with chapters on the latest .NET Core 3.0, .NET Standard and C# 8.0 (final release) too. Use these concepts to deepen your existing knowledge of C# and .NET, to have a solid grasp of the latest in C# and .NET OR to crack your next .NET Interview.
Click here to Explore the Table of Contents or Download Sample Chapters!
Was this article worth reading? Share it with fellow developers too. Thanks!

Subodh is a Trainer and consultant on Azure DevOps and Scrum. He has an experience of over 33 years in team management, training, consulting, sales, production, software development and deployment. He is an engineer from Pune University and has done his post-graduation from IIT, Madras. He is a Microsoft Most Valuable Professional (MVP) - Developer Technologies (Azure DevOps), Microsoft Certified Trainer (MCT), Microsoft Certified Azure DevOps Engineer Expert, Professional Scrum Developer and Professional Scrum Master (II). He has conducted more than 300 corporate trainings on Microsoft technologies in India, USA, Malaysia, Australia, New Zealand, Singapore, UAE, Philippines and Sri Lanka. He has also completed over 50 consulting assignments - some of which included entire Azure DevOps implementation for the organizations.
He has authored more than 85 tutorials on Azure DevOps, Scrum, TFS and VS ALM which are published on
www.dotnetcurry.com.Subodh is a regular speaker at Microsoft events including Partner Leadership Conclave.You can connect with him on
LinkedIn .