Angular is one of the most popular JavaScript frameworks for developing both web-based and mobile apps. Most tools and IDEs that support Angular development are oriented towards an individual developer. Many non-trivial apps that are developed using Angular need a lot of team effort.
Teams often need to collaborate on coding which requires a version control. Various versions of the code need to go through a Build to ensure that code developed by different developers integrates smoothly with that developed by others. Output of the build has to be deployed at various environments for testing and use.
These services of version control, build and deployment are provided very effectively by Azure DevOps. In this article, we will take a walkthrough of how to use those services for an Angular 6 app. You will walk through the various steps to:
- Create a simple Angular 6 application.
- Alter some code.
- Put it under version control repository git.
- Push the code to a shared repository on Azure DevOps.
- Build the optimized version of the code.
- Deploy it to a Web App under Azure App Service.
- Test the deployed app using Protractor.
Before we begin, a word about what this article is not about. It is not a tutorial about Angular as a technology.
Editorial Note: For those new to Angular, we have a bunch of tutorials at www.dotnetcurry.com/tutorials/angularjs.
Following are the assumptions and prerequisites needed for this walkthrough:
1. Since Angular is based upon Node.JS, you will need the latest version of node and npm installed.
2. Installation of git for your respective operating system
3. I am going to show screenshots of developing code using Visual Studio Code which is a free, open source IDE from Microsoft.
4. You will need a subscription on Azure DevOps. If you do not have such a subscription, you can easily create a free subscription (Up to 5 users free). You can find steps to do so from https://dev.azure.com
It is also necessary to have latest version of Angular (I have used v6) installed on your machine. It can be done by running the command
>> npm install -g @angular/cli@latest
Create Angular app and Add to git repository on Azure DevOps
Once you have these prerequisites in place, you can start with creating an Angular app. To do so, start with creating a folder named SSGSEMSAngular and open that folder in VS Code.
Next step is to initialize your local git repository. Start a terminal in VS Code and enter the command:
>> git initialize
Once the local git repository is initialized, you can add some code to it. To create a new Angular app, run following command in the terminal:
>> ng new ssgsemsng
When asked, accept to add Angular Routing and choose CSS as the format for the stylesheet.
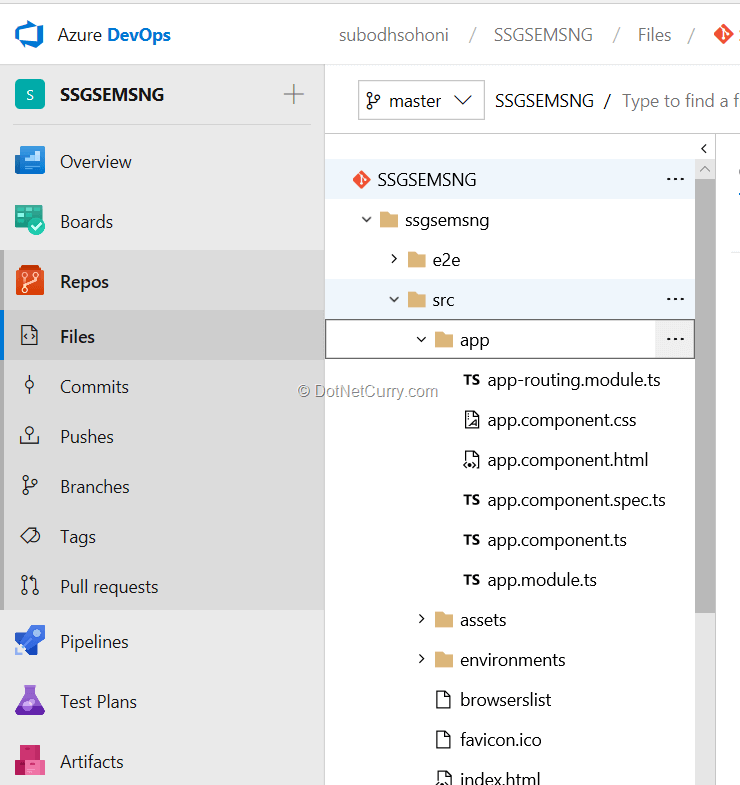
Now you have a basic Angular 6 app code ready. It will create a folder structure with a root folder that is ssgsemsng. The most important folder in which the necessary code resides is ssgsemsng/src/app.
Now, let’s Push this initial code to Azure DevOps. To do so, create a new Team Project with git repository as SSGSEMSNG. When you open the Repo page of that team project, you will be able to see the options to clone the repository. Copy the two lines that are commands to set remote repository of your git local repository and to push the code. Execute them in the terminal of your VS Code. Commands will look something like this:
>> git remote add origin https://dev.azure.com/subodhsohoni/SSGSEMSNG/_git/ssgsemsng
>> git push -u all
Customize code of Angular 6 app
Let’s change some code. Open the file ssgsemsng/src/app/app.component.ts and change the Title as below:
import { Component } from '@angular/core';

@Component({
  selector: 'app-root',
  templateUrl: './app.component.html',
  styleUrls: ['./app.component.css']
})
export class AppComponent {
  title = 'SSGS EMS - Angular';
}
Open the file ssgsemsng/src/app/app.component.html and make changes in line with these:
<div style="text-align:center">
  <h1>
    Welcome to {{ title }}!
  </h1>
  <img width="300" alt="SSGS Logo" src="../assets/images/SSGSLogo.png">
</div>
<h2>SSGS IT EDUCON Services Pvt. Ltd. </h2>
<ul>
  <li>
    <h2><a target="_blank" rel="noopener" href="http://www.ssgsonline.com/products.htm">Products</a></h2>
  </li>
  <li>
    <h2><a target="_blank" rel="noopener" href="http://www.ssgsonline.com/services.htm">Services</a></h2>
  </li>
  <li>
    <h2><a target="_blank" rel="noopener" href="http://www.ssgsonline.com/company.htm">About Us</a></h2>
  </li>
</ul>
Make sure to create a “ssglslogo.png” file in the assets folder.
Open the file ssgsemsng/src/app/app.component.css and make following changes:
h1 {
    color: rgb(3, 85, 78);
    font-family: Arial, Helvetica, sans-serif;
    font-size: 250%;
  }

h2 {
    color: blueviolet;
    font-family: 'Segoe UI', Tahoma, Geneva, Verdana, sans-serif;
    font-size: 180%
}
Your next step is to commit all the changes and Push them to the remote repository. If you are using VS Code like me, click the  icon which will show all the changes. Enter the comments for commit and then click the
  icon to commit it to the local repository. Click the
  icon and from the context menu that appears click Push. Now the Repo on the SSGSEMSNG team project will look like this:
Create build pipeline definition
Your next task is to create a build pipeline that will create the optimized version of the app. Start with creating a new build pipeline from Pipelines >> Build on your team project in the browser.
In this pipeline, you will add following tasks:
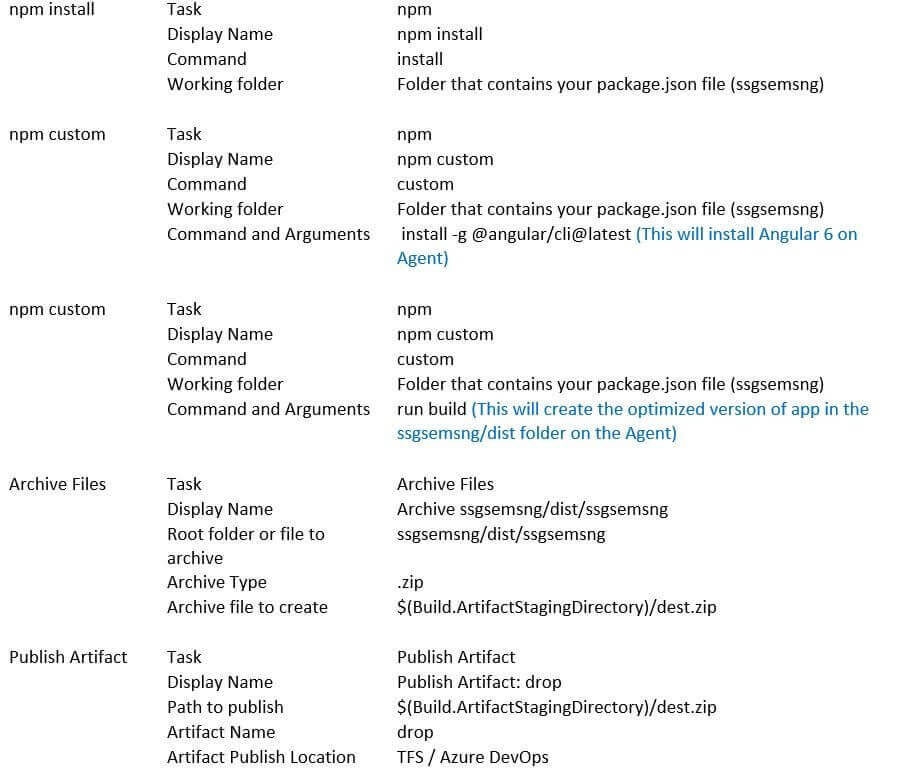
Once this build pipeline is defined, you can queue the build. The created artifact should contain a file named dest.zip which will be used to do the deployment.
Release and Deploy the Angular 6 app to Azure App Service
To do the deployment of the app, we will create a Release Pipeline. In this pipeline, you will create an environment named Dev. Although I will guide you to create that environment, later on, you can extend the same release pipeline to add more environments like Test, UAT, Staging and Prod.
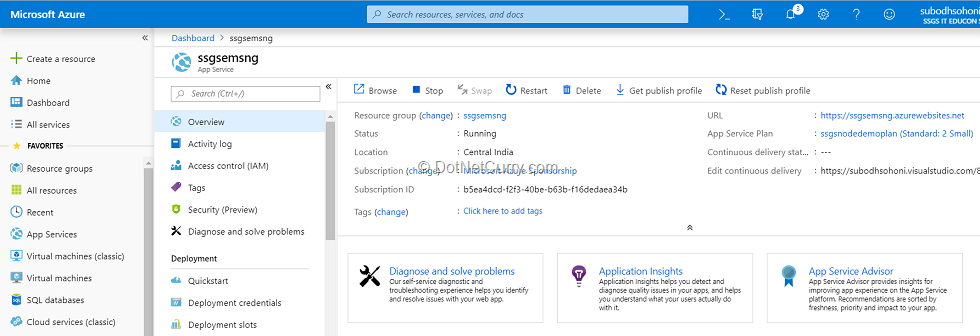
Before we can create a release pipeline, we will need to create a web app in Azure App Service. Open Azure portal and sign in with the same email address that you have used to create the Azure DevOps account. Create new web app with name ssgsemsng. There is no need to do anything else.
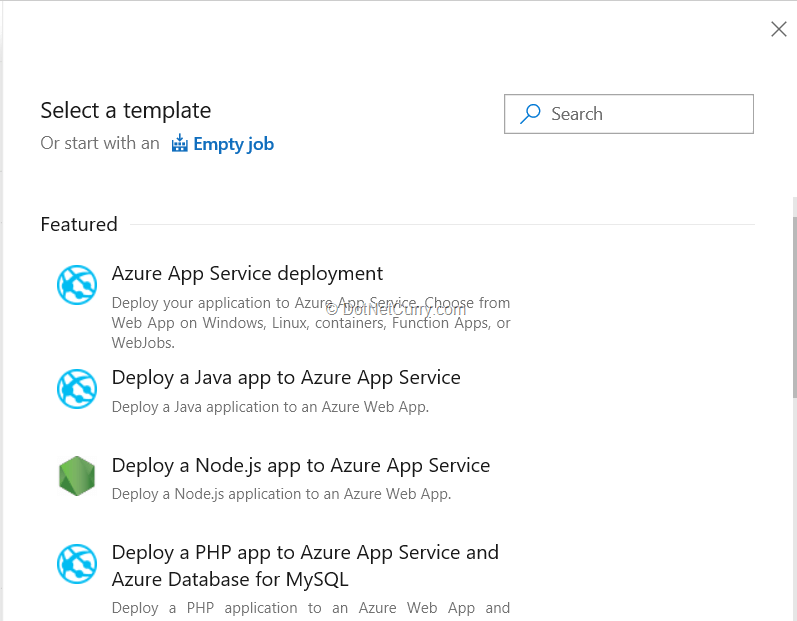
Re-login to your Azure DevOps account and open your team project. In the Pipelines select Releases and start creation of the new release pipeline. Select the template of “Deploy a Node.js app to Azure App Service” template. Provide the name “Dev Env” to the new stage.
Under the Pipeline tab, select the build pipeline that you have created earlier as the artifact source to be deployed. Let the default version be the “Latest”.
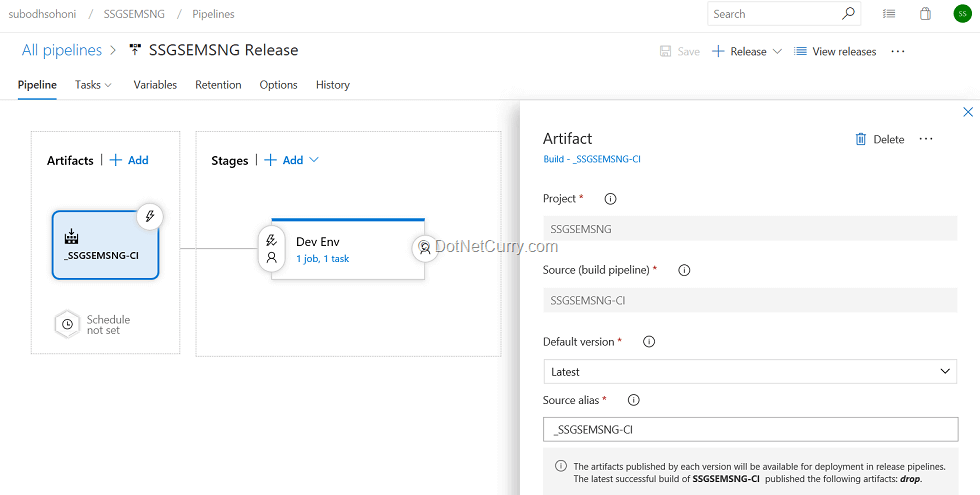
Under the Tasks tab, Select your Azure Account and authorize Azure DevOps to access resources from that Azure account when prompted. From the drop down for App Service Name, select the “ssgsemsng” web app that you have created in the earlier step.
Now, select the task that is automatically added, named Deploy to Azure App Service. In the parameter Package or Folder, select the .ZIP file from the artifact. Ensure that File Transforms & Variable Substitution and App Settings section are empty.
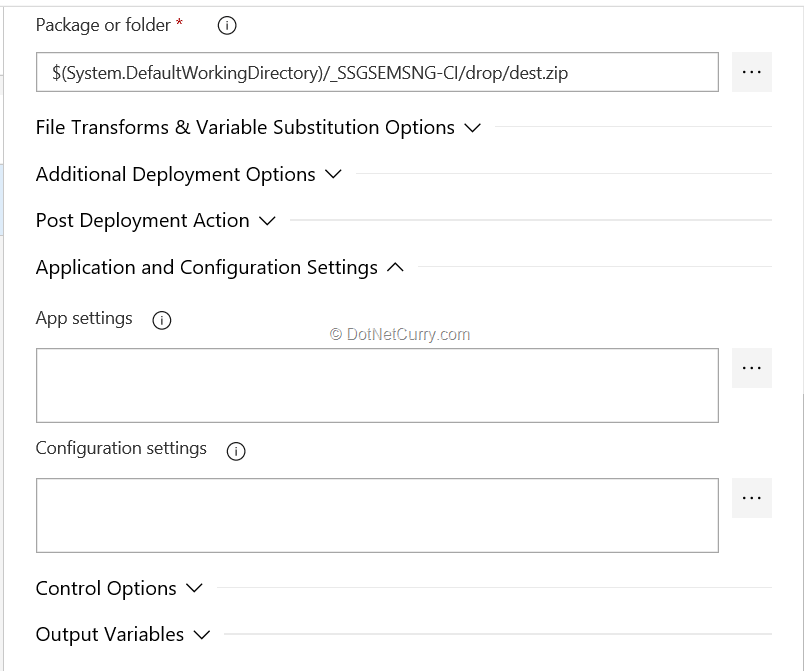
Now we can create a release and proceed with the deployment.
Modify code of Protractor End-to-End test
As a next step, let’s add the post-deployment testing to the release. The Angular App code that you generated in the beginning has added a folder named “e2e”, which has a subfolder named “src” that contains the tests that can be executed after the optimized code is deployed. These tests use the Protractor framework which is based upon Jasmine. Know more about Jasmine here: https://jasmine.github.io/
We’ll have to make some changes in the files:
1. In e2e\src\app.e2e-spec.ts, change the test code to as follows:
it('should display welcome message', () => {
    page.navigateTo();
    expect(page.getTitleText()).toEqual('Welcome to SSGS EMS - Angular!');
});
2. In the same file, add the test reporter for Jasmine
var jasmineReporters = require('jasmine-reporters');
jasmine.getEnv().addReporter(new jasmineReporters.JUnitXmlReporter({
    consolidateAll: true,
    savePath: 'testresults',
    filePrefix: 'reportXMLoutput'
}));
To add the reporters, add the jasmine-reporters by running the command:
>>npm install jasmine-reporters --save
This will also add an entry in the dependencies section in the package.json file
3. In e2e\protractor.conf.js make a change in the baseUrl as follows:
baseUrl: 'https://ssgsemsng.azurewebsites.net', // instead of //'http://localhost:4200/',
This ensures that End-to-End testing is done on the deployed app and not on the localhost.
4. In the “package.json” file, change the “scripts” section as follows:
  "scripts": {
    "ng": "ng",
    "start": "ng serve",
    "build": "ng build",
    "test": "ng test --watch=false", //will not repeat test
    "lint": "ng lint",
    "e2e": "ng e2e ssgsemsng-e2e" //will run the e2e test
  },
Now you can commit and push the code to the git repository on your Azure DevOps account.
Build the test code
For creation of the test artifact, create a new build pipeline definition. Call it SSGSEMSNG-SRC since this will contain the source. Add the following tasks in this build pipeline.
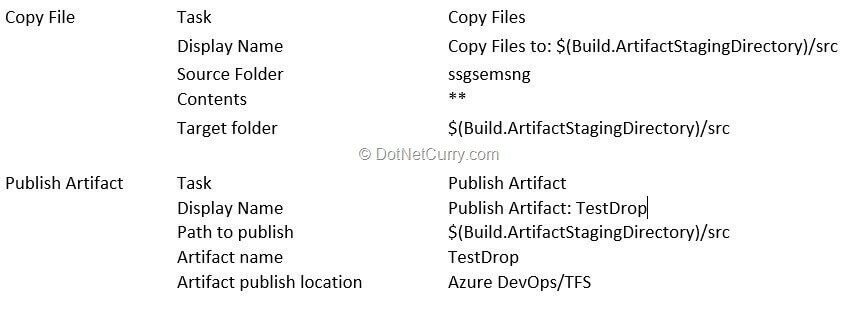
Queue the build to create the TestDrop artifact and observe it.
Run the test automatically after deployment
Next step is to modify the release pipeline that you have created in the earlier steps. Open that pipeline definition for editing. Add a new artifact TestDrop that you have created.
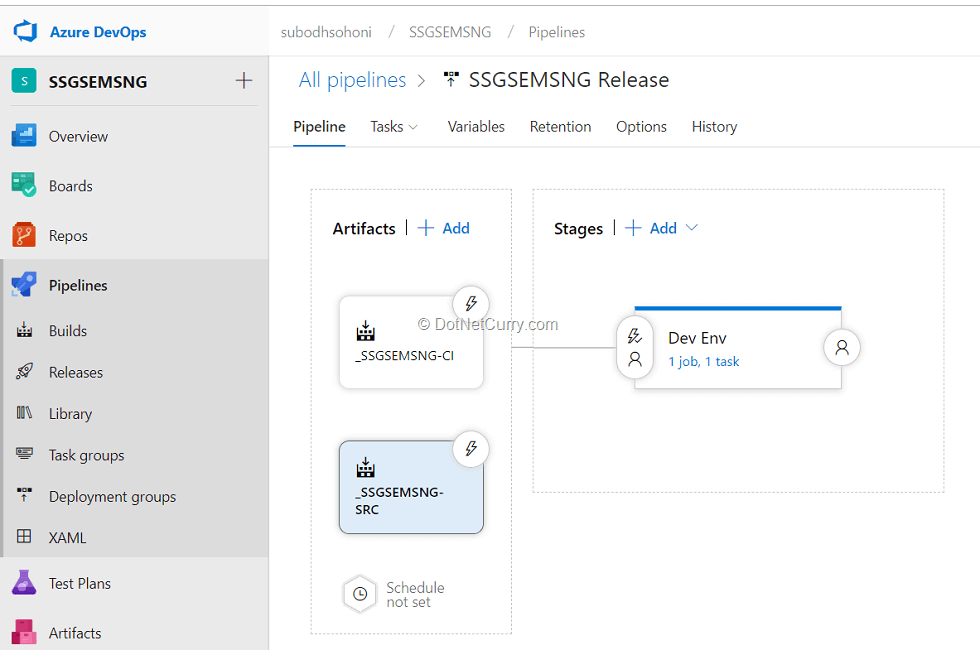
Now, in the Dev Env, add the following tasks:
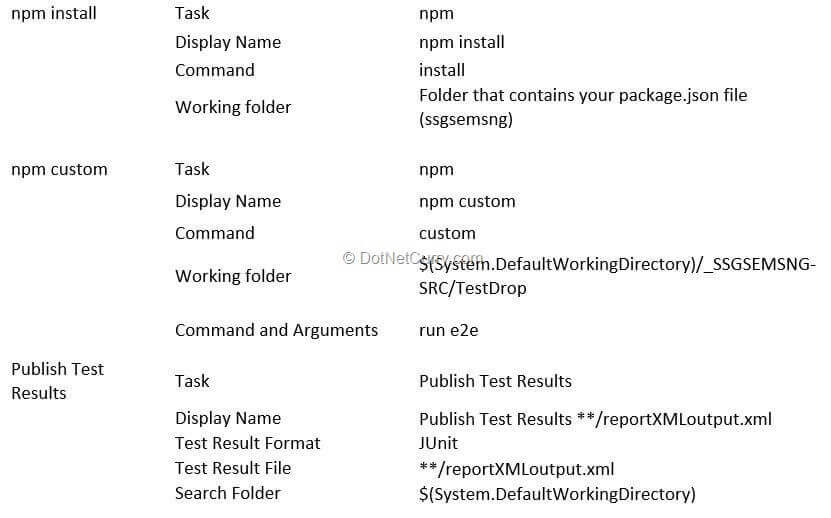
One limitation that I encountered was that this release had to be created with an on-premises agent. I tried many times with Hosted Agent 2017 but it failed as it could not load the necessary modules. You may need to do some more research to get it working. You will also need Chrome on the agent as the test is internally using Selenium WebDriver for Chrome.
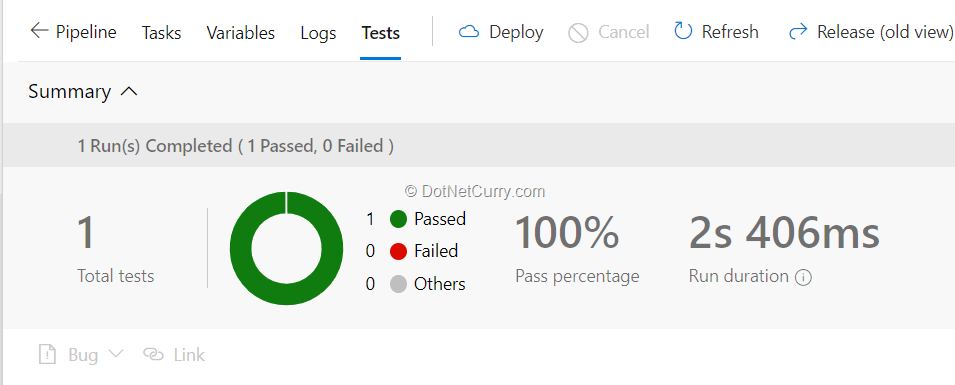
When you create a release and after deployment of the application, the test should run. It opens Chrome, sends the request and evaluates response to pass the test. It shows the output under Tests tab as follows:
Summary
In this article, you were able to do following tasks:
- Create an Angular 6 app and modify its code.
- Create a team project on Azure DevOps and clone its repository.
- Add the Angular 6 app code to your git repository on Azure DevOps.
- Build the Angular 6 app with optimization.
- Deploy the built Angular 6 app to Azure App Service as a web app.
- Code a test using Protractor framework and put it under git repository.
- Build the code for test.
- Run the test as part of release after the app is deployed to Azure App Service.
This article was technically reviewed by Tim Sommer.
This article has been editorially reviewed by Suprotim Agarwal.
C# and .NET have been around for a very long time, but their constant growth means there’s always more to learn.
We at DotNetCurry are very excited to announce The Absolutely Awesome Book on C# and .NET. This is a 500 pages concise technical eBook available in PDF, ePub (iPad), and Mobi (Kindle).
Organized around concepts, this Book aims to provide a concise, yet solid foundation in C# and .NET, covering C# 6.0, C# 7.0 and .NET Core, with chapters on the latest .NET Core 3.0, .NET Standard and C# 8.0 (final release) too. Use these concepts to deepen your existing knowledge of C# and .NET, to have a solid grasp of the latest in C# and .NET OR to crack your next .NET Interview.
Click here to Explore the Table of Contents or Download Sample Chapters!
Was this article worth reading? Share it with fellow developers too. Thanks!

Subodh is a Trainer and consultant on Azure DevOps and Scrum. He has an experience of over 33 years in team management, training, consulting, sales, production, software development and deployment. He is an engineer from Pune University and has done his post-graduation from IIT, Madras. He is a Microsoft Most Valuable Professional (MVP) - Developer Technologies (Azure DevOps), Microsoft Certified Trainer (MCT), Microsoft Certified Azure DevOps Engineer Expert, Professional Scrum Developer and Professional Scrum Master (II). He has conducted more than 300 corporate trainings on Microsoft technologies in India, USA, Malaysia, Australia, New Zealand, Singapore, UAE, Philippines and Sri Lanka. He has also completed over 50 consulting assignments - some of which included entire Azure DevOps implementation for the organizations.
He has authored more than 85 tutorials on Azure DevOps, Scrum, TFS and VS ALM which are published on
www.dotnetcurry.com.Subodh is a regular speaker at Microsoft events including Partner Leadership Conclave.You can connect with him on
LinkedIn .