In this article, we will see how to automate business process by designing workflows using SharePoint Designer 2010. We will also see how to design and integrate InfoPath 2010, which is introduced in SharePoint Designer 2010 with our workflow.
Scenario – To understand the integration better, let us take an overview of a scenario where we will evaluate a new customer which will get registered with our Purchase Order System. This evaluation of the customer will be done by the company employees. They will write their evaluation comments using InfoPath form.
The steps to create a SharePoint Site using a Template ‘Team Site’ remains the same as shown in my previous article SharePoint Dashboard with Common Filters using PerformancePoint Services 2010.
Now that you have created a SharePoint site with ‘Team Site’ template, let’s add a list. To create a list, click on ‘Lists’ link from the left hand navigation pane and click on ‘Create’ button. The ‘Create’ dialog box will appear as shown below –

Once we create a list with the name ‘New Customer Review’, we need to add a couple of columns as described in the table given below. To create a column, click on list settings from the top ‘Ribbon’ as shown below –

Now click on ‘Create Column’ link from the ‘List Settings’ page as shown below –

Now create the lists as described below. Also add some sample data in the lists –
Customers List –

Now let’s edit the site in SharePoint Designer 2010. Open SharePoint Designer 2010 and click on ‘Open Site’ button. Now paste the URL of your site and click ‘Open’ as shown below –

You will see all the site contents in the left hand side section ‘Navigation’. So to create a workflow, click on ‘Workflows’ in the navigation section. You will see a ‘Workflows’ ribbon on top. Now you can create three types of workflow in SharePoint 2010 using SharePoint Designer 2010 –
-
List Workflow – associated with a specific list in SharePoint.
-
Reusable Workflow – we can be associate this workflow with multiple lists or content types.
-
Site Workflow – this workflow is not associated with any lists or site content types.
Click on Site Workflow as shown below –

Once you click on the ‘Site Workflow’ button, it will ask you the name of the workflow and the description of the workflow. Let’s give a name to the workflow as ‘Customer Review’ and description as ‘Check the customer background’ as shown below –

Click the ‘OK’ button. This will show you workflow editor window in which it shows you the first step with the name ‘Step 1’ as shown below –

Now let’s have a look at a few things. Pay particular attention to the Workflow ribbon.
-
Save button – Now you can save the workflow. This facility was not available in SharePoint Designer 2007.
-
Publish button – By clicking publishing button, you can publish the workflow to the site.
-
Conditions – You can implement the conditions in our workflow.
-
Action – You can add multiple actions when a specific condition occurs in the workflow.
-
Initiation Form Parameters – Now in SharePoint Designer 2010, you can design InfoPath forms for taking the data from the end users. You can also modify the form design using InfoPath Form designer 2010 if it is installed on your machine.
If you see in the above figure, it shows you a horizontal line with ‘Orange’ color where you can start typing the Steps by double clicking.
So first of all, we will design an Initiation form. This form will be used by an Employee who will fill up the information about customer review. So click on ‘Initiation Form Parameters’ button. This will show you a dialog box. Let’s click on the ‘Add’ button to add the different fields on our ‘Initiation Form’ as shown below –

Let’s add the following fields –

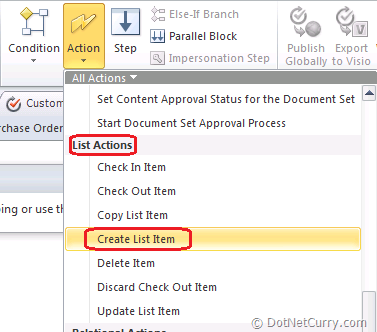
Now we are ready with our ‘Initiation Form’. If you observe, our form is similar to our list which we have created in the above steps. So we will use this initiation form to fill data in our list. To add the data from our ‘Initiation Form’ to our ‘New Customer Review’ button, let’s add an ‘Action’ in our workflow as shown below. To add an ‘Action’ in our workflow, click on ‘Action’ dropdown list and make a choice of ‘Create List Item’ from the ‘List Actions’ section as shown below –

This will show you the following screen –

Click on ‘this list’ which brings up the ‘Create New List item’ dialog box. From the list dropdown, choose our list ‘New Customer Review’ and click on the ‘Add’ button. This will bring up the ‘Value Assignment’ dialog box. In this dialog box, we will set the field of our list. Choose our first field ‘CustomerID’ and click on ‘To this value’ button as shown below –

In the ‘Lookup for Integer’ dialog box, choose ‘Data Source’ as ‘Workflow Variables and Parameters’ and set ‘Field from source’ to ‘Parameter: CustomerID’ as shown above. Repeat this step for all the fields of ‘New Customer Review’ list fields. Once done, the ‘Create List item box’ should look like below –

Now let’s add another action in to our workflow. Go to ‘Core Actions’ group and choose ‘Send an Email’ action as shown below –

Now click on ‘These Users’ link and you will see the ‘Define E-Mail Message’ window. In the ‘To’ section, click on the address button and make a choice of ‘Owner’ group. In the ‘Subject’, to write a message click on ‘Add lookup button’ to add a lookup item. Now write a message ‘Customer Reviewed by – ‘ and then click on ‘Add or Change Lookup’ button. This pops up a pop up box ‘Lookup for String’. Choose ‘Workflow variables and Parameters’ in the Data source section and choose ‘Employee Name’ in the ‘Field from Source section’ as shown below –

Now in the Message box, write a message ‘Customer Ratings are –‘ and then click on the ‘Add or Change lookup button’. Then choose ‘Workflow variables and Parameters’ in the Data source section and choose ‘Ratings’ in the ‘Field from Source’ section. The final window should look like the following –

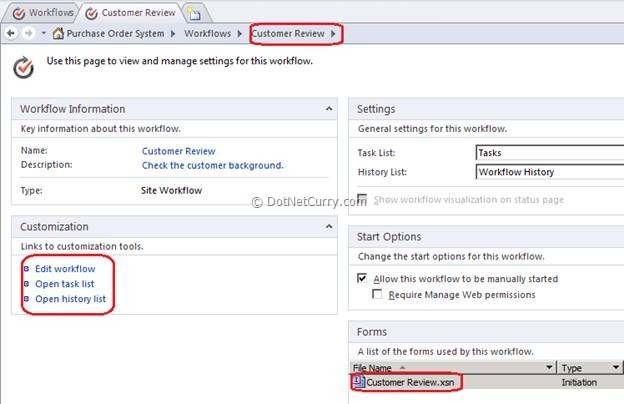
Now ‘Save’ your workflow. Click on the ‘Publish’ button. Once your workflow has been published, click on the ‘Customer Review’ workflow from the navigation section as shown below –

If you check the above diagram, you will see all the details of the workflow with the initiation form. If you observe carefully, your initiation form is now ‘InfoPath Form’. Click on ‘Customer Review.xsn’ form and it will get edited in the InfoPath form designer.
Let’s modify this form a bit –
-
Add a title to our form as Customer Review Report.
-
Format the titles of each field. Make it bold.
-
Change the title of ‘Start’ button to ‘Submit Review’.
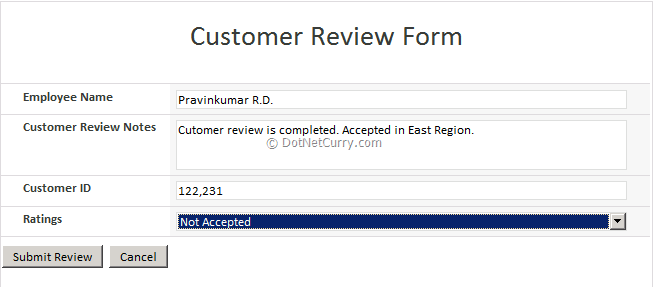
Please note that InfoPath form is a very powerful tool which you can use to retrieve data from heterogeneous systems like ‘Web Services’, ‘Databases’, ‘SharePoint Lists’ etc. Now your form should look like the following –

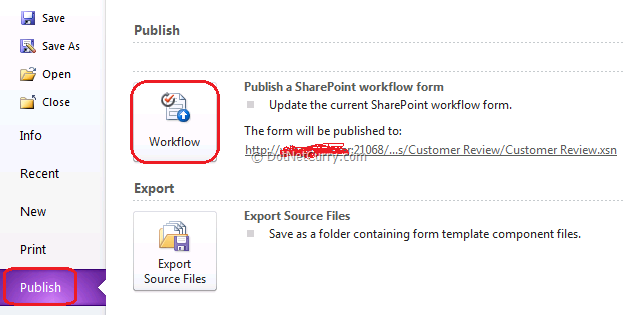
Now save your form locally. To make this modified form available to our workflow, you will have to publish this form. The steps to publish this form are –
-
Click on the File menu and go to Publish sub menu.
-
On the right hand side, you will see the actual address of the form from where it got downloaded in to our InfoPath form designer tool.
-
Click on the ‘Workflow’ button. This will publish the form and shows you a message at the end.

Testing the WorkFlow
Once your form has been published, let’s go back to our SharePoint site and test our Workflow. To test the workflow, go to ‘Site Action’ menu and click on ‘View All Site Contents’ menu. This displays two link buttons on the top. First one is ‘Create’ and second is ‘Site Workflows’. Click on ‘Site Workflows’ button and you will see your workflow ‘Customer Review’ as shown below –

Now click on the ‘Customer Review’ workflow and you will see the ‘Initiation Form’ which we designed to add the customer review item in the list ‘New Customer Review’. Fill in the information and then click on ‘Submit Review’ button as shown below –

Check the ‘New Customer Review’ list and you should see the item in that list. But the problem is now we cannot ask users to go everytime to ‘View All Site Contents’ from the ‘Site Action’ menu. So let’s make it convenient for the end user by adding a link web part on our home page. Follow these steps:
1. ‘Edit’ the ‘Home’ page.
2. Go to ‘Insert’ ribbon and click on ‘Web Part’ button. From the web part group, choose ‘Lists and Libraries’ and then choose ‘Link’ web part. Click on the Add button. Now save your page.
3. Click on ‘Site Action’ - ‘View All Site Content’. Click on ‘Site Workflows’ link button. Now right click ‘Customer Review’ and click on ‘Copy Shortcut’.
4. Now go to home page and click on ‘Add New Link’ button under ‘Links’ web part. Paste the link which we just copied. In the description, write ‘Customer Review Form’ and click ‘Save’ button. This should look like the following –

Test the link and now you have successfully created a workflow with an Initiation form using SharePoint Designer 2010.
Summary – In this article, we have seen how to automate business processes by designing workflows using SharePoint Designer 2010. We have also seen how to design and integrate InfoPath 2010 which is introduced in SharePoint Designer 2010 with our workflow.
This article has been editorially reviewed by Suprotim Agarwal.
C# and .NET have been around for a very long time, but their constant growth means there’s always more to learn.
We at DotNetCurry are very excited to announce The Absolutely Awesome Book on C# and .NET. This is a 500 pages concise technical eBook available in PDF, ePub (iPad), and Mobi (Kindle).
Organized around concepts, this Book aims to provide a concise, yet solid foundation in C# and .NET, covering C# 6.0, C# 7.0 and .NET Core, with chapters on the latest .NET Core 3.0, .NET Standard and C# 8.0 (final release) too. Use these concepts to deepen your existing knowledge of C# and .NET, to have a solid grasp of the latest in C# and .NET OR to crack your next .NET Interview.
Click here to Explore the Table of Contents or Download Sample Chapters!
Was this article worth reading? Share it with fellow developers too. Thanks!
Pravinkumar, works as a freelance trainer and consultant on Microsoft Technologies. He is having over 10 years of experience in IT and is also a Microsoft Certified Trainer(MCT). He has conducted various corporate trainings on all versions of .NET Technologies including .NET, SharePoint Server, Microsoft SQL Server, Silverlight, ASP.NET, Microsoft PerformancePoint Server 2007 (Monitoring). He is passionate about learning new technologies from Microsoft. You can contact Pravinkumar at dabade[dot]pravinkumar [attherate] gmail[dot]com