In a previous article, I introduced you to Diagnostic Analyzers in Visual Studio 2015. Diagnostic analyzers are a great new extensibility feature in Visual Studio 2015 for performing static code analysis. Most developers will probably settle with using the ones provided by Microsoft and third party vendors. Nevertheless, there are scenarios that warrant development of custom diagnostic analyzers, such as enforcing coding guidelines in a company. Keeping this customization in mind, Microsoft has put a lot of effort in making the initial experience as pleasant as possible. This article will walk you through the process of creating a simple diagnostic analyzer on your own.
Software Prerequisites
To use diagnostic analyzers, Visual Studio 2015 is required: Community, Professional or Enterprise edition to be exact. Although this might suffice for development, the experience can get much better by installing the .NET Compiler Platform SDK. It includes two components that are important for our task:
- Visual Studio project template for a diagnostic analyzer, and
- Roslyn Syntax Visualizer for interactive syntax tree exploration.
To follow the examples in this article, you will need to have this extension installed in your copy of Visual Studio 2015.
The template we are going to use will also create a Visual Studio extension. Therefore your Visual Studio installation will need to include the Visual Studio Extensibility Tools.

Figure 1: Visual Studio Extensibility Tools feature in Visual Studio setup
You do not have to worry if you have already installed Visual Studio 2015 without this feature. Once you create a project, Visual Studio detects and will offer to install the missing feature for you.
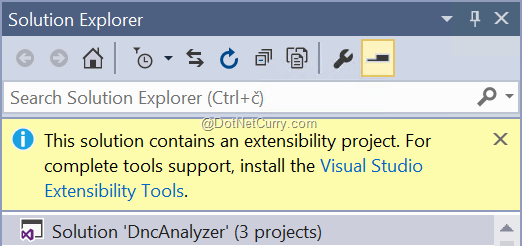
Figure 2: Install missing feature directly from Visual Studio
Trying Out the Default Diagnostic
We will start out by creating a new Visual Studio project from the template and giving it a test run.
Run Visual Studio 2015 and create a new project based on the Diagnostic with Code Fix (NuGet + VSIX) template (you can find it in Templates > Visual C# > Extensibility node). It will create a solution with three projects for you (DncAnalyzer part of each name will be replaced with whatever name you choose for your project):
- Portable class library project DncAnalyzer with the actual analyzer code.
- Unit test project DncAnalyzer.Test with unit tests for the analyzer.
- VSIX project DncAnalyzer.VSIX for packaging the analyzer as a Visual Studio extension.
Visual Studio will conveniently preselect the last one as a startup project. When you run the solution from within Visual Studio, it will perform the following steps for you:
- Compile the analyzer.
- Create a Visual Studio extension from it.
- Run a new instance of Visual Studio.
- Install the created extension in it.
To try out the analyzer, you can create a new class library project inside this Visual Studio instance. It should immediately report a warning and offer you a fix for it.
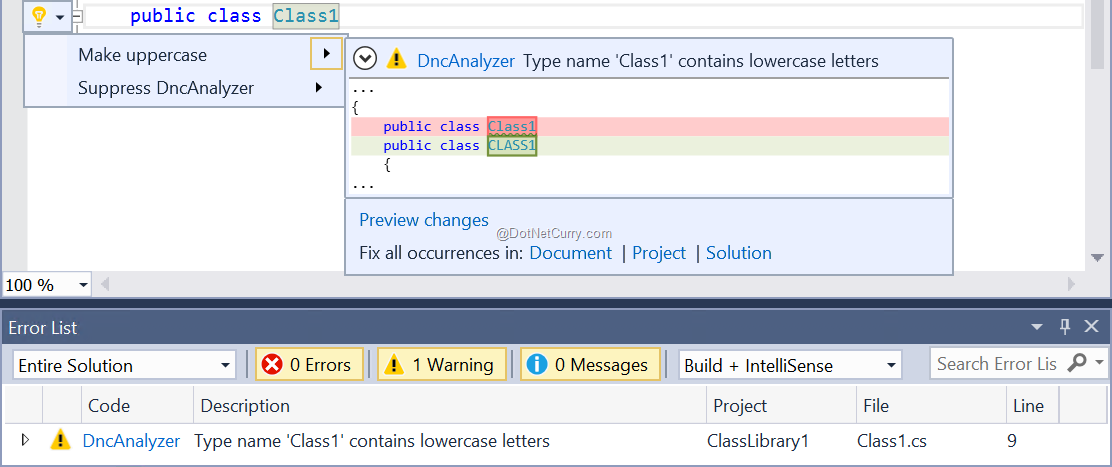
Figure 3: Default diagnostic analyzer in action
Even debugging works flawlessly in this setup. Switch back to your first Visual Studio instance and open DiagnosticAnalyzer.cs from DncAnalyzer project. Set a break point in the first line of AnalyzeSymbol method. Now switch back to the second instance and change the class name. Code execution should stop at the line with the breakpoint. This makes it easy to troubleshoot a diagnostic during development.
The only downside is a relatively long Visual Studio start-up time, which makes the typical cycle of finding a problem, fixing it and restarting the project, slower than one would wish. This is where the unit test project can prove helpful. To try it, resume the execution from the breakpoint and close the second Visual Studio instance. Run the test in the first Visual Studio instance by navigating to Test > Run > All Tests in the main menu. Test Explorer will show up with test results.
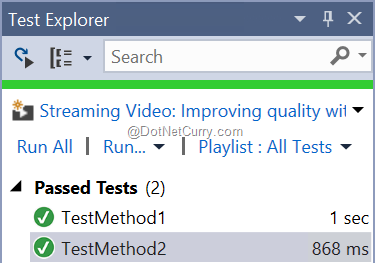
Figure 4: Unit test results in Test Explorer
If you right click TestMethod2 and select Debug Selected Tests from the context menu, the execution should again stop at the breakpoint, assuming you have not removed it yet. You can save a lot of time by testing your code with unit tests for the majority of development time and only run it in Visual Studio towards the end to make sure it behaves as expected.
Validation of Regular Expressions
Although the template has already provided us with a working diagnostic analyzer, this is a rather simple example. To make it more interesting, let us set a more ambitious and useful final goal: validating regular expression patterns appearing in source code as string literals. In order to have it working by the end of this article, we will actually have to limit the scope a little bit. Instead of covering all possible cases, we will settle with inspecting only the following one:
using System.Text.RegularExpressions;

namespace RegexSample
{
    public class Class1
    {
        public void Foo()
        {
            Regex.Match("", "[");
        }
    }
}
To be exact, we will inspect all calls to Regex.Match method, having the second argument (i.e. the regular expression pattern) as a string literal.
Instead of jumping directly into writing code, we will first take advantage of a very useful tool, bundled with .NET Compiler Platform SDK, the Roslyn Syntax Visualizer. To see it in action, create a new class library project, and add the above code into it. Now, navigate to View > Other Windows > Syntax Visualizer to open it. If you try moving the cursor to different spots in the code editor window, you will notice that the syntax visualizer tree view is keeping in sync, always focusing on the currently selected token. It works the other way around, as well: whenever you select a node in the tree view, the corresponding part of source code will be selected in the code editor.
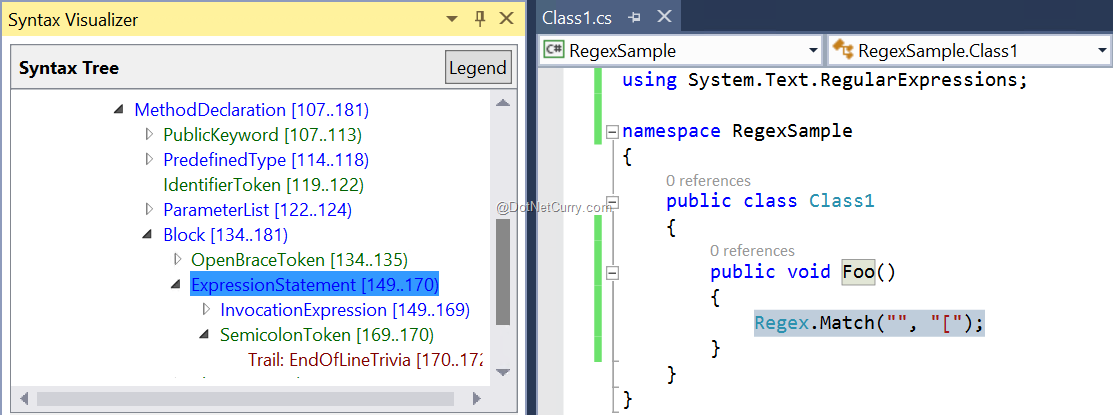
Figure 5: Regex.Match method call in syntax visualizer
Select the Regex.Match method call as seen in Figure 5 and fully expand it in the tree view to get a better sense of the code that we will be inspecting. You will notice that the nodes in the tree view are of three different colors:
- Blue color represents intermediate nodes in the syntax tree, i.e. higher level language constructs
- Green color represents tokens, e.g. keywords, names, and punctuation
- Red color represents trivia, i.e. formatting characters that do not affect semantics.
To get an even better view of the sub tree, right click on the InvocationExpression node in the tree view and click on View Directed Syntax Graph. This will render it nicely in a separate window.
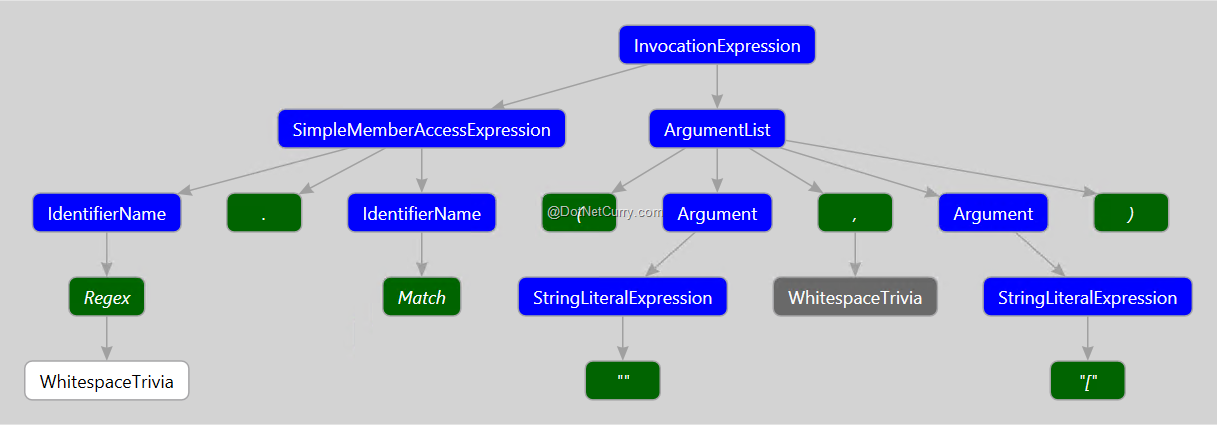
Figure 6: InvocationExpression syntax tree
Looking at this image, we can formulate the basic idea of how to implement the analyzer. The first step is to recognize the language construct of interest, i.e. the one corresponding to this syntax tree:
- We will need to inspect all InvocationExpression nodes, because they are representing the method calls.
- Out of these, the ones that interest us are only those which are invoking Regex.Match method with two arguments.
- Even that is not specific enough: we will only analyze calls with a string literal as its second argument.
The second step will be much easier. We will retrieve the value of the literal and verify that it is a valid regular expression pattern. This can easily be done using .NET’s Regex class.
Implementing the Idea
With the plan in place, we can get to work. Switch back to the Visual Studio instance with the default diagnostic analyzer project open (as created at the beginning of this article). We are going to use it as our starting point.
Before we start implementing the analysis algorithm, we should modify the identity of the analyzer to match our intentions. The relevant code can be found at the beginning of the DncAnalyzerAnalyzer class:
public const string DiagnosticId = "DncAnalyzer";

// You can change these strings in the Resources.resx file. If you do not want your analyzer to be localize-able, you can use regular strings for Title and MessageFormat.
private static readonly LocalizableString Title = new LocalizableResourceString(nameof(Resources.AnalyzerTitle), Resources.ResourceManager, typeof(Resources));
private static readonly LocalizableString MessageFormat = new LocalizableResourceString(nameof(Resources.AnalyzerMessageFormat), Resources.ResourceManager, typeof(Resources));
private static readonly LocalizableString Description = new LocalizableResourceString(nameof(Resources.AnalyzerDescription), Resources.ResourceManager, typeof(Resources));
private const string Category = "Naming";

private static DiagnosticDescriptor Rule = new DiagnosticDescriptor(DiagnosticId, Title, MessageFormat, Category, DiagnosticSeverity.Warning, isEnabledByDefault: true, description: Description);
We will do the following changes:
- Set DiagnosticId to "DNC01". This is the unique identifier of our analyzer.
- Set Category to "Usage". There is no predefined list of supported categories. It is best you check existing analyzers and choose one from there.
- Set the default severity to error by changing the fifth argument of the DiagnosticDescriptor constructor call to DiagnosticSeverity.Error. As you can see, all values describing the analyzer are passed to this constructor.
We still have not changed all the texts, describing our analyzer. Since they are localizable, we need to open the Resources.resx file and change them there:
- AnalyzerTitle is a short name for the error. We will set it to: "Regular expression is invalid"
- AnalyzerDescription is a longer description of what is being analyzed. We will set it to: "Pattern must be a valid regular expression."
- AnalyzerMessageFormat is the template for the actual error message. It will be passed to String.Format along with your additional data, when you report the error. We will set it to: "Regular expression is invalid: {0}"
Once we are through with the formalities, we can continue by specifying when Visual Studio should execute our custom analyzer code. This is how we will change the Initialize method:
public override void Initialize(AnalysisContext context)
{
    context.RegisterSyntaxNodeAction(AnalyzeSyntax, SyntaxKind.InvocationExpression);
}
The previously used RegisterSymbolAction would have allowed us to do analysis at the level of a symbol, which was fine for the default analyzer, checking the casing of a class name. We are interested in a full node in the syntax tree; hence, we will call RegisterSyntaxNodeAction and specify the type of node that interests us by passing it SyntaxKind.InvocationExpression.
The first argument is the name of the callback method that will be called. This is where we will put all of our logic. We can delete the existing AnalyzeSymbol method and create a new AnalyzeSyntax method with the following signature:
private void AnalyzeSyntax(SyntaxNodeAnalysisContext context)
{
}
Since in our call to RegisterSyntaxNodeAction, we have specified that we are only interested in InvocationExpression, we can safely assume that our method will only be called for this type of nodes:
var invocationExpression = (InvocationExpressionSyntax)context.Node;
We can expect Visual Studio to call our method a lot; therefore, it is important to make it as efficient as possible and to avoid any unnecessary processing. Very likely, only a small part of method calls will actually be calls to Regex.Match. To stop processing those as soon as possible, we will check which method is being called in two phases:
var memberExpresion = invocationExpression.Expression as MemberAccessExpressionSyntax;
if (memberExpresion?.Name?.ToString() != "Match") return;
var memberSymbol = context.SemanticModel.GetSymbolInfo(memberExpresion).Symbol;
if (memberSymbol?.ToString() != "System.Text.RegularExpressions.Regex.Match(string, string)") return;
First, we only check the name of the method. In the unlikely case that it is actually named Match, we do a lookup into the symbol table and check the full method signature. Of course, symbol table lookup is much slower than a simple string comparison. If any of the two checks fails, we quietly exit the method and stop further analysis.
Being sure that the right method is called, we continue by checking whether the second argument is really a literal:
var argumentList = invocationExpression.ArgumentList as ArgumentListSyntax;
if ((argumentList?.Arguments.Count ?? 0) != 2) return;

var regexLiteral = argumentList.Arguments[1].Expression as LiteralExpressionSyntax;
if (regexLiteral == null) return;
Having already checked the full method signature makes counting the number of arguments redundant in this case. Keep in mind though, that we really do not want the analyzers to throw any exceptions. Therefore, if there was even the slightest doubt that retrieving the second argument from the array could throw one, it is better to do a second check, especially if it is as efficient as this one.
At this point in code, we can be sure that the method call exactly matches what we are interested in. We still have to retrieve the value of the literal:
var regexOpt = context.SemanticModel.GetConstantValue(regexLiteral);
var regex = regexOpt.Value as string;
We will leave the validation of the regular expression pattern to the Regex class. This is how it will be called in the compiled code as well:
try
{
    System.Text.RegularExpressions.Regex.Match("", regex);
}
catch (ArgumentException e)
{
    var diag = Diagnostic.Create(Rule, regexLiteral.GetLocation(), e.Message);
    context.ReportDiagnostic(diag);
}
Notice, how the error is reported when the regular expression is invalid. We create a report by passing all the relevant data to its factory method: Rule with full analyzer description, location in the code corresponding to the erroneous node, and the arguments for our error message format.
Our diagnostic analyzer is complete. Before trying it out, delete the CodeFixProvider.cs file from the project to prevent the default code fix from popping up in Visual Studio. You can now run the solution. Once a new instance of Visual Studio starts, open the regular expression sample which we have been analyzing using the Roslyn Syntax Visualizer. The invalid regular expression should be marked as error.
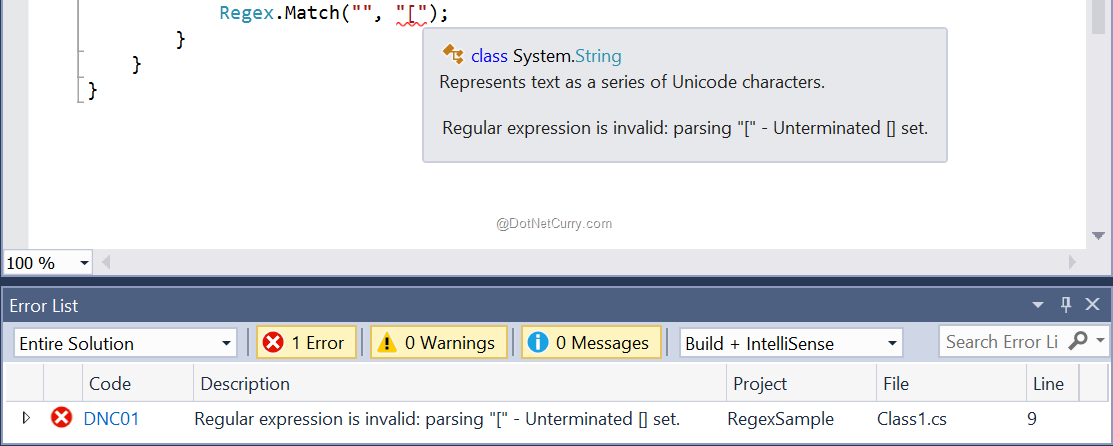
Figure 7: Invalid regular expression detected
Conclusion:
As you can see, thanks to Roslyn, static code analysis became more accessible than it was ever before. Admittedly, our example is still simple, and extending it to cover all possible cases would be a lot of work. Nevertheless, such a low barrier to entry should encourage many developers to try diagnostic analyzer development themselves. I am sure some of them will end up developing diagnostic analyzers, which we will be using every day. Dear reader, maybe you will be one of them!
Download the entire source code of this article (Github)
This article is published from the DNC Magazine for .NET Developers and Architects. Download this magazine from here [Zip PDF] or Subscribe to this magazine for FREE and download all previous and current editions
This article has been editorially reviewed by Suprotim Agarwal.
C# and .NET have been around for a very long time, but their constant growth means there’s always more to learn.
We at DotNetCurry are very excited to announce The Absolutely Awesome Book on C# and .NET. This is a 500 pages concise technical eBook available in PDF, ePub (iPad), and Mobi (Kindle).
Organized around concepts, this Book aims to provide a concise, yet solid foundation in C# and .NET, covering C# 6.0, C# 7.0 and .NET Core, with chapters on the latest .NET Core 3.0, .NET Standard and C# 8.0 (final release) too. Use these concepts to deepen your existing knowledge of C# and .NET, to have a solid grasp of the latest in C# and .NET OR to crack your next .NET Interview.
Click here to Explore the Table of Contents or Download Sample Chapters!
Was this article worth reading? Share it with fellow developers too. Thanks!
Damir Arh has many years of experience with software development and maintenance; from complex enterprise software projects to modern consumer-oriented mobile applications. Although he has worked with a wide spectrum of different languages, his favorite language remains C#. In his drive towards better development processes, he is a proponent of Test-driven development, Continuous Integration, and Continuous Deployment. He shares his knowledge by speaking at local user groups and conferences, blogging, and writing articles. He is an awarded Microsoft MVP for .NET since 2012.