As part of DevOps, the operations team integrates with the development team to provide value to customer as early as possible. It does the following tasks:
- Creates virtual machines as targets for deployment
- Provisions those with prerequisites
- Deploys built application software on them
- Monitors availability and performance of the application
- Provides feedback to the development team
For providing value early on after the software is built, the operations team likes to automate as many tasks as possible from the above list.
In one of the earlier articles I had detailed out the process to create a virtual machine using SCVMM Extension that adds a task in the release definition. In that article, I had focused upon Microsoft TFS and creation of virtual machine on premises.
In this article, I am shifting focus to using VSTS Release Management to create a VM in Azure using ARM Template. Creating these virtual machines in Azure will be a convenient way for the operations team to deploy the software on a pristine virtual machine (that has no residual effect of earlier installations). They will be able to automate the entire process of deployment through VSTS Release Management.
ARM Template Details
Let us first understand what an ARM Template is. ARM stands for Azure Resource Manager. ARM is a facility provided in Azure for managing resources that we create in Azure. I quote from the ARM Overview page (https://docs.microsoft.com/en-us/azure/azure-resource-manager/resource-group-overview) “Azure Resource Manager enables you to work with the resources in your solution as a group. You can deploy, update, or delete all the resources for your solution in a single, coordinated operation”.
ARM allows us to create groups of our resources. These resources can be virtual machines, storage account, virtual network, DNS name and many more. One of the interesting features of ARM is that we can create templates describing the resources that we want to manage, and deploy these templates through various vehicles. It can be deployed using PowerShell or using a program that uses Azure APIs or through the VSTS Release Management.
How to use this option of deploying a VM using ARM template through VSTS Release Management is what we are going to check today.
Deploying a Azure VM using ARM template through VSTS
ARM template is a set of JSON files that describe the resources to be managed. We can create the ARM Template in Visual Studio on a computer where Azure SDK 2.6 onwards is installed. It has a project template for Azure Resource Group under the Cloud node. We will use that project template to create a project that will provide us basic template files. The following steps illustrate how to create an Azure Resource Group project.
1. Select File > New > Project menu item in Visual Studio.
2. From Visual C# group of project templates, select the node Cloud. If you do not see this node, it means that the Azure SDK as mentioned above, is not installed on your machine.
3. Select Azure Resource Group template
4. Change the name as you desire.
You may add this solution to the Source Control if you are connected to VSTS or you may do it later.
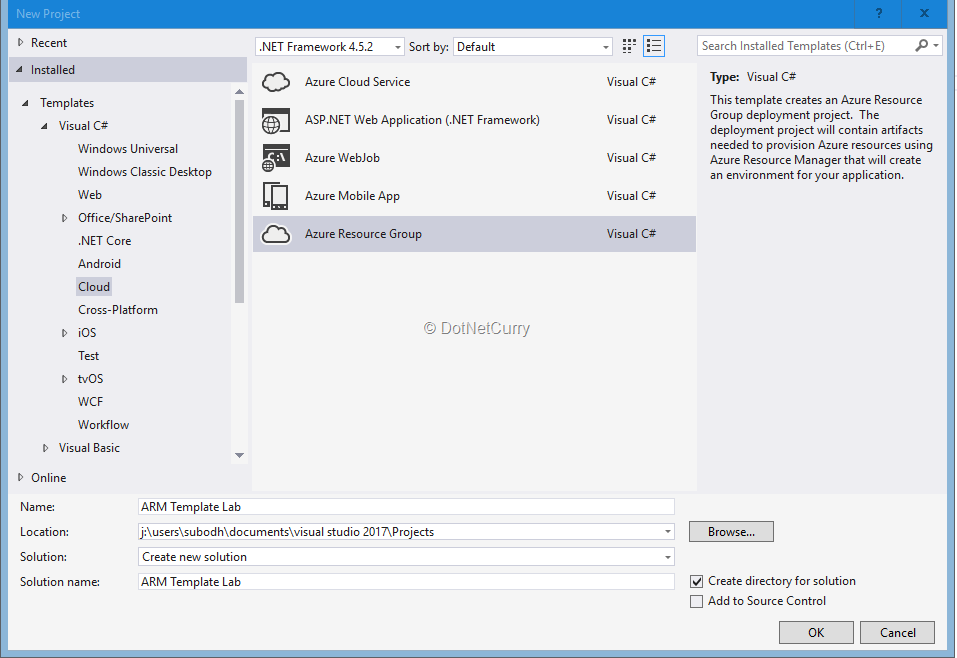
Figure 1: Create a project or Azure Resource Group project template
On the next screen, Visual Studio shows various existing ARM Templates that we can open and customize as per our needs. These templates are available either in Visual Studio itself or are downloaded by Visual Studio from GitHub. There are many such open source templates on GitHub contributed by many authors. From the Visual Studio templates, select the template for Windows Virtual Machine and click the OK button.
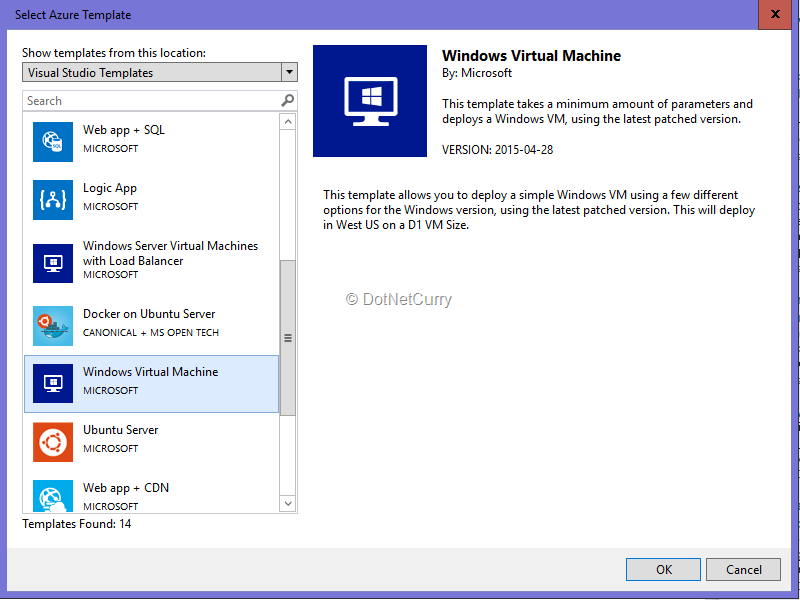
Figure 2: Select an ARM Template
1. It will create a project for customizing that ARM Template. This project contains three content files:
a. WindowsVirtualMachine.json
b. WindowsVirtualMachine.parameters.json
c. Deploy-AzureResourceGroup.ps1
We will edit the first two files.
2. Let us first open the WindowsVirtualMachine.json. This JSON file is the main file of the template and contains the definitions of the resources to be managed.
The main file (WindowsVirtualMachine.json) of the ARM template is made up of three sections:
1. Parameters – These define some variables for which the value can be given at the execution time. Definition of each parameter contains the name, type and may also optionally contain the allowed values and default values.
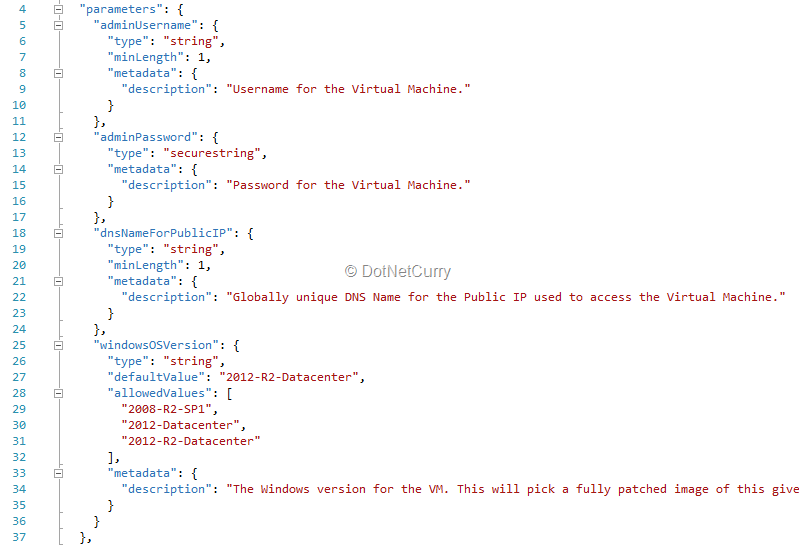
Figure 3: Parameters section of ARM Template
2. Variables – These are the variables that are assigned values at the design time only. These variables along with the parameters are used in the resources section.
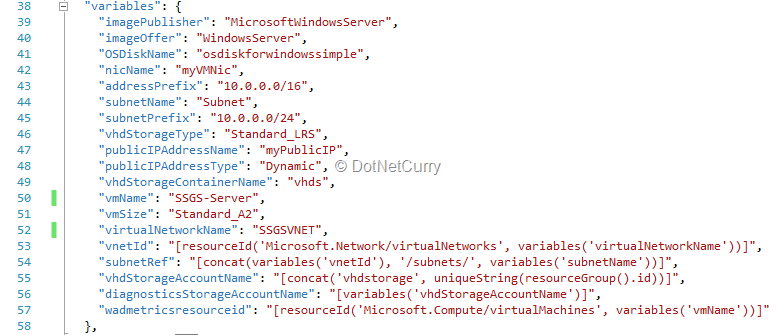
Figure 4: Variables section of ARM Template
3. Resources – This is the section which describes each of the resource to be managed and properties of each resource.
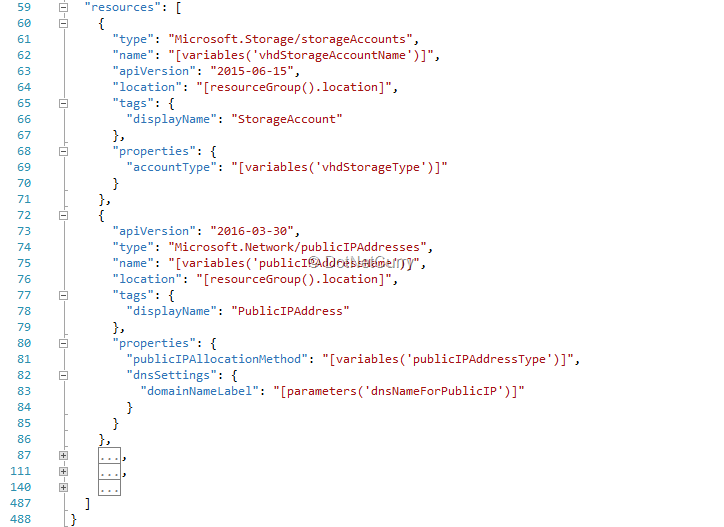
Figure 5: Resources section of ARM Template
For more details, you can refer to the page https://docs.microsoft.com/en-us/azure/azure-resource-manager/resource-group-authoring-templates
4. I changed some values of the variables to
- a. vm-Name = “SSGS-Server”
- b. virtualNetworkName = “SSGSVNET”
5. You may experiment with the size of the VM, range of IP addresses etc.

Figure 6: General structure of ARM Template
The WindowsVistualMachine.parameters.json contains the initial values of the parameters defined in the template. We will override these values later when we create the release definition which uses this ARM Template.
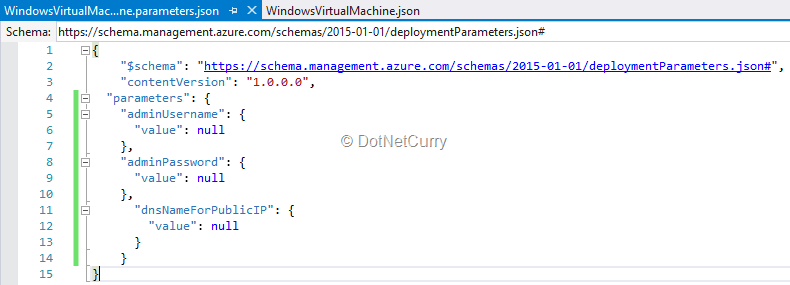
Figure 7: ARM Template parameters values
Adding the ARM Template to the Source Control
After customizing the ARM Template, we need to put it under source control. Since we are going to use it in a release definition, unless it is under the source control, VSTS will not be able to find it.
To put the solution under source control, first connect to a team project under VSTS from team explorer in Visual Studio. That team project may use TFVC or git as source control. Check-in or commit and push as appropriate to the source control.
In the example shown, I have used a team project named RM Demo which uses TFVC but this process works equally well with git.
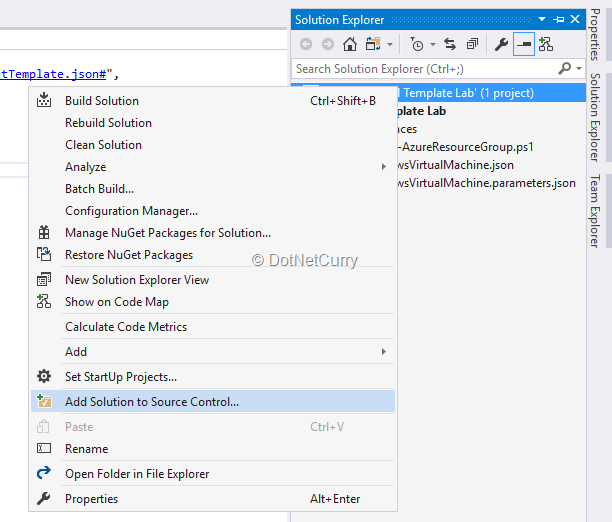
Figure 8: Add the ARM template to source control
Build Definition
Now we are going to create a build definition which will copy the ARM template to an artifact that will be accessible to the release definition. Open the default page of team project which we had used earlier (RM Demo). Select Build and Release menu and then select Build from the dropdown.
Create a new build definition. Select an Empty template to do so. Add a new task of Copy Publish Artifacts from the Utilities section. When you select that task, you will be able to see its properties. Set the following values to the properties:
Copy Root: Click the selector button and select the folder that contains the ARM Template files under the source control. In my case it was $/RM Demo/ARM Template Lab/ARM Template Lab.
Content: These are the contents that should be copied into the artifact. Provide the value **\*.json
Artifact Name: This can be any convenient name which will be available in Release Management too. I have given a name Files.
Artifact Type: Server. Since we are going to use Hosted agent, we do not have the liberty to use File Share.

Figure 9: Properties of Copy Publish Artifacts task in build definition
Save the build definition and queue it. After the build is over, we will be able to see the artifacts that are created by the build.
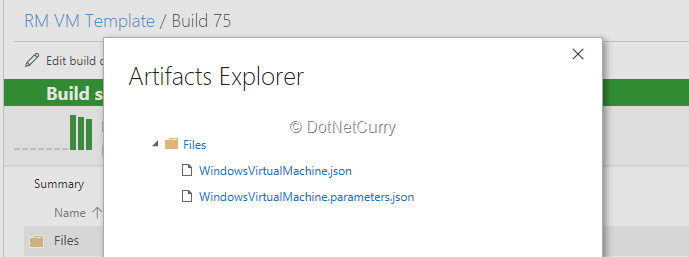
Figure 10: ARM Template under build artifact
Release Definition - Create VM in Azure
Once the artifacts are created and are available, we can move on to Release Management to deploy the ARM Template. Follow these steps to create VM in Azure automatically.
1. From Build and Release menu, select Release.
2. Click on the green + symbol to start creation of a new release definition.
3. Select empty for the template to be used.
4. Select the build definition that we have created in the earlier steps as the source for the artifact.
5. In the environment created, add a task of the type Azure Resource Group Deployment from the Deploy group.
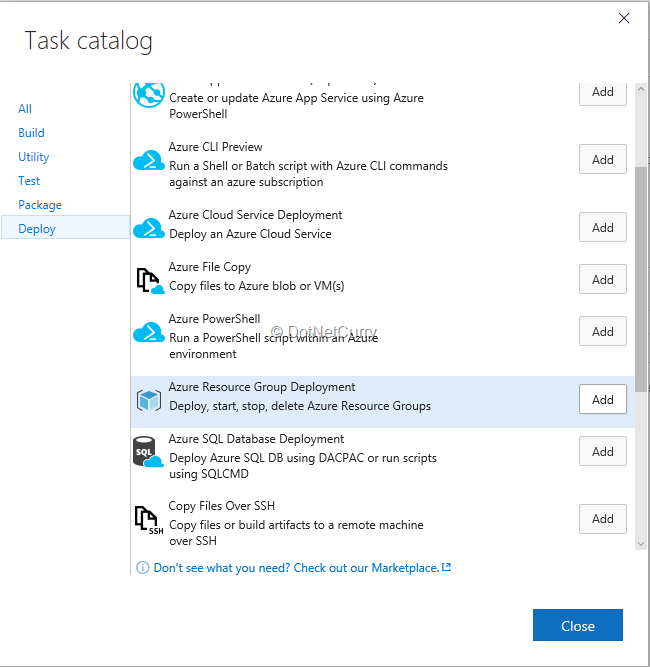
Figure 11: Select Azure Resource Group Deployment task in release definition
6. Now we need to create a Service Endpoint to access the Azure service. To create it from the Settings (Gear icon on the page), click Services.
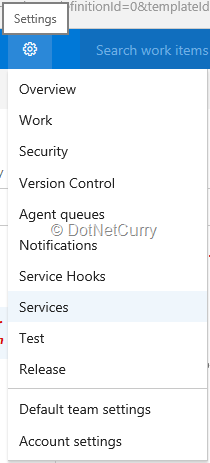
Figure 12: Create new Service Endpoint
7. On the Service page, click the Add New Service Endpoint button and select Azure Resource Manager. Provide a name to that Service Endpoint and select the appropriate Azure Subscription (if you have multiple subscriptions). Click OK button to create the Service Endpoint.
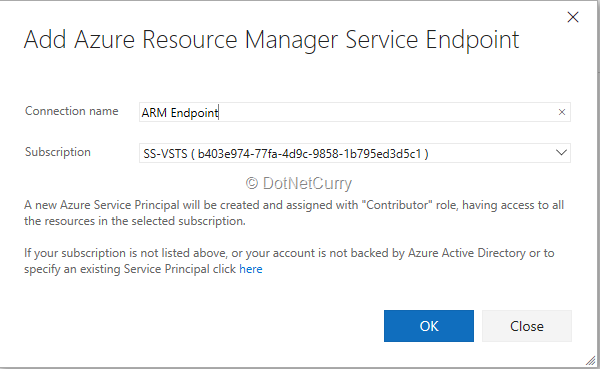
Figure 13: Set connection name for ARM Service Endpoint
8. Now we can use this Service Endpoint in the Azure Resource Group Deployment task. For that task, set the properties as below:
- a. Azure Connection Type: Azure Resource Manager
- b. Azure Subscription: Name of the Service Endpoint that we created in earlier step.
- c. Action: Create or update Resource Group. You will see that there are many other options available in the drop down that allow us to control various resources like starting and stopping a VM etc.
- d. Resource Group: Name of the resource Group that we want to manage, It can be an existing resource group or a new one to be created.
- e. Location: Safe to go with East US. I tried with Central India since that is nearest to me but it did not allow me to use that location probably because ARM Template deployment is not supported over there yet.
- f. Template: Path of the template file (WindowsVirtualMachine.json) under the artefact named Files. You can select it from the UI.
- g. Template Parameters: Path of the parameters file (WindowsVirtualMachine.parameters.json) under the artefact named Files. You can select it from the UI.
- h. Override Template Parameters: This follows a specific syntax and it should override the default values (null) that are in the parameters file. I created a few release level variables and used them over here.
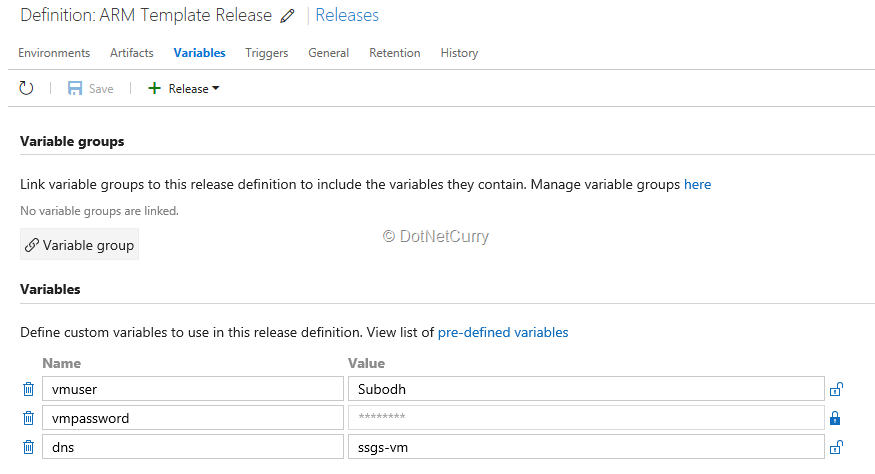
Figure 14: Variables in release definition that provide parameter values in ARM Template
Value of this property is given as: -adminUsername $(vmuser) -adminPassword (ConvertTo-SecureString -String $(vmpassword) -AsPlainText -Force) -dnsNameForPublicIP $(dns)
All the properties look like the following:
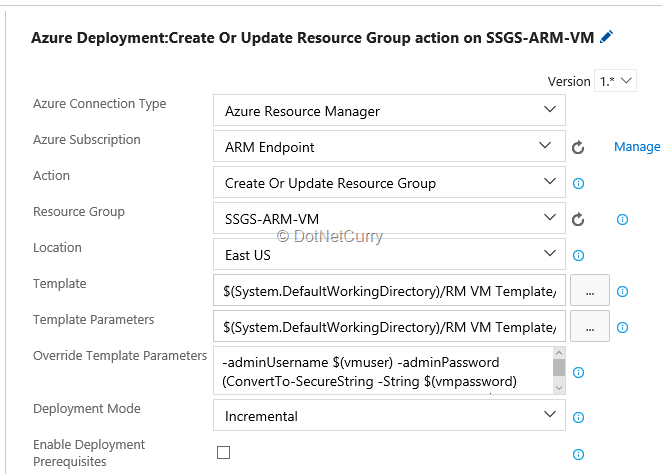
Figure 15: Azure deployment task properties in release definition
We are now ready to deploy the ARM Template that will create a Virtual Machine in a resource group on Azure. Click on the Release button. Select the latest build of the selected build definition. A new release will be created. Select that to open the details of that release. Click on the Deploy button.
You may need to wait a bit (about 15 min or so) as the deployment process is busy creating resource group, various resources including a new VM from that ARM Template. Once the process is over, we will be able to see those resources in the Azure Portal.
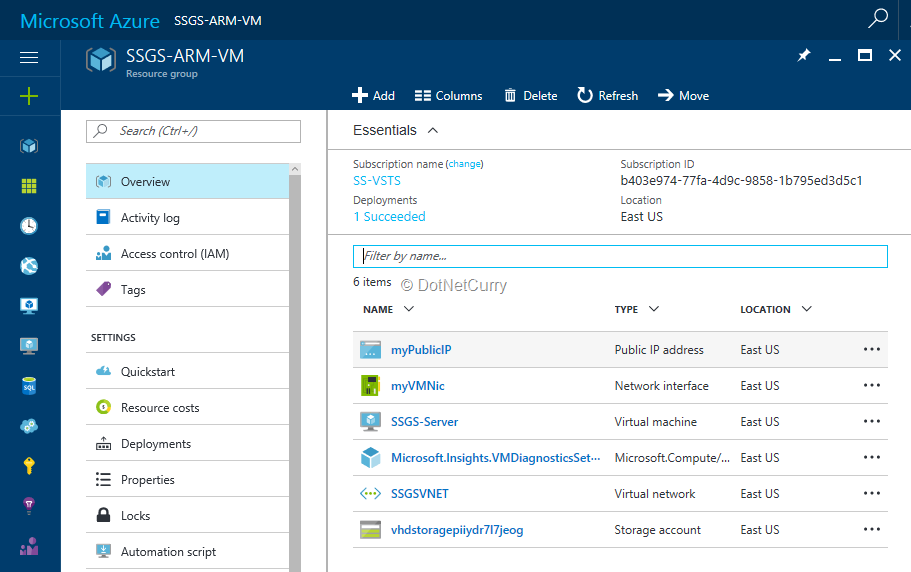
Figure 16: Resource created by the release using specified ARM Template
Conclusion
In this article, I have stepped you through the process of creation of a VM in Azure using ARM Template.
Creating and using ARM Templates is a convenient way for operations team to create and provision the virtual machines whenever needed. It will be particularly useful for creating the environments for testing where the application needs to be installed time and again on machines that have no residual effects of earlier installations. There are many ARM Templates provided by Microsoft in Visual Studio and more open source ARM Templates are available from GitHub.
This article has been editorially reviewed by Suprotim Agarwal.
C# and .NET have been around for a very long time, but their constant growth means there’s always more to learn.
We at DotNetCurry are very excited to announce The Absolutely Awesome Book on C# and .NET. This is a 500 pages concise technical eBook available in PDF, ePub (iPad), and Mobi (Kindle).
Organized around concepts, this Book aims to provide a concise, yet solid foundation in C# and .NET, covering C# 6.0, C# 7.0 and .NET Core, with chapters on the latest .NET Core 3.0, .NET Standard and C# 8.0 (final release) too. Use these concepts to deepen your existing knowledge of C# and .NET, to have a solid grasp of the latest in C# and .NET OR to crack your next .NET Interview.
Click here to Explore the Table of Contents or Download Sample Chapters!
Was this article worth reading? Share it with fellow developers too. Thanks!

Subodh is a Trainer and consultant on Azure DevOps and Scrum. He has an experience of over 33 years in team management, training, consulting, sales, production, software development and deployment. He is an engineer from Pune University and has done his post-graduation from IIT, Madras. He is a Microsoft Most Valuable Professional (MVP) - Developer Technologies (Azure DevOps), Microsoft Certified Trainer (MCT), Microsoft Certified Azure DevOps Engineer Expert, Professional Scrum Developer and Professional Scrum Master (II). He has conducted more than 300 corporate trainings on Microsoft technologies in India, USA, Malaysia, Australia, New Zealand, Singapore, UAE, Philippines and Sri Lanka. He has also completed over 50 consulting assignments - some of which included entire Azure DevOps implementation for the organizations.
He has authored more than 85 tutorials on Azure DevOps, Scrum, TFS and VS ALM which are published on
www.dotnetcurry.com.Subodh is a regular speaker at Microsoft events including Partner Leadership Conclave.You can connect with him on
LinkedIn .